Deep Learning Env by CUDA and PyTorch
以3090Server为例
2024.06.26
3090Server目前系统已更新至Ubuntu 20.04.6 LTS,但对下面的记录影响不大
Ubuntu 18.04.6 LTS
gcc version 7.5.0
CUDA 11.3
cuDNN 8.9.5
Server Basic Info 1 2 3 Welcome to Ubuntu 18.04.6 LTS (GNU/Linux 5.4.0-150-generic x86_64) Model name: Intel(R) Xeon(R) CPU E5-2699C v4 @ 2.20GHz NVIDIA Corporation GA102 [GeForce RTX 3090] (rev a1)
Personal Dir 1 2 3 4 5 6 7 8 9 10 houjinliang@3090server:~$ ll
Miniconda 下载Miniconda的sh脚本文件,增加文件可执行的权限,然后执行下载脚本。
1 2 3 houjinliang@3090server:~/MyDownloadFiles$ wget -c https://repo.anaconda.com/miniconda/Miniconda3-latest-Linux-x86_64.shchmod +x Miniconda3-latest-Linux-x86_64.sh
安装过程中会有选择安装路径的选择,直接选择默认路径.
1 2 3 4 5 6 7 8 9
1 2 3 4
1 2 3 4 5 6 7 8 9 10 11 12 13 14 # >>> conda initialize >>> # !! Contents within this block are managed by 'conda init' !! __conda_setup="$('/mnt/houjinliang/miniconda3/bin/conda' 'shell.bash' 'hook' 2> /dev/null)" if [ $? -eq 0 ]; then eval "$_ _conda_ setup"else if [ -f "/mnt/houjinliang/miniconda3/etc/profile.d/conda.sh" ]; then . "/mnt/houjinliang/miniconda3/etc/profile.d/conda.sh" else export PATH="/mnt/houjinliang/miniconda3/bin:$PATH" fi fi unset __ conda_setup # <<< conda initialize <<<
1 2 3 source ~/.bashrc
检查一下Minconda的基本信息.
1 2 3 4 5 6 7 8 9 10 11 12 13 14 15 16 17 18 19 20 21 22 23 24 25 26 27 28 29 30 31 32 33 34 env location : /mnt/houjinliang/miniconda3dir : /mnt/houjinliang/miniconda3/etc/conda
可以选择将conda或者pip换源
1 2 3 (base) houjinliang@3090server:~$ conda config --show-sources
pip换源,我选择换成阿里云源。可以直接用命令的方式,如下.
1 2 (base) houjinliang@3090server:~$ pip config set global.index-url https://mirrors.aliyun.com/pypi/simple/
或者是修改 ~/.config/pip/pip.conf (没有就创建一个), 内容如下:
1 2 3 (base) houjinliang@3090server:~$ cat ~/.config/pip/pip.conf
NV Driver
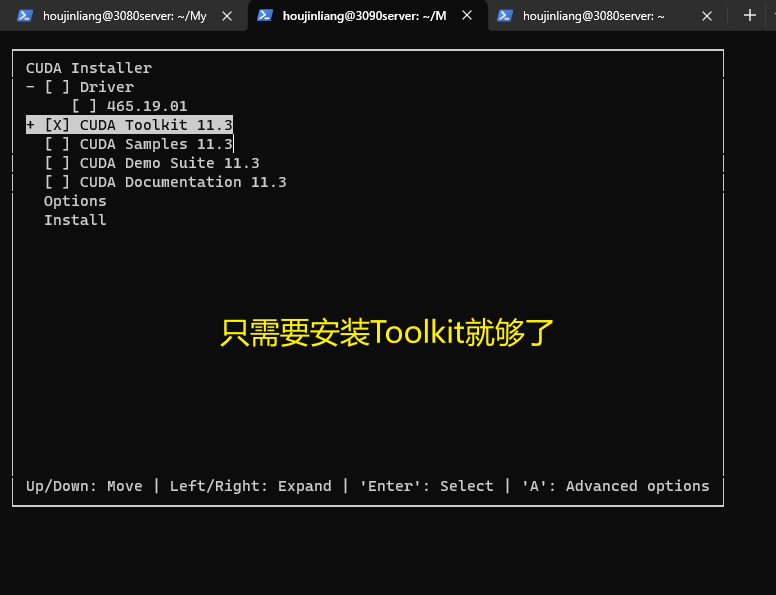
这里的驱动是服务器自带的,所以在给自己目录下安装CUDA的时候,可以不选择安装driver,影响不大。
1 2 3 (base) houjinliang@3090server:~$ cat /proc/driver/nvidia/version
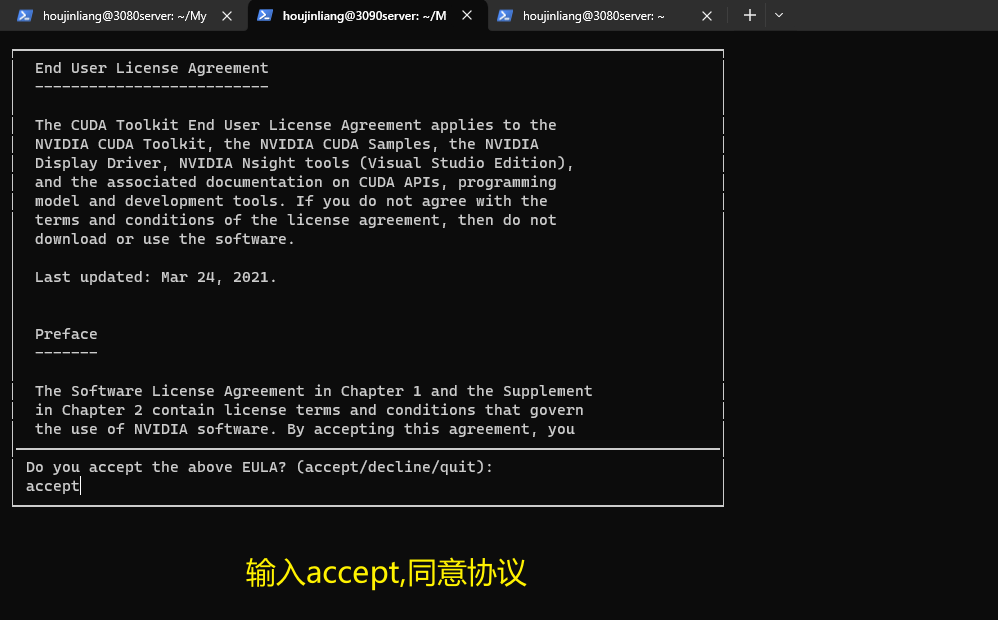
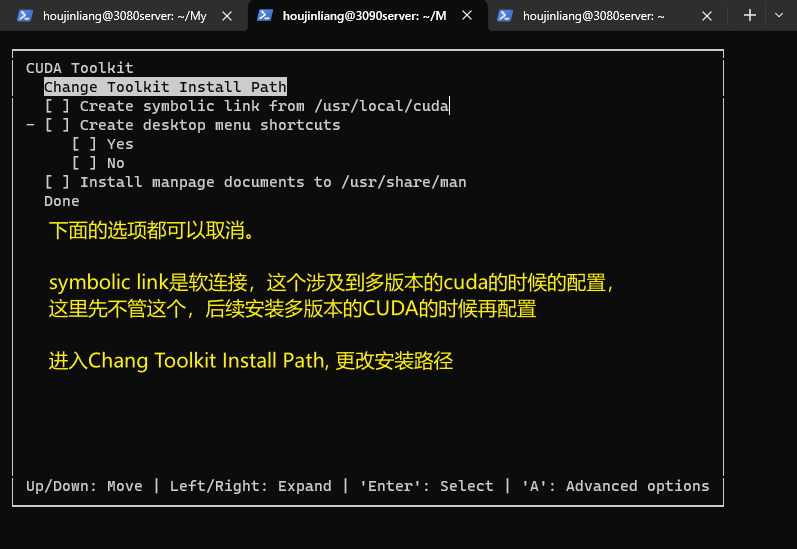
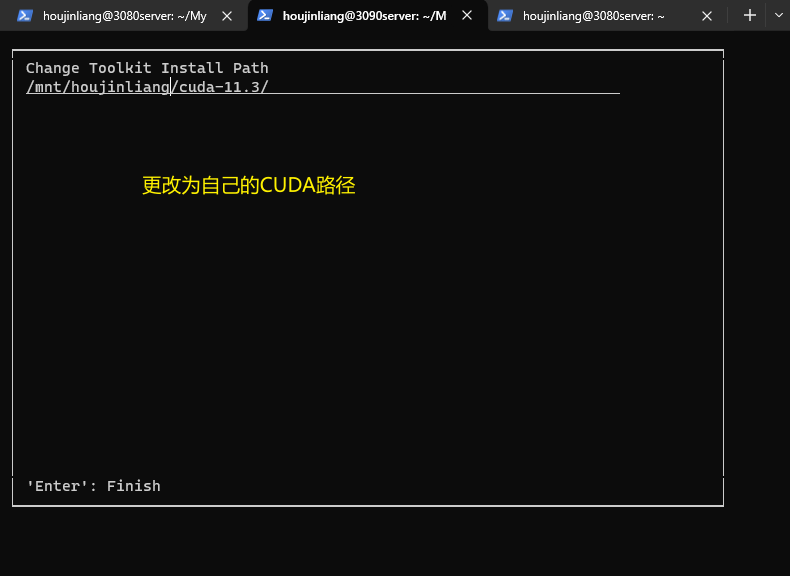
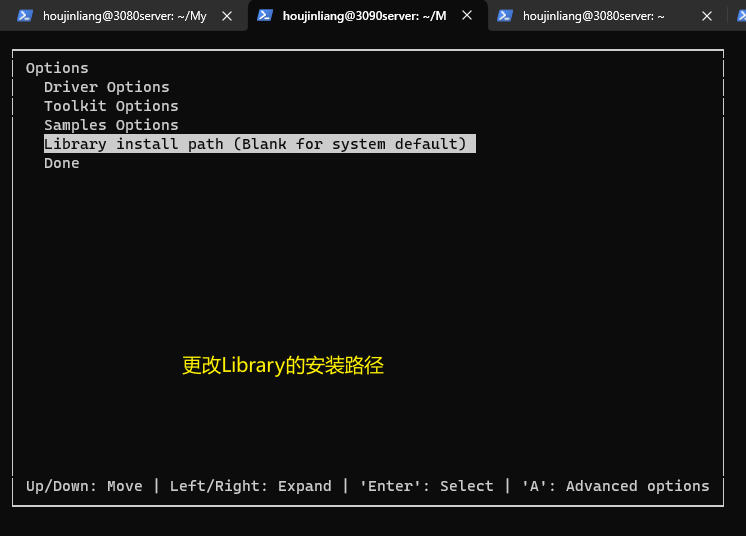
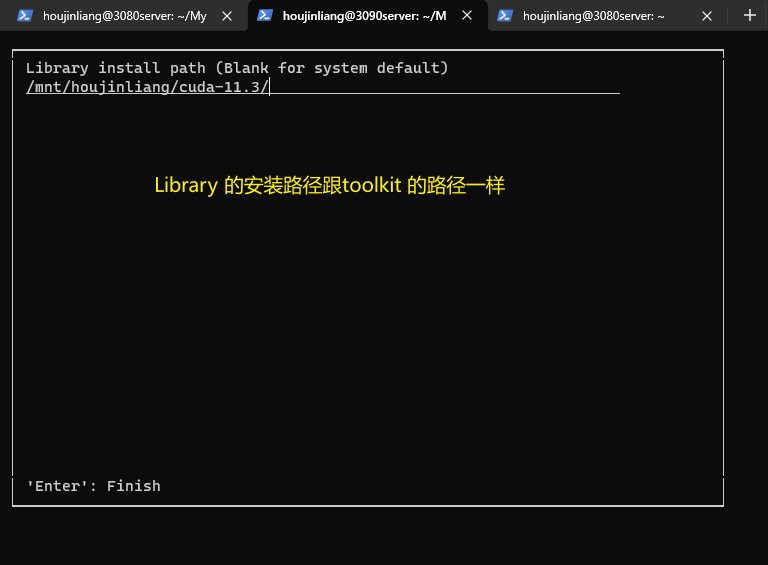
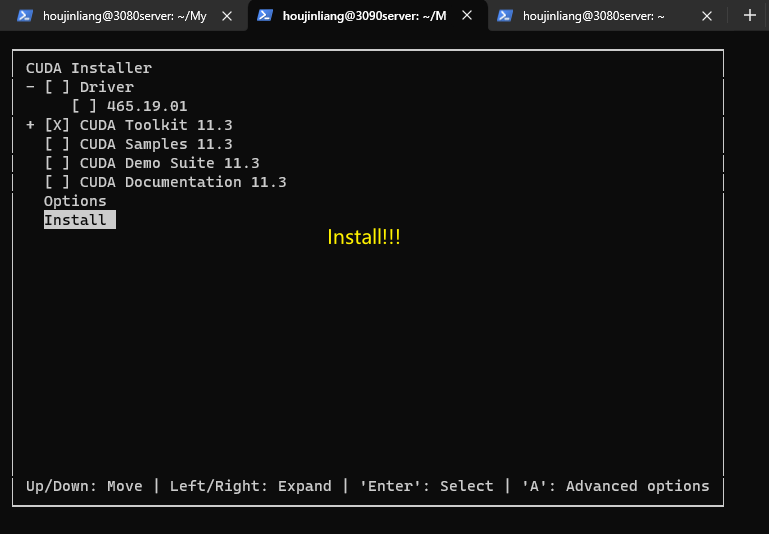
CUDA 11.3.1 & CUDNN 8.9.5 1 2 3 4 5 6 7 8 9 10 11 12 13 14 15 16 17 18 19 20 21 chmod +x cuda_11.3.1_465.19.01_linux.run
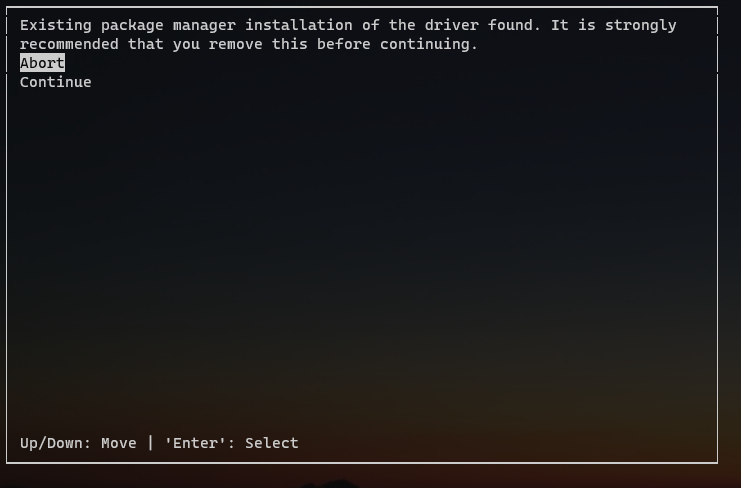
出现这样的不要害怕,直接Continue就好了,然后按照下面的步骤。
安装完成
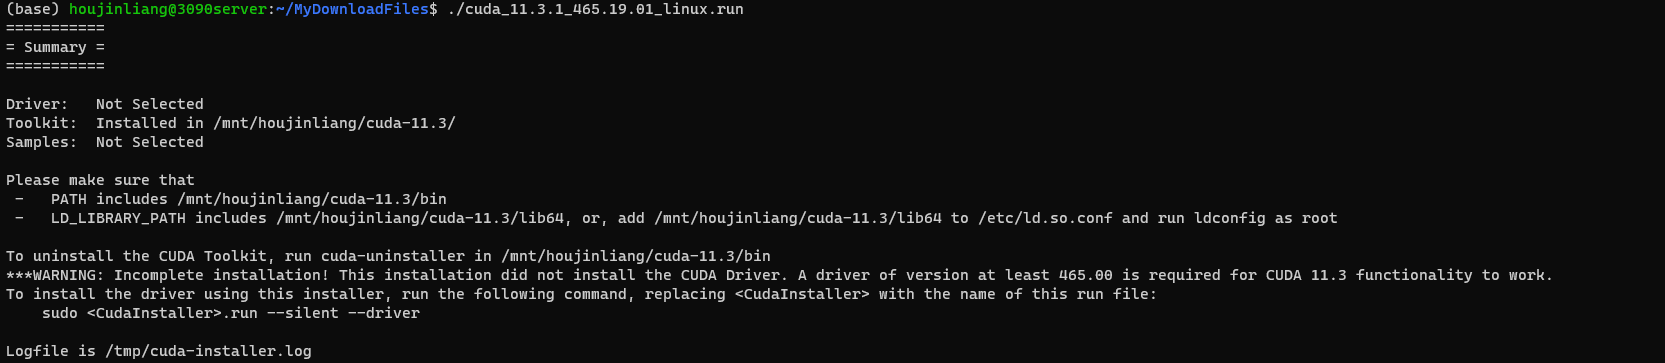
1 2 3 4 5 6 7 8 9 10 11 12 13 14 15 16 17 18 19 (base) houjinliang@3090server:~/MyDownloadFiles$ ./cuda_11.3.1_465.19.01_linux.runin /mnt/houjinliang/cuda-11.3/in /mnt/houjinliang/cuda-11.3/binfor CUDA 11.3 functionality to work.command , replacing <CudaInstaller> with the name of this run file:sudo <CudaInstaller>.run --silent --driver
安装完成之后,最好把这个/tmp/cuda-installer.log文件删除了,如果不删的话,后面的用户再安装就会有影响。为了不妨碍他人,最好把这个删掉。
1 rm /tmp/cuda-installer.log
配置CUDA Toolkit 的环境变量,使用vim或vscode
1 2
1 2 3 4 5 6 7 # >>> cuda environment variables >>> # murphy insert _HOME=/mnt/houjinliang/cuda-11.3 export CUDA_ PATH=$CUDA_HOME export PATH=$CUDA_ HOME/bin:$PATH_LIBRARY_ PATH=$CUDA_HOME/lib64:$LD_ LIBRARY_PATH # <<< cuda environment variables <<<
1 2 3 4 5 6 7 8 9 10 11 12 13 14 source ~/.bashrcwhich nvcc
cudann安装。cudnn的下载需要到nVidia的网站,登录账号才行,这里我就直接用之前安装的时候已经下载好的了。
1 2 3 4 5 6 7 8 9 10 11 12 13 14 15 16 17 18 19 20 21 22 23 24 25 26 27 28 29 30 31 32 33 34 35 36 (base) houjinliang@3090server:~/MyDownloadFiles$ llcd cudnn-linux-x86_64-8.9.5.29_cuda11-archive/cp lib/* ~/cuda-11.3/lib64/cp include/* ~/cuda-11.3/includechmod +x ~/cuda-11.3/include/cudnn.hchmod +x ~/cuda-11.3/lib64/libcudnn*cat ~/cuda-11.3/include/cudnn_version.h | grep CUDNN_MAJOR -A 2
Git & Github
在Linux的Ubuntu发行版上一般都会默认安装了Git,所以不需要自己手动安装,拿来即用即可。
1 2 3 git config --global user.name "SSH keys Name" "SSH keys Email" "Email of Github Account"
1 2 3 4 5 6 7 8 9 10 11 12 13 14 15 16 17 18 19 'hjl_3080server' 'cosmicdustycn@outlook.com' "cosmicdustycn@outlook.com" in which to save the key (/mnt/houjinliang/.ssh/id_rsa): '/mnt/houjinliang/.ssh' .for no passphrase): in /mnt/houjinliang/.ssh/id_rsa.in /mnt/houjinliang/.ssh/id_rsa.pub.
不需要担心Git的用户配置会对本服务器上的其他用户会产生影响。ssh-keygen生产的的用户密钥会保存在个人账号的目录下。
1 2 3 4 5 6 7 8 9 (dlpy310pth113) houjinliang@3080server:~/.ssh$ pwd
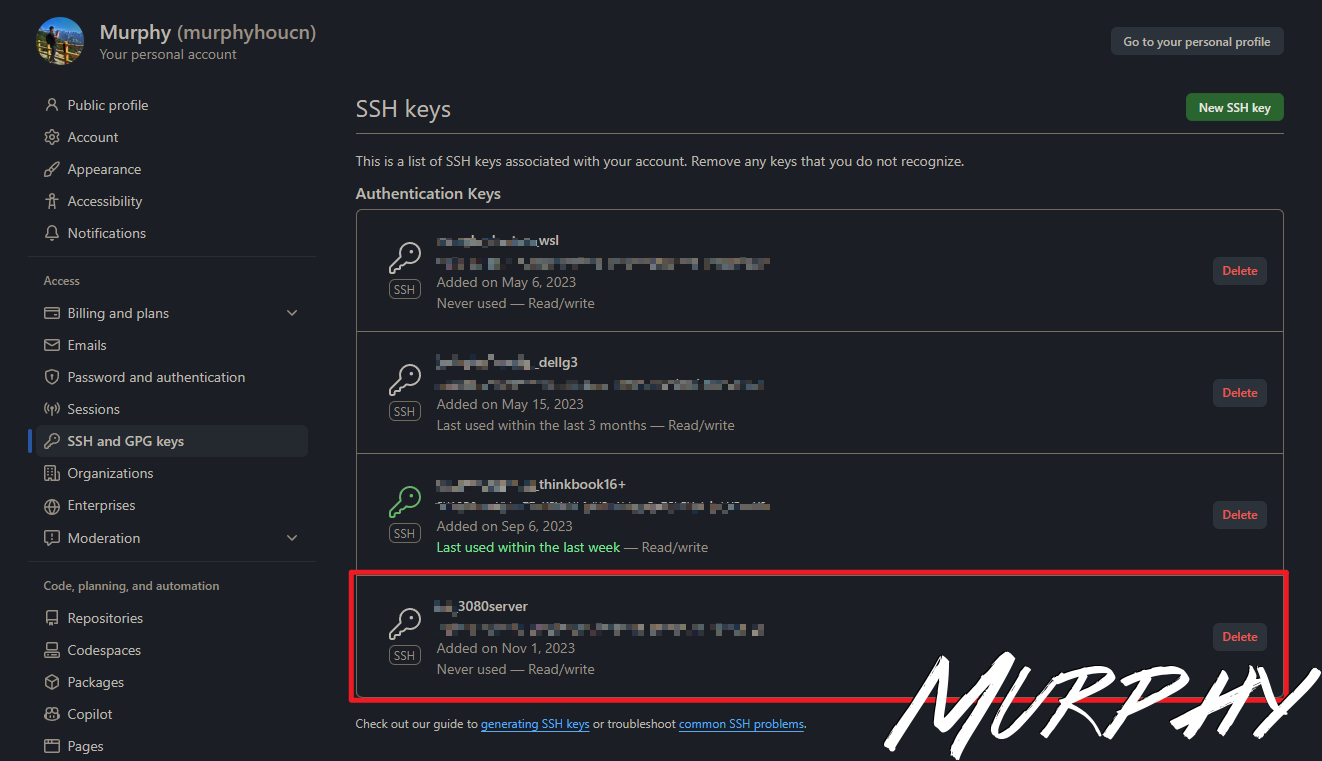
复制id_rsa.pub文件下的内容,到Github的Setting中设置SSH Keys。如下。
1 2 ssh -T git@github.com've successfully authenticated, but GitHub does not provide shell access.
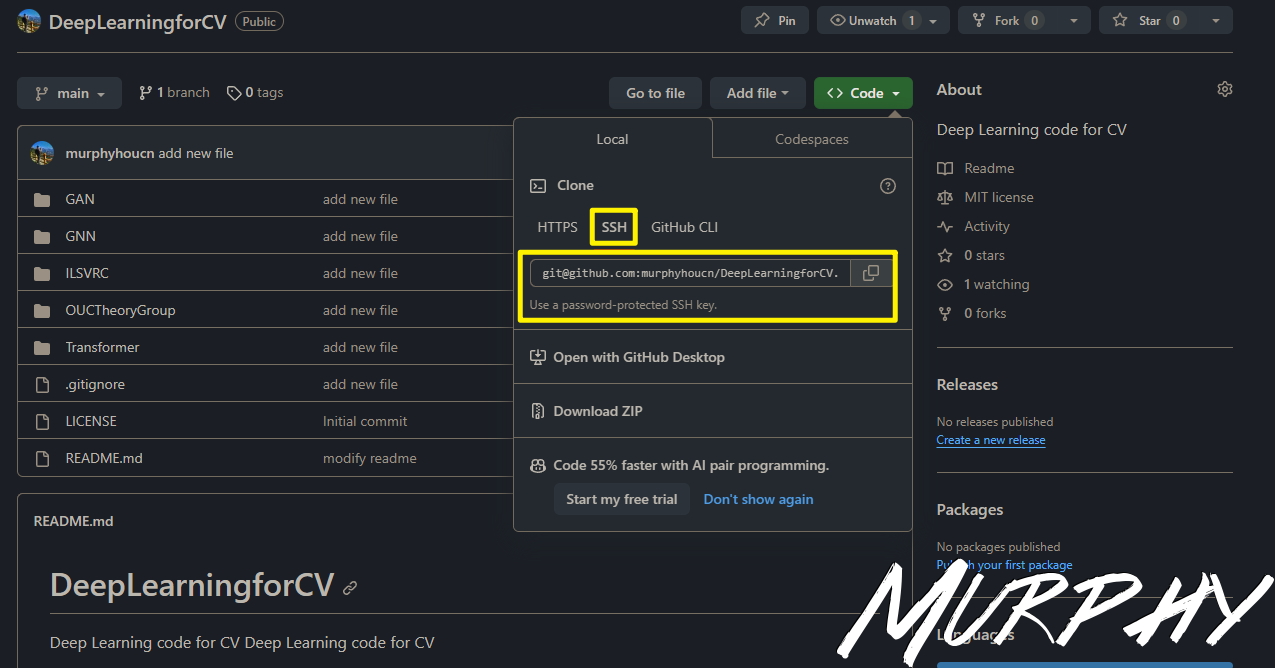
1 2 3 4 5 (base) houjinliang@3080server:~/userdoc$ git clone git@github.com:murphyhoucn/XXX.git"add new file"
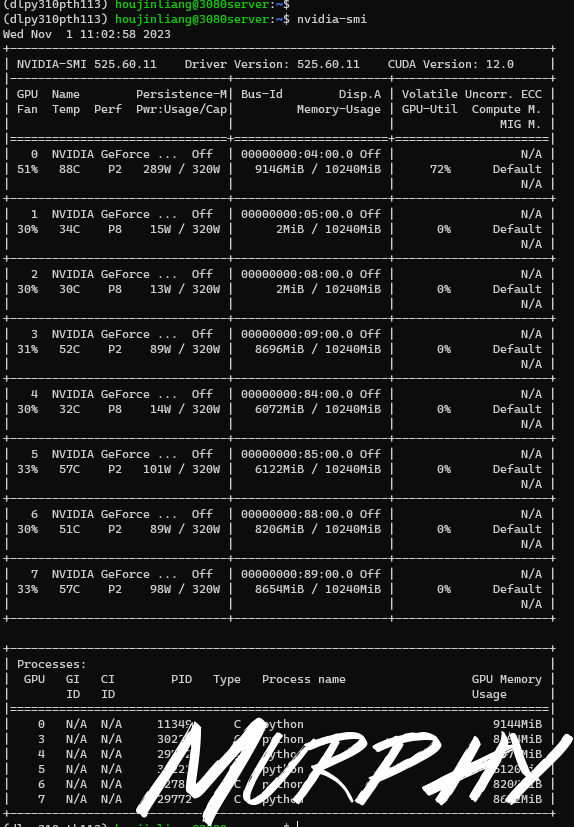
nvidia-smi
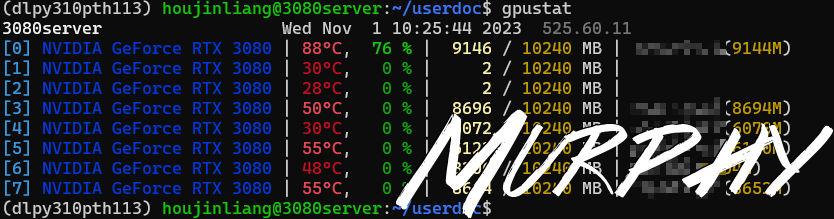
gpustat
1 2 (dlpy310pth113) houjinliang@3080server:~/userdoc$ pip install gpustat
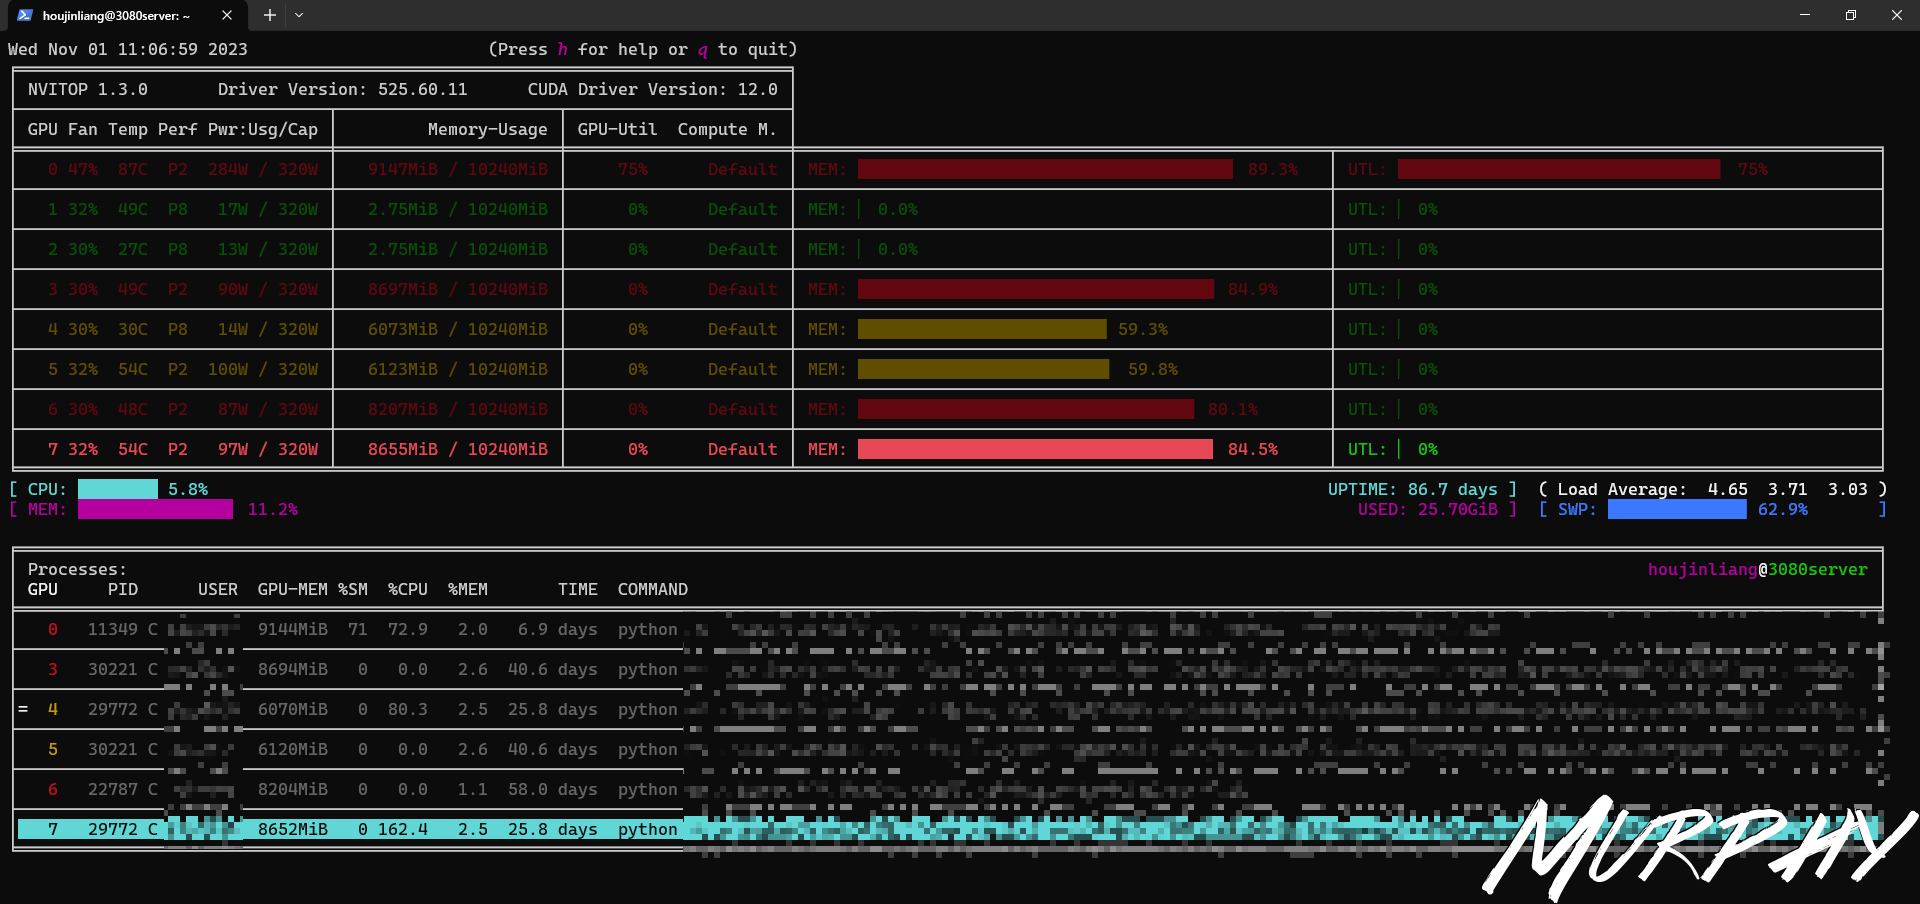
nvitop
1 2 3 4 5 6 (dlpy310pth113) houjinliang@3080server:~$ pip install nvitopin ./miniconda3/envs/dlpy310pth113/lib/python3.10/site-packages (1.3.0)in ./miniconda3/envs/dlpy310pth113/lib/python3.10/site-packages (from nvitop) (12.535.108)in ./miniconda3/envs/dlpy310pth113/lib/python3.10/site-packages (from nvitop) (5.9.5)in ./miniconda3/envs/dlpy310pth113/lib/python3.10/site-packages (from nvitop) (5.3.1)in ./miniconda3/envs/dlpy310pth113/lib/python3.10/site-packages (from nvitop) (2.3.0)
Server Comp
2080ti OS Basic Info 1 2 3 4 5 6 7 8 9 10 11 12 13 14 15 16 17 18 19 (base) houjinliang@ubuntu-server:~$ uname -auname -suname -nuname -runame -vuname -p
Dev Info 1 2 3 4 5 6 7 8 9 10 11 12 13 14 15 16 17 18 19 20 21 22 (base) houjinliang@ubuntu-server:~$ pwd which nvcccat /proc/driver/nvidia/versionsource for copying conditions. There is NOfor MERCHANTABILITY or FITNESS FOR A PARTICULAR PURPOSE.
3080Server OS Info 1 2 3 4 5 6 (base) houjinliang@3080server:~$ lsb_release -a
Dev Info 1 2 3 4 5 6 7 8 9 10 11 12 (base) houjinliang@3080server:~$ which nvccpwd which nvcc
3090Server
Ubuntu 20.04.06 LTS
cuda_11.3
cudnn_8.9.5
OS Info 1 2 3 4 5 6 (base) houjinliang@3090server:~$ lsb_release -a
Dev Info 1 2 3 4 5 6 7 8 9 10 11 12 13 14 15 16 17 18 (base) houjinliang@3090server:~$ which nvcccat ~/cuda-11.3/include/cudnn_version.h | grep CUDNN_MAJOR -A 2
3090Server2
Ubuntu 20.04.5 LTS
CUDA 11.3
cuDNN 8.9.5
OS Info 1 2 3 4 5 6 (base) houjinliang@3090server2:~$ lsb_release -a
Dev Info 1 2 3 4 5 6 7 8 9 10 11 12 13 14 15 16 17 18 19 20 21 22 (base) houjinliang@3090server2:~$ cat /proc/driver/nvidia/versionwhich nvcccat ~/cuda-11.3/include/cudnn_version.h | grep CUDNN_MAJOR -A 2
4090Server
Ubuntu 22.04.2 LTS
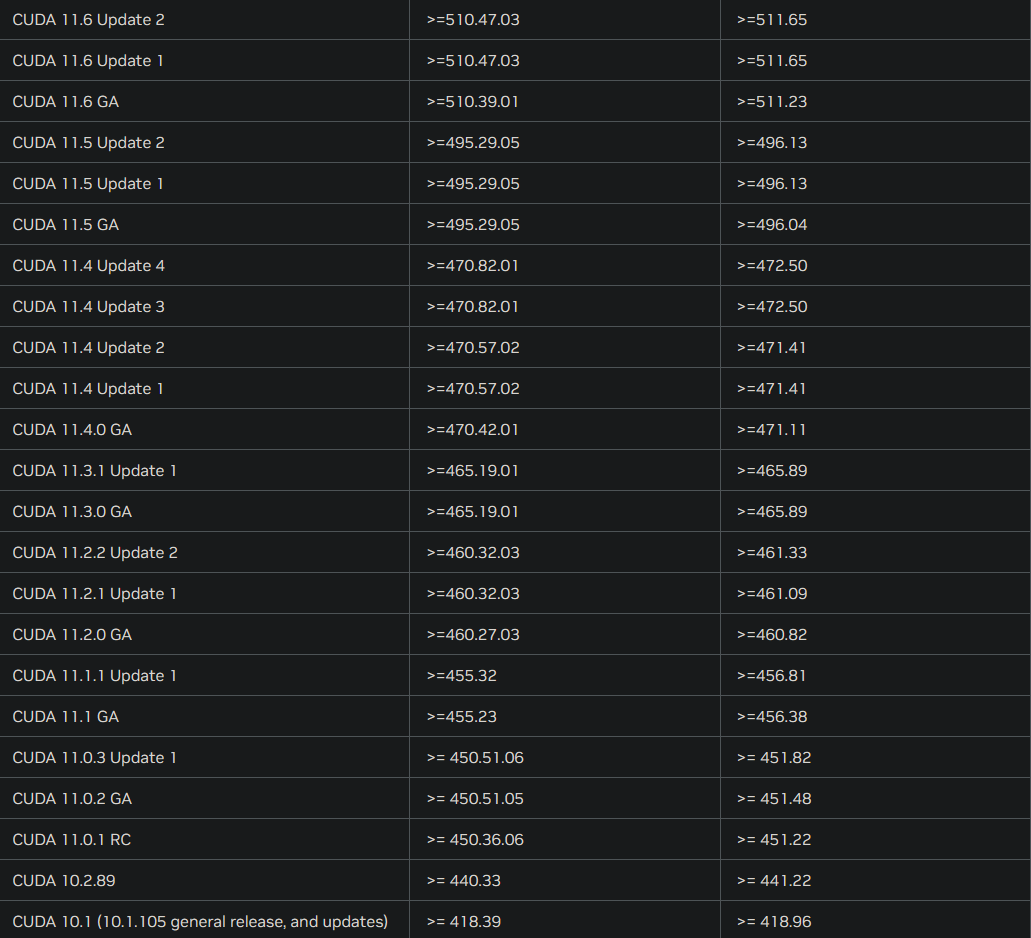
CUDA11.6 : cuda_11.6.2_510.47.03_linux.run
cuDNN 8.9.5: cudnn-linux-x86_64-8.9.5.29_cuda11-archive.tar.xz
OS Info 1 2 3 4 5 6 (base) houjinliang@4090server:~$ lsb_release -a
Dev Info 1 2 3 4 5 6 7 8 9 10 11 12 13 14 15 16 17 18 19 20 21 22 23 (sr_benchmark) houjinliang@4090server:~$ cat /proc/driver/nvidia/versionwhich nvcccat ~/cuda-11.6/include/cudnn_version.h | grep CUDNN_MAJOR -A 2
之前在CUDA 11.3环境下安装的PyTorch,直接conda-pack打包过来了 至于conda env,我把之前服务器上的环境使用conda-pack打包,然后使用scp传过来,然后解压到对应文件夹下。虽然之前cuda113,torch也是113版本的,但是在cuda116的服务器上也能用(那就先用着?!
问题:Failed to initialize NVML: Driver/library version mismatch 环境正常运行了很长一段时间,但是突然有一天,在运行程序的时候出现了这样一个报错!
1 ERROR: cuda is not available, try running on CPU
这个error是我自己的程序里写得报错提示,系统的cuda不可用了?!这是咋回事?!
1 2 3 4 5 6 7 8 9 10 11 12 13 14 15 16 17 18 19 20 21 22 23 24 25 26 27 28 29 30 31 32 33 34 35 36 37 38 (base) houjinliang@4090server:~$ nvidia-smi"/mnt/houjinliang/miniconda3/lib/python3.12/site-packages/gpustat/cli.py" , line 58, in print_gpustatid =id )"/mnt/houjinliang/miniconda3/lib/python3.12/site-packages/gpustat/core.py" , line 402, in new_query"/mnt/houjinliang/miniconda3/lib/python3.12/site-packages/pynvml.py" , line 1947, in nvmlInit"/mnt/houjinliang/miniconda3/lib/python3.12/site-packages/pynvml.py" , line 1937, in nvmlInitWithFlags"/mnt/houjinliang/miniconda3/lib/python3.12/site-packages/pynvml.py" , line 899, in _nvmlCheckReturn"help" , "copyright" , "credits" or "license" for more information.print (torch.cuda.is_available())functions before calling NumCudaDevices() that might have already set an error? Error 804: forward compatibility was attempted on non supported HW (Triggered internally at ../c10/cuda/CUDAFunctions.cpp:112.)return torch._C._cuda_getDeviceCount() > 0
4090Server2
Ubuntu 22.04.3 LTS
gcc version 12.3.0
OS Info 1 2 3 4 5 6 (base) houjinliang@4090server2:~$ lsb_release -a
Dev Info 1 2 3 4 5 6 7 8 9 10 11 12 13 14 15 16 17 18 19 20 21 22 (base) houjinliang@4090server2:~$ cat /proc/driver/nvidia/versionwhich nvcccat ~/cuda-12.4/include/cudnn_version.h | grep CUDNN_MAJOR -A 2
CUDA Toolkit 12.4 Update 1 Downloads | NVIDIA Developer
1 (base) houjinliang@4090server2:~/MyDownloadFiles$ wget https://developer.download.nvidia.com/compute/cuda/12.4.1/local_installers/cuda_12.4.1_550.54.15_linux.run
CUDNN : cudnn-linux-x86_64-8.9.7.29_cuda12-archive.tar
https://developer.nvidia.com/downloads/compute/cudnn/secure/8.9.7/local_installers/12.x/cudnn-linux-x86_64-8.9.7.29_cuda12-archive.tar.xz/
1 2 3 4 5 6 7 8 9 10 11 12 13 14 15 (base) houjinliang@4090server2:~/MyDownloadFiles$ tar xvJf cudnn-linux-x86_64-8.9.7.29_cuda12-archive.tar.xzcd cudnn-linux-x86_64-8.9.7.29_cuda12-archive/cp lib/* ~/cuda-12.4/lib64/cp include/* ~/cuda-12.4/includechmod +x ~/cuda-12.4/include/cudnn.hchmod +x ~/cuda-12.4/lib64/libcudnn*
git install 这台服务器上没有git,使用deb包安装一个
1 (base) houjinliang@4090server2:~/MyDownloadFiles$ wget http://archive.ubuntu.com/ubuntu/pool/main/g/git/git_2.34.1-1ubuntu1.11_amd64.deb
1 2 3 4 5 6 7 8 9 10 11 12 13 14 (base) houjinliang@4090server2:~/MyDownloadFiles$ cd ~mkdir gitcd git/
1 (base) houjinliang@4090server2:~$ vim ~/.bashrc
1 2 3 4 # >>> git environment variables >>> # murphy insert # <<< git environment variables <<<
1 (base) houjinliang@4090server2:~$ source ~/.bashrc
1 2 3 4 5 6 7 8 (base) houjinliang@4090server2:~$ which git
conda env 虽然4090server2上面的CUDA环境是12.4,但这里还是用了在3080上配置的sr_benchmark的环境。
1 2 3 4 5 6 7 8 9 10 11 12 13 14 15 16 17 18 19 20 21 22 (base) houjinliang@4090server2:~$ mkdir ~/miniconda3/envs/sr_benchmarkenv list"help" , "copyright" , "credits" or "license" for more information.print (torch.cuda.is_available())
3080Server - MMYOLO Overview — MMYOLO 0.6.0 documentation
1 2 3 4 5 6 7 8 9 10 11 (base) houjinliang@3080server:~$ conda create -n py38mmyolo python=3.8'https://mirrors.aliyun.com/pypi/simple' "import torch; print(torch.__version__); print(torch.cuda.is_available())"
1 2 3 4 pip install -U openmim"mmengine>=0.6.0" "mmcv>=2.0.0rc4,<2.1.0" "mmdet>=3.0.0,<4.0.0"
1 2 3 4 5 6 7 8 9 git clone https://github.com/open-mmlab/mmyolo.gitcd mmyolo
1 2 3 4 5 6 7 8 9 10 (base) houjinliang@3080server:~/userdoc/offlinefile$ wget http://images.cocodataset.org/zips/val2017.zip
Ref Links CUDA 12.6 Update 2 Release Notes
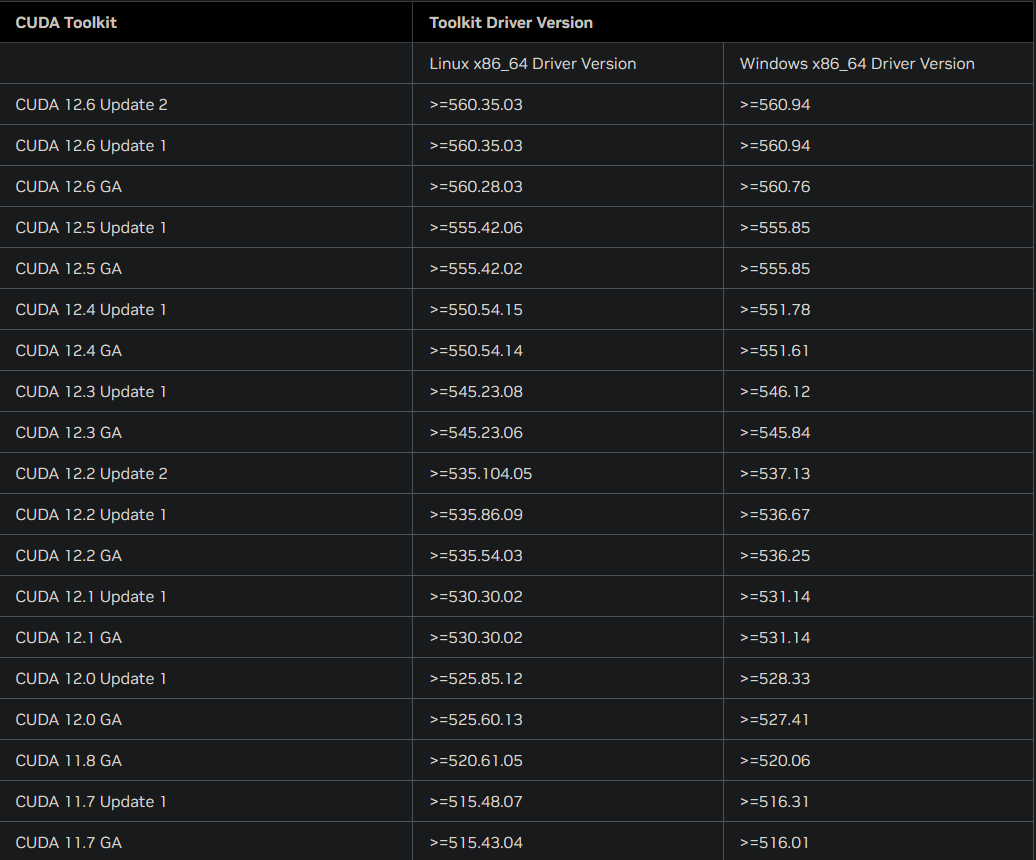
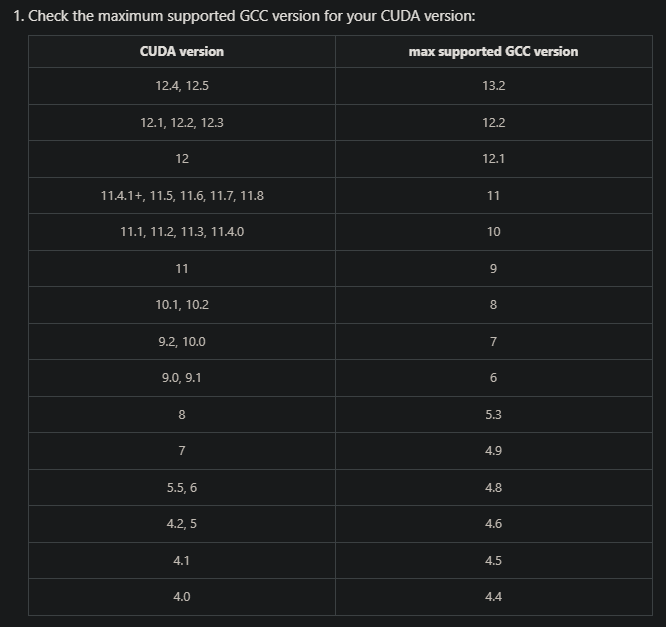
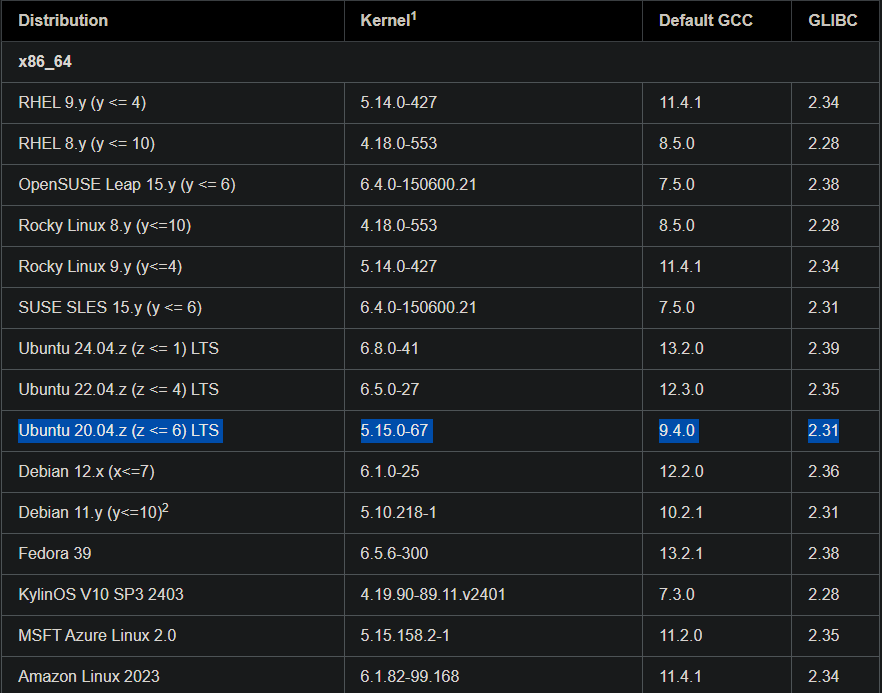
GCC与CUDA版本对应
3080Server - gcc 7.5.0 (Ubuntu 18.04.6 LTS)-> CUDA 11.3
3090Server - gcc 7.5.0 (Ubuntu 18.04.6 LTS)-> CUDA 11.3
3090Server2 - gcc 9.4.0 (Ubuntu 20.04.5 LTS)-> CUDA 11.3
4090Server - gcc 11.4.0 (Ubuntu 22.04.2 LTS)-> CUDA 11.6
4090Server - gcc 12.3.0 (Ubuntu 22.04.3 LTS)-> CUDA 12.4
https://docs.nvidia.com/cuda/cuda-installation-guide-linux/index.html
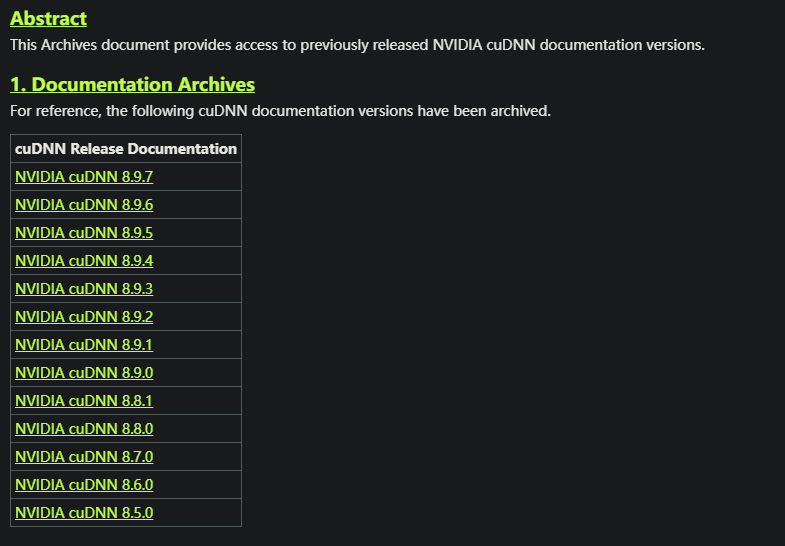
cuDNN docs
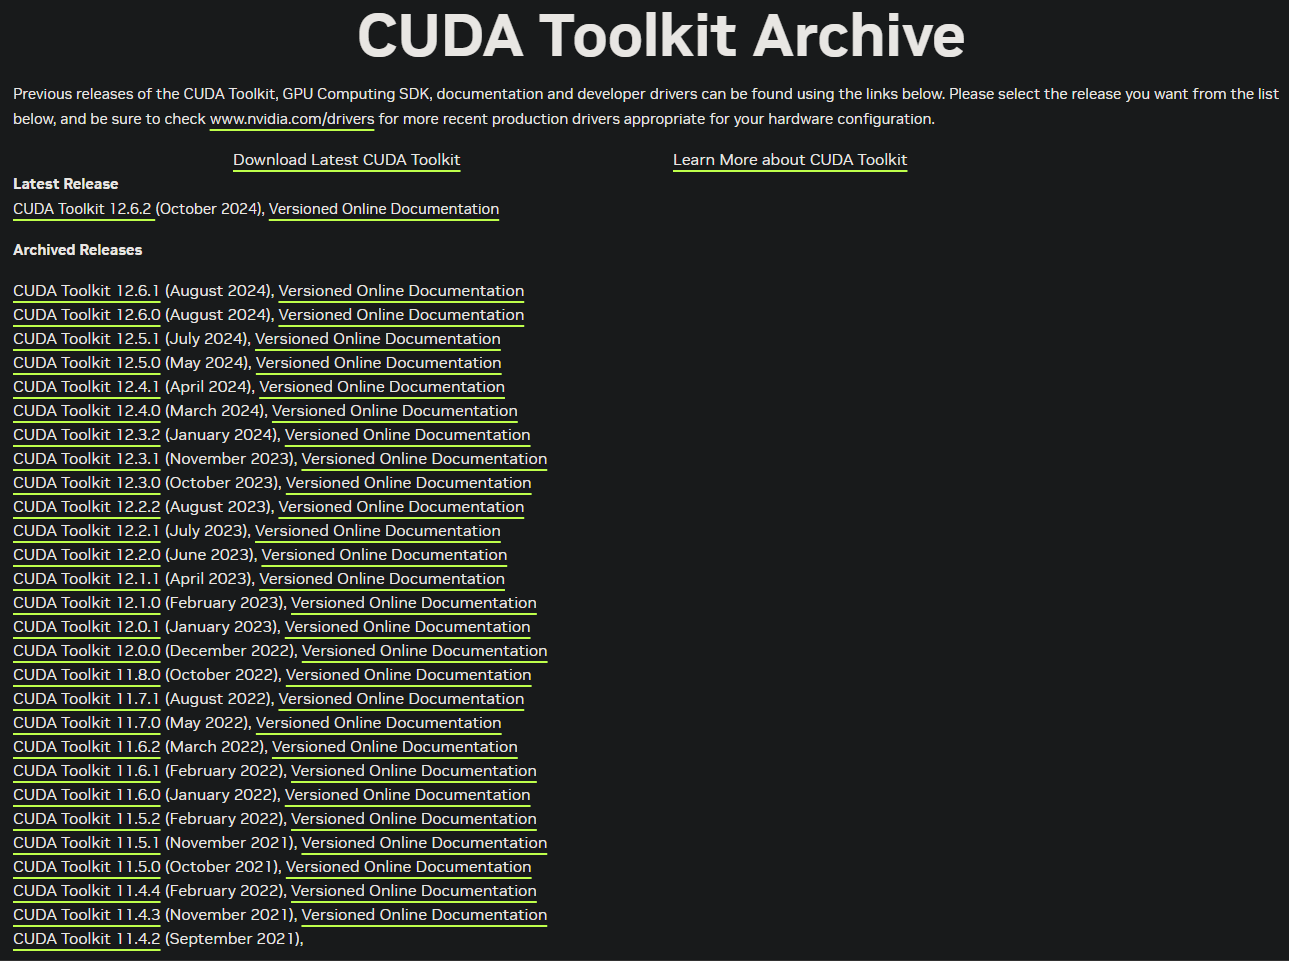
CUDA Toolkit Archive | NVIDIA Developer
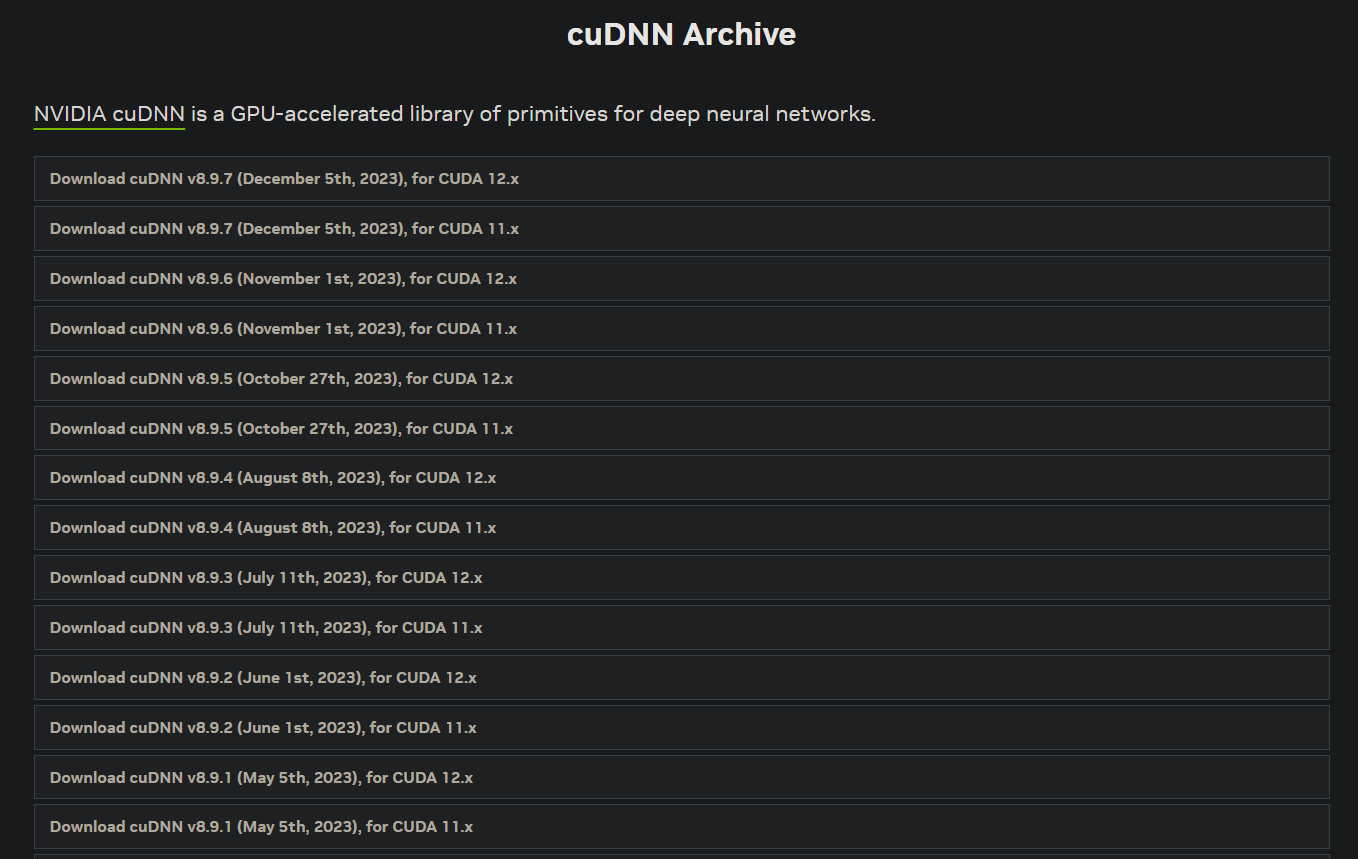
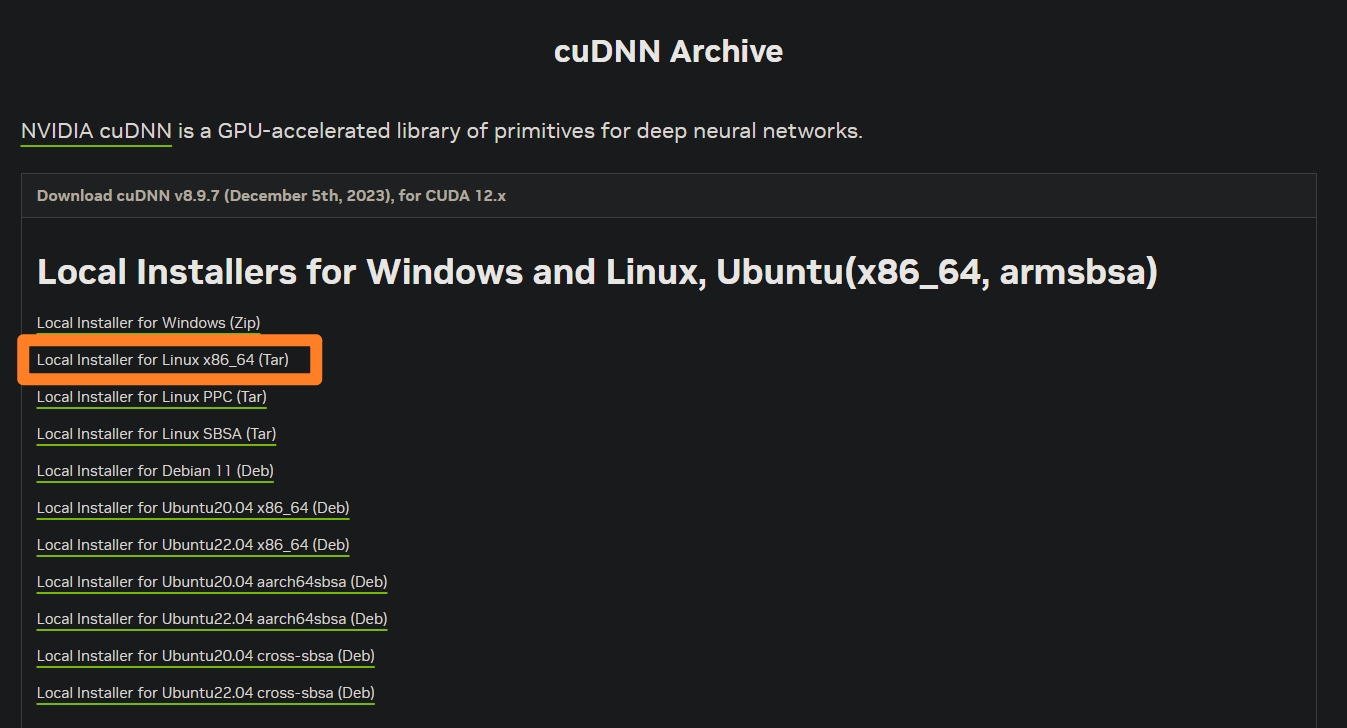
cuDNN Archive
Docker
Docker Install
需要管理员用户!
1 2 3 4 5 6 7 8 9 10 11 12 13 14 15 16 17 18 19 20 21 22 23 24 sudo apt updatesudo apt install \sudo gpg --dearmor -o /usr/share/keyrings/docker-archive-keyring.gpgecho \"deb [arch=amd64 signed-by=/usr/share/keyrings/docker-archive-keyring.gpg] https://mirrors.aliyun.com/docker-ce/linux/ubuntu \ $(lsb_release -cs) stable" | sudo tee /etc/apt/sources.list.d/docker.list > /dev/nullsudo apt updatesudo apt install docker-ce docker-ce-cli containerd.iosudo systemctl enable dockersudo systemctl start docker
为了让非管理员用户也能使用docker,需要建立用户组,赋予用户组内的用户权限
1 2 3 4 5 6 7 8 9 10 11 12 sudo groupadd dockersudo usermod -aG docker $USER sudo usermod -aG docker xxxxxxxx'^docker:' /etc/group
配置docker代理
docker 代理配置需要管理员用户 !
上网代理,参考瞧瞧我对服务器干了些什么! - MurphyHou (cosmicdusty.cc)
一、配置镜像服务器(很多镜像服务器已经不能用了)
1 2 3 4 5 6 7 8 9 10 11 12 13 vim /etc/docker/daemon.json"registry-mirrors" : ["https://hub-mirror.c.163.com" ,"https://mirror.baidubce.com" sudo systemctl daemon-reloadsudo systemctl restart docker
二、docker pull代理
1 2 3 4 5 6 7 8 9 10 11 12 sudo mkdir -p /etc/systemd/system/docker.service.dsudo touch /etc/systemd/system/docker.service.d/proxy.conf"HTTP_PROXY=http://127.0.0.1:7890/" "HTTPS_PROXY=http://127.0.0.1:7890/" "NO_PROXY=localhost,127.0.0.1,.example.com" sudo systemctl daemon-reloadsudo systemctl restart docker
三、Container代理
1 2 3 4 5 6 7 8 9 10 11 12 13 14 15 "proxies" :"default" :"httpProxy" : "http://127.0.0.1:7890" ,"httpsProxy" : "http://127.0.0.1:7890" ,"noProxy" : "localhost,127.0.0.1,.example.com"
测试Docker配置是否成功
Ubuntu | Docker — 从入门到实践 (gitbook.io)
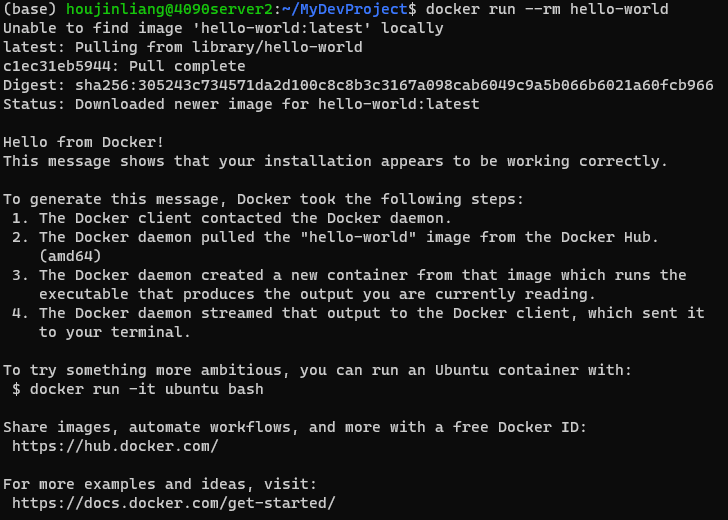
1 docker run --rm hello-world
Overleaf in My Server
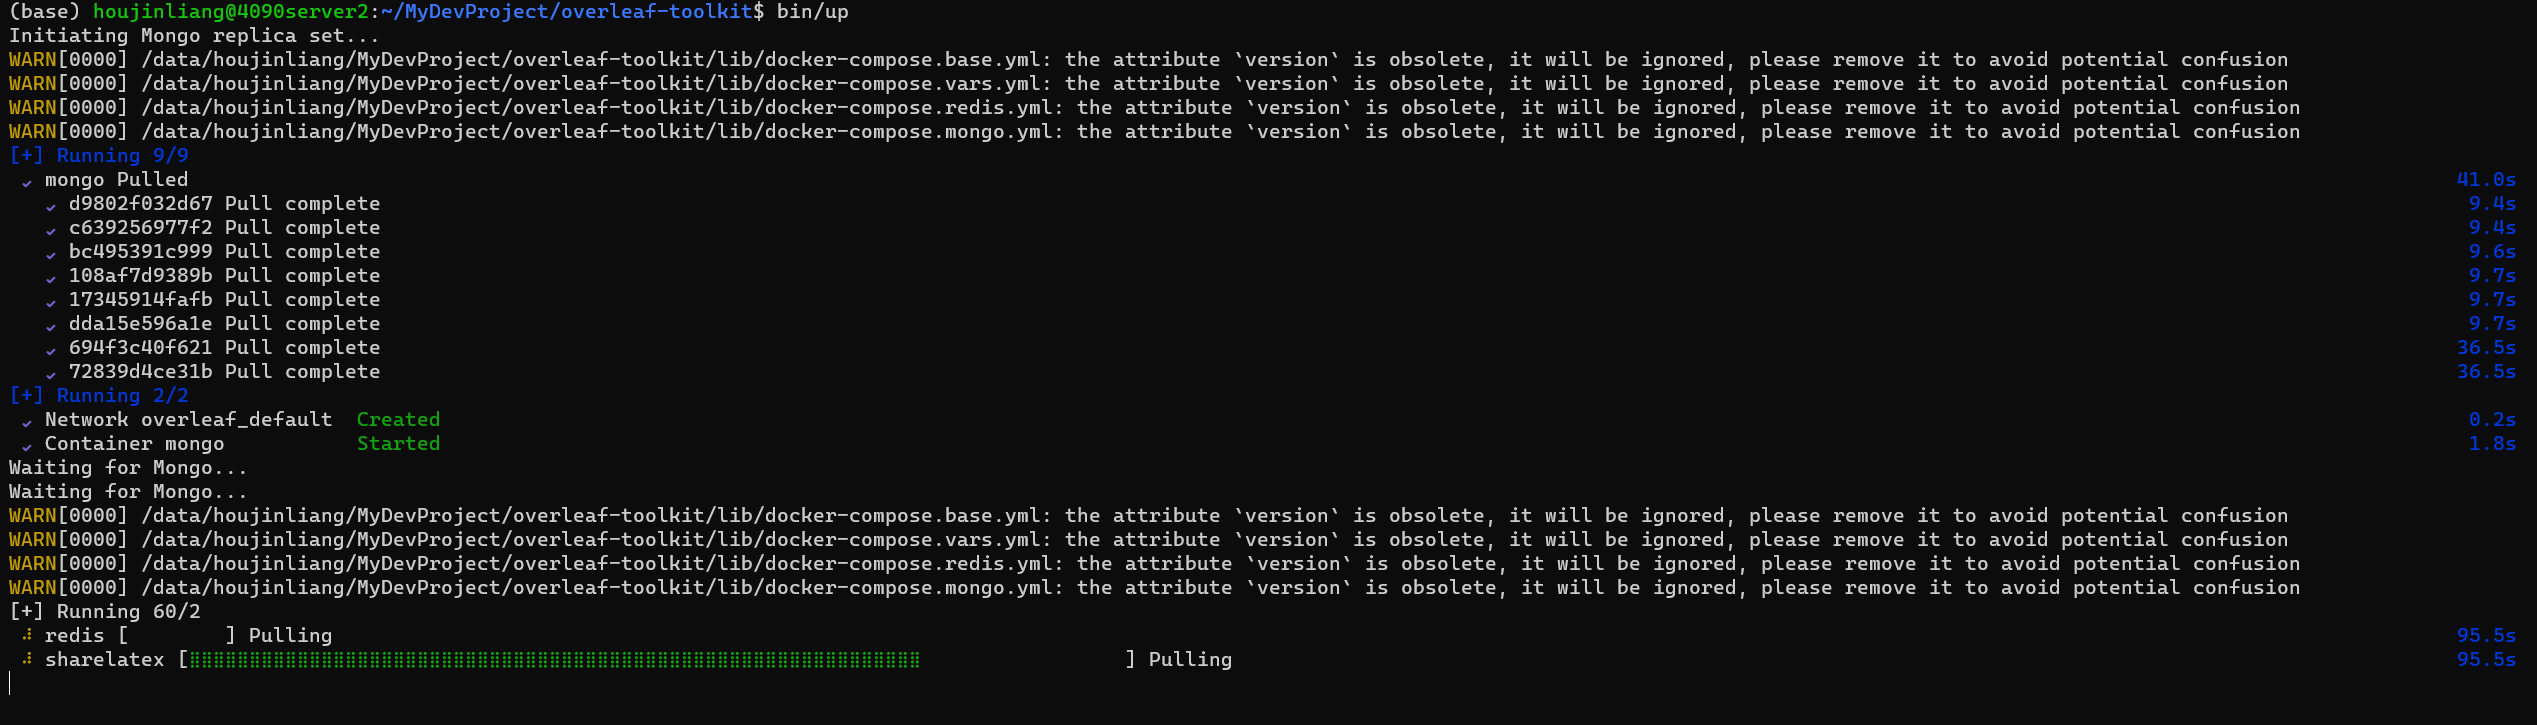
上述的docker环境配置好之后,可以配置一下overleaf. 特别是得配置好网络环境,要不然Docker Image拉取不下来
Config 1 2 3 4 5 6 7 8 clone https://github.com/overleaf/toolkit.git ./overleaf-toolkit && cd overleaf-toolkit
Remote link 因为服务是在远程服务器上,为了在本地能直接方法,需要修改端口和外网访问
在./config/overleaf.rc中,需要修改以下字段:
1 2 OVERLEAF_LISTEN_IP=xx.xx.xx.xx # 远程服务器IP
Overleaf 容器启动之后,可以打开 http://xx.xx.xx.xx:xx/launchpad 注册管理员帐户。之后我们就可以用这个帐户登录 Overleaf 平台。
网上教程中还给出了一些复杂的配置,后面根据需要再配置吧。
Writen in later 因为Overleaf官网对于免费用户,只有20s的编译时间,超过时间限制则无法编译。对于这种情况,只能付费解决。如果面对我遇到这样的情况的话,我可能也会选择付费的方式。但在网上看到了可以在服务器上搭建自己的Overleaf,所以想跟着教程自己试一下。按照教程一步步走下来,最后也配置成功了。也许最后并不会使用自己配置的这个,但折腾永不停息,万一用到了呢?!
Server OS Update,Ubuntu 18.04 -> 20.04 3080server(2025.06.11) 3080Server和3090Server都是Ubuntu 18.04版本,由于Ubuntu 18.04已经“寿命将尽”,很多软件的维护都结束了,现在出现了一个很大的问题!VSCode 1.85之后的版本使用SSH-remote连不上服务器了!天杀的!Damn!
只有两种解决方法
根据对应的发行版,升级至 Ubuntu 20.04 LTS、Debian 10 或 RHEL 8 降级到 VS Code 1.85
VSCode降级:November 2023 (version 1.85) ,安装1.85.2版本,然后关闭自动更新。(14 封私信 / 2 条消息) VSCode怎么关闭自动更新 - 知乎
先把VSCode降级之后,将就用了一段时间,后面决定,不能就这么妥协了,我得去把实验室的服务器更新一下!
系统更新比较简单,直接一行命令,然后一路Y或Enter就行了。
系统更新完了之后遇到了几个问题
连不上网(这台服务器之前就有这个问题)
nVidia驱动。
ssh端口
连不上网的问题是最大的,也不记录中间怎么排查的了,就直接贴一下教程了。
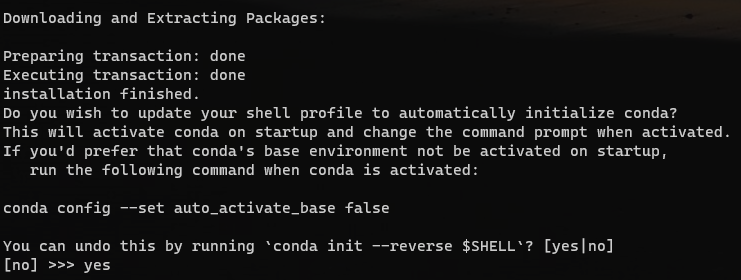
找了好久的方法,这个方式是有效的!
但是,如果按照他说起,再改回false的话,重启后的电脑还是之前连不上网络的状态,还需要重走一边教程。所以最后采取了保持true。这样重启后,会自动联网!
nVidia驱动,这个问题比较好解决,因为有GUI桌面,直接在软件更新中把驱动换上就行。
第三个问题是ssh端口,系统更新之后又变成了默认的22端口,为了服务器安全,需要改一下。
这个问题其实很简单。(14 封私信 / 2 条消息) 安全加固指南:如何更改 SSH 服务器的默认端口号 - 知乎
直接编辑配置文件就行。
1 sudo vim /etc/ssh/sshd_config
但是!我改了半天的ssh_config!我说怎么一直不生效!改错了!!!废了好大的劲!!!
3090server(2025.06.19) 这次比较顺利,遇到的问题还是网络和驱动的问题。
首先,在还没有更新的时候查看了一下当前的网络配置,比较抽象,为什么是docker桥接的网络, 不知道咋回事,不管了!
更新完成之后遇到一个问题,之前的网线连接的网卡指示灯不亮,我不知道是还没有缓冲好还是咋了,我直接换了另外一个网卡了,指示灯亮了。然后使用nm-connection-editor和nmtui就配好了PPPOE,但是这时候的IP是跟之前不一样了,算了,也不管了,能用就行。
第二个问题是切换英伟达驱动的时候遇到的!
1 2 3 sudo dpkg --configure -asudo apt update && sudo apt upgrade
磁盘查询, df。df 的全称是 “disk free”,它的核心作用是从文件系统(通常可以理解为磁盘分区)的宏观角度 查看整体的使用情况。
1 2 3 4 5 6 7 8 user@3080server:~$ df -hdf -Tdf -hT
磁盘查询,du。du 的全称是 “disk usage”,它与 df 完美互补。当 df 告诉你某个分区(比如 /)快满了,du 就能帮你找到到底是哪个目录或文件占用了大量空间 。
1 2 3 4 5 6 7 8 9 10 11 12 du -h /path/to/dirdu -sh /path/to/dir: 这是最常用的组合!sudo du -sh /mnt/houjinliangsudo du --max-depth=1 -h /mnt/ | sort -rh
ncdu 命令 (交互式磁盘空间分析器)。这是一个强烈推荐 的工具,可以看作是 du 的超级升级版。它不是系统自带的,但非常值得安装。功能: 它会扫描你指定的目录,然后提供一个可交互的、可视化的文本界面 ,让你能方便地按大小排序、进入子目录、甚至直接删除文件。
1 2 3 4 5 6 7 8 9 sudo apt update && sudo apt install ncdu`sudo yum install ncdu`sudo ncdu /mnt
查看磁盘和分区结构的工具 (lsblk, fdisk)。有时候你不仅想看容量,还想了解物理磁盘的结构,比如“我的服务器上到底有几块硬盘?每块硬盘是怎么分区的?”
查看文件以及文件夹大小
1 2 3 4 5 6 7 8 9 10 11
总用量 26251480
1 2 3 4 5 6 7 8 9 10 11
命令:
等价于:
不过,ls 命令的选项可以合并,所以通常写作 ls -hl。因为 ll 本身就是 ls -l,所以这个命令实际上是 ls -l -h。
选项解释:
1 2 3 4 5 6 7 8 9 10 11 12 (py38mmyolo) houjinliang@3080server:~$ du -h --max-depth=1
1 2 3 4 5 user@3080server:/mnt$ sudo du -sh /mnt/bailuqian/sudo du -sh /mnt/chenzhengtao/
1 sudo du --max-depth=1 -h /mnt/ | sort -rh
1 2 3 4 5 6 7 8 9 10 11 12 13 14 15 16 17 18 19 20 21 22 23 24 25 26 27 28 29 30 31 32 33 34 35 #!/bin/bash "/mnt" if [ ! -d "$TARGET_DIR " ]; then echo "错误: 目录 ${TARGET_DIR} 不存在。" exit 1fi echo "正在计算目录 [${TARGET_DIR} ] 下所有文件夹的大小..." echo "--------------------------------------------------" "${TARGET_DIR} " -mindepth 1 -maxdepth 1 -type d | while read -r dir ; do sudo du -sh "${dir} " done echo "--------------------------------------------------" echo "计算完成。"