Back to Top Video Links
VIDEO
Notebook Links
01. Welcome to C++ C++ for hardware, C++ for game engines
02-04. Setup C++ in different OS 05. How C++ works preprocessor statement
source file(Main.cpp) –compiler–> object files(Main.obj) –linker–> executable file(Main.exe) (Windows platform)
source file(file1.cpp, file2.cpp) –compiler–> object files(file1.obj, file2.obj) –linker–> executable file(file.exe) (Windows platform)
declaration and defination
06. How the C++ Compiler Works text form to an actual executable binary
compiling(cpp->obj)
linking(obj->exe)
translation unit
preprocessor How ‘#include ‘ works
All the compiler did was open the header file and copy whatever was in here. Let’s see a simple example.
1 2 3 4 5 6 int math (int a, int b) int result = a * b;#include "EndBrace.h"
1 2 3 4 5 6 #include <xx > #include "xx" #define A B #if #endif
what’s actually inside the obj file function signature
the complier’s work: It takes the source files and output an object file which contains machine code and any other constant data that we’ve defined.
07. How the C++ Linker Works 1 2 3 4 5 6 static int math (int a, int b) int result = a * b;
08. Variables in C++
int -> 4 Bytes(4×8=32 bits) -> (-$2^31$)~($2^31-1$)false and any other digits mean true. 为了节约这个内存空间,我们可以把8个bool类型的变量放在1个Byte的内存中,但这个是高级的操作了。
sizeof()
pointer: int* a;
reference: int& a;
09. Functions in C++ function and method
return value
.cpp and .h
所谓的头文件,其实它的内容跟 .cpp 文件中的内容是一样的,都是 C++ 的源代码。但头文件不用被编译。我们把所有的函数声明全部放进一个头文件中,当某一个 .cpp 源文件需要它们时,它们就可以通过一个宏命令 “#include” 包含进这个 .cpp 文件中,从而把它们的内容合并到 .cpp 文件中去。当 .cpp 文件被编译时,这些被包含进去的 .h 文件的作用便发挥了。
理解 C++ 中的头文件和源文件的作用 | 菜鸟教程 (runoob.com)
1 2 3 4 #pragma once
下面这两种写法等价,都是起到了头文件保护作用。前者是现在常用是格式,后者是之前的代码常用的格式
1 2 3 4 5 6 7 #pragma once void InitLog () void Log (const char * message) struct Player {};
1 2 3 4 5 6 7 8 #ifdef _LOG_H_ #define _LOG_H_ void InitLog () void Log (const char * message) struct Player {};#endif
#include & #include “xx.h”
iostream这个东西看起来不想是文件呀?
11. How to DEBUG C++ in VISUAL STUDIO Breakpoints & Reading memory
12. CONDITIONS and BRANCHES in C++(if statements) if and else
else if其实并不是一个关键词,而是else和if的一个组合。
1 2 3 4 5 6 7 8 9 10 11 12 13 14 15 16 17 if (ptr)Log (ptr);else if (ptr = "Hello" )Log ("Ptr is Hello" );if (ptr)Log (ptr);else if (ptr = "Hello" )Log ("Ptr is Hello" );
13. BEST Visual Studio Setup for C++ Projects!
Visual Studio项目中的文件夹是虚拟文件夹,起到一种筛选器的作用。
bin means binary
Output Directory: $(SolutionDir)bin$(Platform)$(Configuration)\
Intermediate Directory: $(SolutionDir)bin\intermediate$(Platform)$(Configuration)\
什么是 Visual Studio 解决方案和项目? - Visual Studio (Windows) | Microsoft Learn
14. Loops in C++ (for loops, while loops) for loops 1 2 3 4 5 6 7 8 9 10 11 12 13 14 15 for (int i = 0 ; i < 5 ; i++)"hello" << endl;int i = 0 ;for (; i < 5 ; )"hello" << endl;
while loops 1 2 3 4 5 6 int i = 0 ;while (i < 5 )"hello" << endl;
for loops和while loops怎么选择,这两个基本上一样,选择哪个,主要取决于是否需要新变量(当然也无所谓)。for loops中for (int i = 0; i < 5; i++)i是临时变量,跳出循环后i就没有定义了,而在while loops中,i是在循环体之外定义的,所有跳出while loops时,i依然有定义,其值是跳出while loops时i的数值。
do while loops 至少会执行循环一次。
1 2 3 4 5 6 int i = 0 ;do "hello" << endl;while (i < 5 );
15. Control Flow in C++ (break, continue, return) continue: loops
1 2 3 4 5 6 7 8 9 10 11 for (int i = 0 ; i < 5 ; i++)if (i % 2 != 0 )continue ;"i = " << i << endl;
break: loops and switch
1 2 3 4 5 6 7 8 9 10 for (int i = 0 ; i < 5 ; i++)if (i % 2 != 0 )break ;"i = " << i << endl;
return: get out of the function entirely
16. Pointer in C++ ⭐
raw pointer(原始指针) ✔
smart pointer(智能指针)
Computer deal with memory. Memory is everything to a computer.
指针用于管理和操控内存。
A pointer is an integer, a number which stores a memory address . That is all that is!
1 2 3 void * ptr = 0 ; void * ptr = NULL ; void * ptr = nullptr ;
1 2 3 4 5 6 7 8 9 10 11 12 13 14 15 16 17 18 19 20 int var1 = 5 ;int * ptr1 = &var1;"the memory address of var1 is " << ptr1 << endl;10 ;"the value stored in memory address of var1 is " << *ptr1 << endl;int var2 = 6 ;int * ptr2;12 ;"the memory address of var2 is " << ptr2 << endl;"the value stored in memory address of var2 is " << *ptr2 << endl;
首先说明,在C++中,内存分为5个区:堆、占、自由存储区、全局/静态存储区、常量存储区
栈 :是由编译器在需要时自动分配,不需要时自动清除的变量存储区。通常存放局部变量、函数参数等。堆 :是由new分配的内存块,由程序员释放(编译器不管),一般一个new与一个delete对应,一个new[]与一个delete[]对应。如果程序员没有释放掉,资源将由操作系统在程序结束后自动回收。自由存储区 :是由malloc等分配的内存块,和堆十分相似,用free来释放。全局/静态存储区 :全局变量和静态变量被分配到同一块内存中(在C语言中,全局变量又分为初始化的和未初始化的,C++中没有这一区分)。常量存储区 :这是一块特殊存储区,里边存放常量,不允许修改。
C++中堆(heap)和栈(stack)的区别(面试中被问到的题目)_c++堆和栈的区别-CSDN博客
1 2 3 4 char * buffer = new char [8 ]; memset (buffer, 0 , 8 ); delete [] buffer;
double pointer:双重指针(指针变量的指针,用一个指针变量b存储一个指针变量a的地址)
17. Reference in C++
在计算机如歌处理这两种关键字的角度看,指针和引用基本上是一回事。
语法糖就相当于汉语里的成语。即,用更简练的言语表达较复杂的含义。在得到广泛接受的情况之下,可以提升交流的效率。
之所以叫【语法糖】,不只是因为加糖后的代码功能与加糖前保持一致,更重要的是,糖在不改变其所在位置的语法结构的前提下,实现了运行时等价。可以简单理解为,加糖后的代码编译后跟加糖前一毛一样。
什么是语法糖? - 知乎 (zhihu.com)
引用是指对某个已存在 的变量的引用。
1 2 3 4 5 int a = 5 ;int * b = &a; int & ref = a;
1 2 3 4 5 6 7 8 9 10 11 12 13 14 15 16 int a = 5 ;int & ref = a; int a = 5 ;int & ref = a;10 ;"a = " << a << endl;"ref = " << ref << endl;
举个例子!
1 2 3 4 5 6 7 8 9 10 11 12 13 14 15 16 17 18 #include <iostream> using namespace std;void IncreaseValue (int value) int main () int a = 5 ;IncreaseValue (a);"a = " << a << endl;get ();
要想使用函数把实参a的值进行改变,可以使用指针的方式来实现!
1 2 3 4 5 6 7 8 9 10 11 12 13 14 15 16 17 18 19 #include <iostream> using namespace std;void IncreaseValue (int * value) int main () int a = 5 ;IncreaseValue (&a);"a = " << a << endl;get ();
使用指针 可以改变实参a的值,但是使用引用 能更方便的实现此功能!
1 2 3 4 5 6 7 8 9 10 11 12 13 14 15 16 17 18 #include <iostream> using namespace std;void IncreaseValue (int & value) int main () int a = 5 ;IncreaseValue (a);"a = " << a << endl;get ();
注意:一旦声明了一个引用,就不能更改它所引用的对象了!
1 2 3 4 5 6 7 8 9 10 11 int a = 5 ;int b = 10 ;int & ref = a;"a = " << a << endl;
另外,因为ref并不是一个实际的变量,声明ref的时候必须立刻将其作为一个真正变量的引用!
1 2 3 4 5 6 7 8 int a = 5 ;int & ref;
18. Classes in C++⭐ Object-Oriented Programming(OOP)
Class and Object(类与对象)
C++支持:面向过程、面向对象、基于对象、泛型编程四种类型的编程;
C不支持米那些对象编程;
JAVA, C#只适合面向对象编程(不是不可以其他风格,只是最好编写面向对象编程风格的程序)
类是一种将数据和函数组织在一起的方式。
在面对很多很多变量的时候,使用class能使得代码更简洁和方便维护。
由类类型定义的变量叫做对象(object),创建新对象的过程叫做实例化(instance)。
visibility(访问控制)
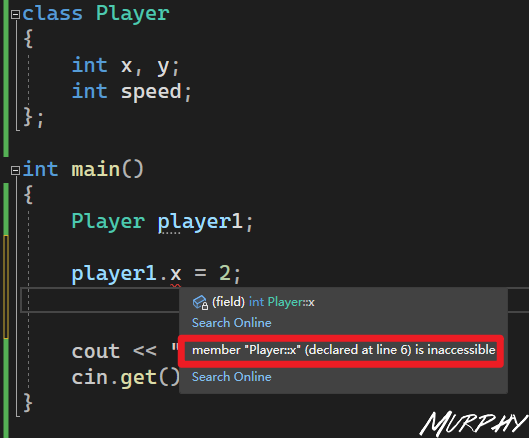
默认情况下,类中的成员的访问控制都是私有的,意味着只有类内部的函数才能方位这些变量。
1 2 3 4 5 6 7 8 9 10 11 12 13 14 15 16 17 18 19 20 21 22 23 24 25 26 27 28 29 30 31 32 33 34 #include <iostream> using namespace std;class Player public : int x, y;int speed;void Move (Player& player, int xa, int ya) int main () 1. x = 0 ;1. y = 0 ;1. speed = 10 ;Move (player1, 1 , -1 );" x = " << player1. x << endl;" y = " << player1. y << endl;get ();
为了使得代码更简洁,可以把函数写到类内,作为方法。这样可以使得当我们为特定的类调用Move函数的时候就是调用他自己的。
1 2 3 4 5 6 7 8 9 10 11 12 13 14 15 16 17 18 19 20 21 22 23 24 25 26 27 28 29 30 31 32 33 #include <iostream> using namespace std;class Player public : int x, y;int speed;void Move (int xa, int ya) {int main () 1. x = 0 ;1. y = 0 ;1. speed = 10 ;1. Move (1 , -1 );" x = " << player1. x << endl;" y = " << player1. y << endl;get ();
类也是一种语法糖。
19. Classes vs Struct in C++ C++中Class和Struct有什么区别?
基本上没什么区别😅
使用 class 时,类中的成员默认都是 private 属性的,而使用 struct 时,结构体中的成员默认都是 public 属性的.
C++中struct存在的唯一原因是因为它想要维持与C之间的兼容性,因为C中没有类但有结构体。如果把C++中的struct删除之后,C++与C存在兼容性问题。
C++中class与struct的使用,主要还是有个人编程风格决定吧。
在讨论Plain Old Data(POD)时候,使用struct; 在讨论比较复杂功能的时候,使用class;
在使用继承的时候,使用class;
在 C 语言 结构体 ** 只能存放一些 变量 函数 **,但 C++ 中的结构体对 C 语言中的结构体做了扩充,可以有函数,因此 C++ 中的结构体跟 C++ 中的类很类似。C++ 中的 struct 可以包含成员函数,也能继承,也可以实现多态。
但在 C++ 中,使用 class 时,类中的成员默认都是 private
C++ 中的 class 可以使用模板,而 struct 不能使用模板。
C++ class和struct区别-C++类与结构体区别-嗨客网 (haicoder.net)
POD 是 Plain Old Data 的缩写,是 C++ 定义的一类数据结构概念,比如 int、float 等都是 POD 类型的。Plain 代表它是一个普通类型,Old 代表它是旧的,与几十年前的 C 语言兼容,那么就意味着可以使用 memcpy() 这种最原始的函数进行操作。两个系统进行交换数据,如果没有办法对数据进行语义检查和解释,那就只能以非常底层的数据形式进行交互,而拥有 POD 特征的类或者结构体通过二进制拷贝后依然能保持数据结构不变。也就是说,能用 C 的 memcpy() 等函数进行操作的类、结构体就是 POD 类型的数据 。
什么是 POD 数据类型? - 知乎 (zhihu.com)
20. How to write a C++ Class Log Class: error, warning and message or trace.
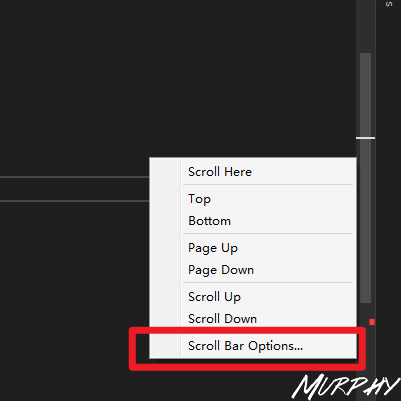
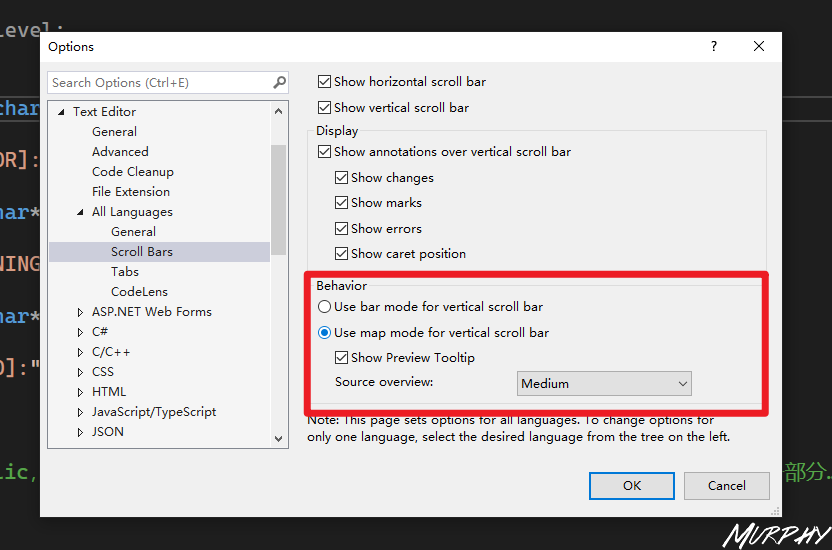
插一个VS使用小技巧,如何让VS和VSCode一样有代码预览窗口。
1 2 3 4 5 6 7 8 9 10 11 12 13 14 15 16 17 18 19 20 21 22 23 24 25 26 27 28 29 30 31 32 33 34 35 36 37 38 39 40 41 42 43 44 45 46 47 48 #include <iostream> using namespace std;class Log public :const int LogLevelError = 0 ;const int LogLevelWarning = 1 ;const int LogLevelInfo = 2 ;private :int m_LogLevel = LogLevelInfo;public :void SetLevel (int level) {void Error (const char * message) {if (m_LogLevel >= LogLevelError)"[ERROR]:" << message << endl;void Warn (const char * message) {if (m_LogLevel >= LogLevelWarning)"[WARNING]:" << message << endl;void Info (const char * message) {if (m_LogLevel >= LogLevelInfo)"[INFO]:" << message << endl;int main () SetLevel (log.LogLevelError);Error ("Hello error!" );Warn ("Hello warning!" );Info ("Hello info!" );get ();
21. Static in C++ Static这部分从21~23
static 是 C/C++ 中很常用的修饰符,它被用来控制变量的存储方式和可见性。
static 关键字用来解决全局变量的访问范围问题
(1)在修饰变量的时候,static 修饰的静态局部变量只执行初始化一次,而且延长了局部变量的生命周期,直到程序运行结束以后才释放。
(2)static 修饰全局变量的时候,这个全局变量只能在本文件中访问,不能在其它文件中访问,即便是 extern 外部声明也不可以。
(3)static 修饰一个函数,则这个函数的只能在本文件中调用,不能被其他文件调用。static 修饰的变量存放在全局数据区的静态变量区,包括全局静态变量和局部静态变量,都在全局数据区分配内存。初始化的时候自动初始化为 0。
(4)不想被释放的时候,可以使用static修饰。比如修饰函数中存放在栈空间的数组。如果不想让这个数组在函数调用结束释放可以使用 static 修饰。
(5)考虑到数据安全性(当程序想要使用全局变量的时候应该先考虑使用 static)。
C/C++ 中 static 的用法全局变量与局部变量 | 菜鸟教程 (runoob.com)
22. Static for Classes and Struct in C++ 1 2 3 4 5 6 7 8 9 10 11 12 13 14 15 16 17 18 19 20 21 22 23 24 25 26 27 28 29 #include <iostream> using namespace std;struct Entity int num;void Print () {int main () 1. num = 2 ;2. num = 5 ;1. num << endl; 2. num << endl; 1. num) << endl; 2. num) << endl; get ();
上面这段代码比较容易理解,e1和e1是结构体Entity的两个不同的实例,不同实例中的num是不同的变量,我们从两个变量的地址也可以看得出来。
如果把结构体Entity的变量变为static类型的话,情况又有什么不一样呢?
1 2 3 4 5 "public: static int Entity::num" (?num@Entity@@2HA)
要解决这个问题,我们必须在代码中定义这些静态变量,像这样,
现在代码能运行了,看一下结果
1 2 3 4 5 6 7 8 9 10 11 12 13 14 15 16 17 18 19 20 21 22 23 24 25 26 27 28 29 30 31 #include <iostream> using namespace std;struct Entity static int num;void Print () {int Entity::num; int main () 1. num = 2 ;2. num = 5 ;1. num << endl; 2. num << endl; 1. num) << endl; 2. num) << endl; get ();
所以,e1.num和e2.num本质上都是同一个变量,所以这样的写法是没有意义的。可以写成如下的形式,
1 2 3 4 5 6 7 8 9 10 11 12 13 14 15 16 17 18 19 20 21 22 23 24 25 26 27 28 29 30 31 #include <iostream> using namespace std;struct Entity static int num;void Print () {int Entity::num;int main () 2 ;5 ;get ();
23.Local Static in C++⭐
生命周期(lifetime)
作用域(scope)
1 2 3 4 5 6 7 8 9 10 11 12 13 14 15 16 17 18 19 20 21 22 23 24 #include <iostream> using namespace std;void Function () int i = 0 ;"i = " << i << endl;int main () Function ();Function ();Function ();get ();
1 2 3 4 5 6 7 8 9 10 11 12 13 14 15 16 17 18 19 20 21 22 23 24 25 26 27 #include <iostream> using namespace std;int i = 0 ;void Function () "i = " << i << endl;int main () Function ();Function ();Function ();"main: i = " << i << endl;get ();
1 2 3 4 5 6 7 8 9 10 11 12 13 14 15 16 17 18 19 20 21 22 23 24 25 26 #include <iostream> using namespace std;void Function () static int i = 0 ;"i = " << i << endl;int main () Function ();Function ();Function ();get ();
24. Enums in C++
枚举类型的定义:枚举类型(enumeration)是 C++ 中的一种派生数据类型,它是由用户定义的若干枚举常量的集合。
C++ 枚举类型详解 | 菜鸟教程 (runoob.com)
25. Constructors in C++ Constructors是一种特殊的method,它在实例化时被调用。
类的构造函数是类的一种特殊的成员函数,它会在每次创建类的新对象时执行。
构造函数的名称与类的名称是完全相同的,并且不会返回任何类型,也不会返回 void。构造函数可用于为某些成员变量设置初始值。
C++ 类构造函数 & 析构函数 | 菜鸟教程 (runoob.com)
对于一个类,在实例化之后,如果直接调用类内的变量,会用链接错误,因为类内的变量未被初始化。
1 2 3 4 5 6 7 8 9 10 11 12 13 14 15 16 17 18 19 20 21 22 23 #include <iostream> using namespace std;class Entity public :float X, Y;void Print () {", " << Y << endl;int main () ", " << e.Y << endl; Print ();get ();
手动初始化。在类内定义一个初始化函数,把类内的变量初始化一个值,这样就不会有链接错误了。但这样不够优雅 ,在类有多个实例化时,需要每次实例化之后都使用这个初始化函数。而C++提供了更优雅有效的方式,就是构造函数(Constructors)
1 2 3 4 5 6 7 8 9 10 11 12 13 14 15 16 17 18 19 20 21 22 23 24 25 26 27 28 29 #include <iostream> using namespace std;class Entity public :float X, Y;void Print () {", " << Y << endl;void Init () {0.0f ;0.0f ;int main () Init ();", " << e.Y << endl;Print ();get ();
Constructors是一种特殊的method,它在实例化时被调用以初始化实例。
1 2 3 4 5 6 7 8 9 10 11 12 13 14 15 16 17 18 19 20 21 22 23 24 25 26 27 #include <iostream> using namespace std;class Entity public :float X, Y;Entity () 0.0f ;0.0f ;void Print () {", " << Y << endl;int main () ", " << e.Y << endl;Print ();get ();
在C++中其实有一个默认的Constructor,但是它本身不做任何事情,方法内部是空的,就像这样
因此,C++不能自动帮我们初始化内存空间,得自己手动完成这个过程。
含参数的构造函数。3中,类中变量的初始化数值是在类中写定的,使用含参数的构造函数能在实例化的时候确定类中变量的初始化数值,如下
1 2 3 4 5 6 7 8 9 10 11 12 13 14 15 16 17 18 19 20 21 22 23 24 25 26 27 #include <iostream> using namespace std;class Entity public :float X, Y;Entity (float x, float y)void Print () {", " << Y << endl;int main () Entity e (5.0f , 6.0f ) ;", " << e.Y << endl;Print ();get ();
26. Destructors in C++
Constructor:构造函数
Destructors: 析构函数
构造函数通常是设置变量的地方启动或执行所需要执行的任何类型的初始化,类似的,析构函数是取消初始化任何内容的地方你可能需要删除或清楚任何已使用的内存。
1 2 3 4 5 6 7 8 9 10 11 12 13 14 15 16 17 18 19 20 21 22 23 24 25 26 27 28 29 30 31 32 33 34 35 36 37 38 39 40 41 42 43 44 45 46 47 48 #include <iostream> using namespace std;class Entity public :float X, Y;Entity () 0.0f ;0.0f ;"Created Entity!" << endl;Entity () "Destroyed Entity!" << endl;void Print () {", " << Y << endl;void Function () Print ();int main () Function ();get ();
析构函数在类的实例化是生命周期末期被调用!
27. Inheritance in C++⭐ 继承提供了一种来实现把多个类之间的公共代码转换为基类的方式,就像是一种模板。
Polymorphic(多态)
1 2 3 4 5 6 7 8 9 10 11 12 13 14 15 16 17 18 19 20 21 22 23 24 25 26 27 28 29 30 31 32 33 34 35 36 37 38 39 40 41 #include <iostream> using namespace std;class Entity public :float X, Y;void Move (float xa, float ya) {class Player : public Entitypublic :const char * Name;void PrintName () {int main () "Tom" ;0 ;0 ;Move (5 , 5 );PrintName ();get ();
继承 (inheritance) 就是在一个已存在的类的基础上建立一个新的类.
已存在的类: 基类 (base class) 或父类 (father class)
新建立的类: 派生类 (derived class) 或子类 (son class)
一个新类从已有的类获得其已有特性, 称为类的继承.
通过继承, 一个新建的子类从已有的父类那里获得父类的特性
派生类继承了基类的所有数据成员和成员函数, 并可以对成员做必要的增加或调整
从已有的类 (父类) 产生一个新的子类, 称为类的派生.
类的继承是用已有的类来建立专用新类的编程技术
一个基类可以派生出多个派生类, 每一个派生类又可以作为基类再派生出新的派生类. 因此基类和派生类是相对而言的
派生类是基类的具体化, 而基类则是派生类的抽象
版权声明:本文为CSDN博主「我是小白呀」的原创文章,遵循CC 4.0 BY-SA版权协议,转载请附上原文出处链接及本声明。https://blog.csdn.net/weixin_46274168/article/details/11659272
多态 多态polymorphism ,基本上来说就是使用一个单一的符号来表示多个不同的类型
28. Virtual functions in C++⭐ Virtual functions(虚函数)
虚函数允许我们覆盖基类中的方法。
虚函数引入了一种动态分配(Dynamic Dispatch)的东西,通常使用VTable(虚函数表)来实现编译。VTable中包含基类中所有虚函数的映射,以便我们能在运行时映射它们向正确的覆写函数。
1 2 3 4 5 6 7 8 9 10 11 12 13 14 15 16 17 18 19 20 21 22 23 24 25 26 27 28 29 30 31 32 33 34 35 36 37 38 #include <iostream> #include <string> using namespace std;class Entity public :string GetName () { return "Entity" ; }class Player : public Entityprivate :public :Player (const string& name) : m_Name (name) {}string GetName () { return m_Name; }void PrintName (Entity* entity) GetName () << endl;int main () new Entity ();PrintName (e);new Player ("Cherno" );PrintName (p);get ();
1 2 3 4 5 6 7 8 9 10 11 12 13 14 15 16 17 18 19 20 21 22 23 24 25 26 27 28 29 30 31 32 33 34 35 36 37 #include <iostream> #include <string> using namespace std;class Entity public :virtual string GetName () return "Entity" ; }class Player : public Entityprivate :public :Player (const string& name) : m_Name (name) {}string GetName () override { return m_Name; }void PrintName (Entity* entity) GetName () << endl;int main () new Entity ();PrintName (e);new Player ("Cherno" );PrintName (p);get ();
29. Interfaces in C++(Pure Virtual Functions)⭐ Pure Virtual Functions(纯虚函数),C++中的纯虚函数的本质上犹如Java和C#中的抽象方法和接口 。
1 2 3 4 5 6 7 8 9 10 11 12 13 14 15 16 17 18 19 20 21 22 23 24 25 26 27 28 29 30 31 32 33 34 35 36 37 38 39 40 41 42 43 44 45 46 47 48 49 50 51 #include <iostream> #include <string> using namespace std;class Printable public :virtual string GetClassName () 0 ; class Entity : public Printablepublic :virtual string GetName () return "Entity" ; }string GetClassName () override { return "Entity" ; }class Player : public Entityprivate :public :Player (const string& name) : m_Name (name) {}string GetName () override { return m_Name; }string GetClassName () override { return "Palyer" ; }void PrintName (Entity* entity) GetName () << endl;void Print (Printable* obj) GetClassName () << endl;int main () new Entity ();new Player ("Cherno" );Print (e);Print (p);get ();
30. Visibility in C++ private, protected, public
私有 成员变量或函数在类的外部是不可访问的,甚至是不可查看的。只有类 和友元函数 可以访问私有成员。
默认情况下,类的所有成员都是私有的。
C++ 类访问修饰符 | 菜鸟教程 (runoob.com)
1 2 3 4 5 6 7 8 9 10 11 12 13 14 15 16 17 18 19 20 21 22 23 24 25 26 27 28 29 30 #include <iostream> #include <string> using namespace std;class Entity private :int X;public :Entity ()0 ; class Player : public Entitypublic :Player ()int main () get ();
protected(受保护) 成员变量或函数与私有成员十分相似,但有一点不同,protected(受保护)成员在派生类(即子类)中是可访问的。
C++ 类访问修饰符 | 菜鸟教程 (runoob.com)
1 2 3 4 5 6 7 8 9 10 11 12 13 14 15 16 17 18 19 20 21 22 23 24 25 26 27 28 29 30 31 32 33 34 #include <iostream> #include <string> using namespace std;class Entity protected :int X;void Print () public :Entity ()0 ; Print (); class Player : public Entitypublic :Player ()10 ; Print (); int main () get ();
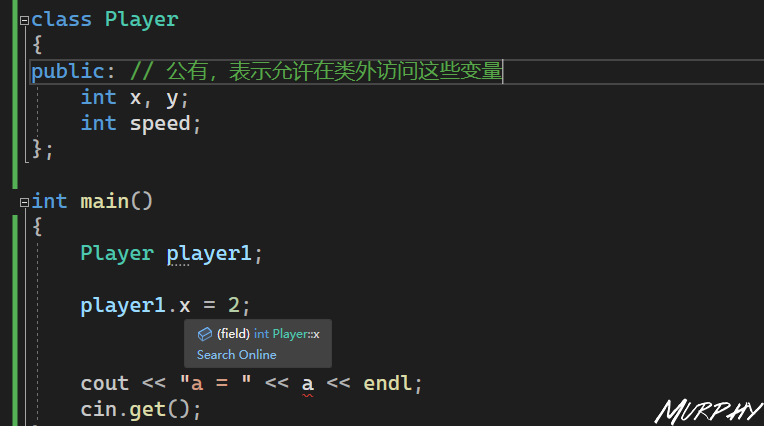
公有 成员在程序中类的外部是可访问的。
C++ 类访问修饰符 | 菜鸟教程 (runoob.com)
1 2 3 4 5 6 7 8 9 10 11 12 13 14 15 16 17 18 19 20 21 22 23 24 25 26 27 28 29 30 31 32 33 34 35 #include <iostream> #include <string> using namespace std;class Entity public :int X;void Print () public :Entity ()0 ; Print (); class Player : public Entitypublic :Player ()10 ; Print (); int main () 10 ; Print (); get ();
31. Arrays in C++ Array and Pointer 1 2 3 4 5 6 7 8 9 10 11 12 int example[5 ];int * ptr = example;2 ] = 10 ;"example[2] =" << example[2 ] << endl;2 ) = 20 ;"example[2] =" << example[2 ] << endl;int *)((char *)ptr + 8 ) = 30 ; "example[2] =" << example[2 ] << endl;+2 中的“2 ”并不是数值2 ,指针+2 的时候会自动根据数据类型来计算实际的字节数。
Stack and Heap
Stack:
和堆一样存储在计算机 RAM 中。
在栈上创建变量的时候会扩展,并且会自动回收。
相比堆而言在栈上分配要快的多。
用数据结构中的栈实现。
存储局部数据,返回地址,用做参数传递。
当用栈过多时可导致栈溢出(无穷次(大量的)的递归调用,或者大量的内存分配)。
在栈上的数据可以直接访问(不是非要使用指针访问)。
如果你在编译之前精确的知道你需要分配数据的大小并且不是太大的时候,可以使用栈。
当你程序启动时决定栈的容量上限。
Heap:
和栈一样存储在计算机RAM。
在堆上的变量必须要手动释放,不存在作用域的问题。数据可用 delete, delete[] 或者 free 来释放。
相比在栈上分配内存要慢。
通过程序按需分配。
大量的分配和释放可造成内存碎片。
在 C++ 中,在堆上创建数的据使用指针访问,用 new 或者 malloc 分配内存。
如果申请的缓冲区过大的话,可能申请失败。
在运行期间你不知道会需要多大的数据或者你需要分配大量的内存的时候,建议你使用堆。
可能造成内存泄露。
什么是堆? 什么是栈? - 知乎 (zhihu.com)
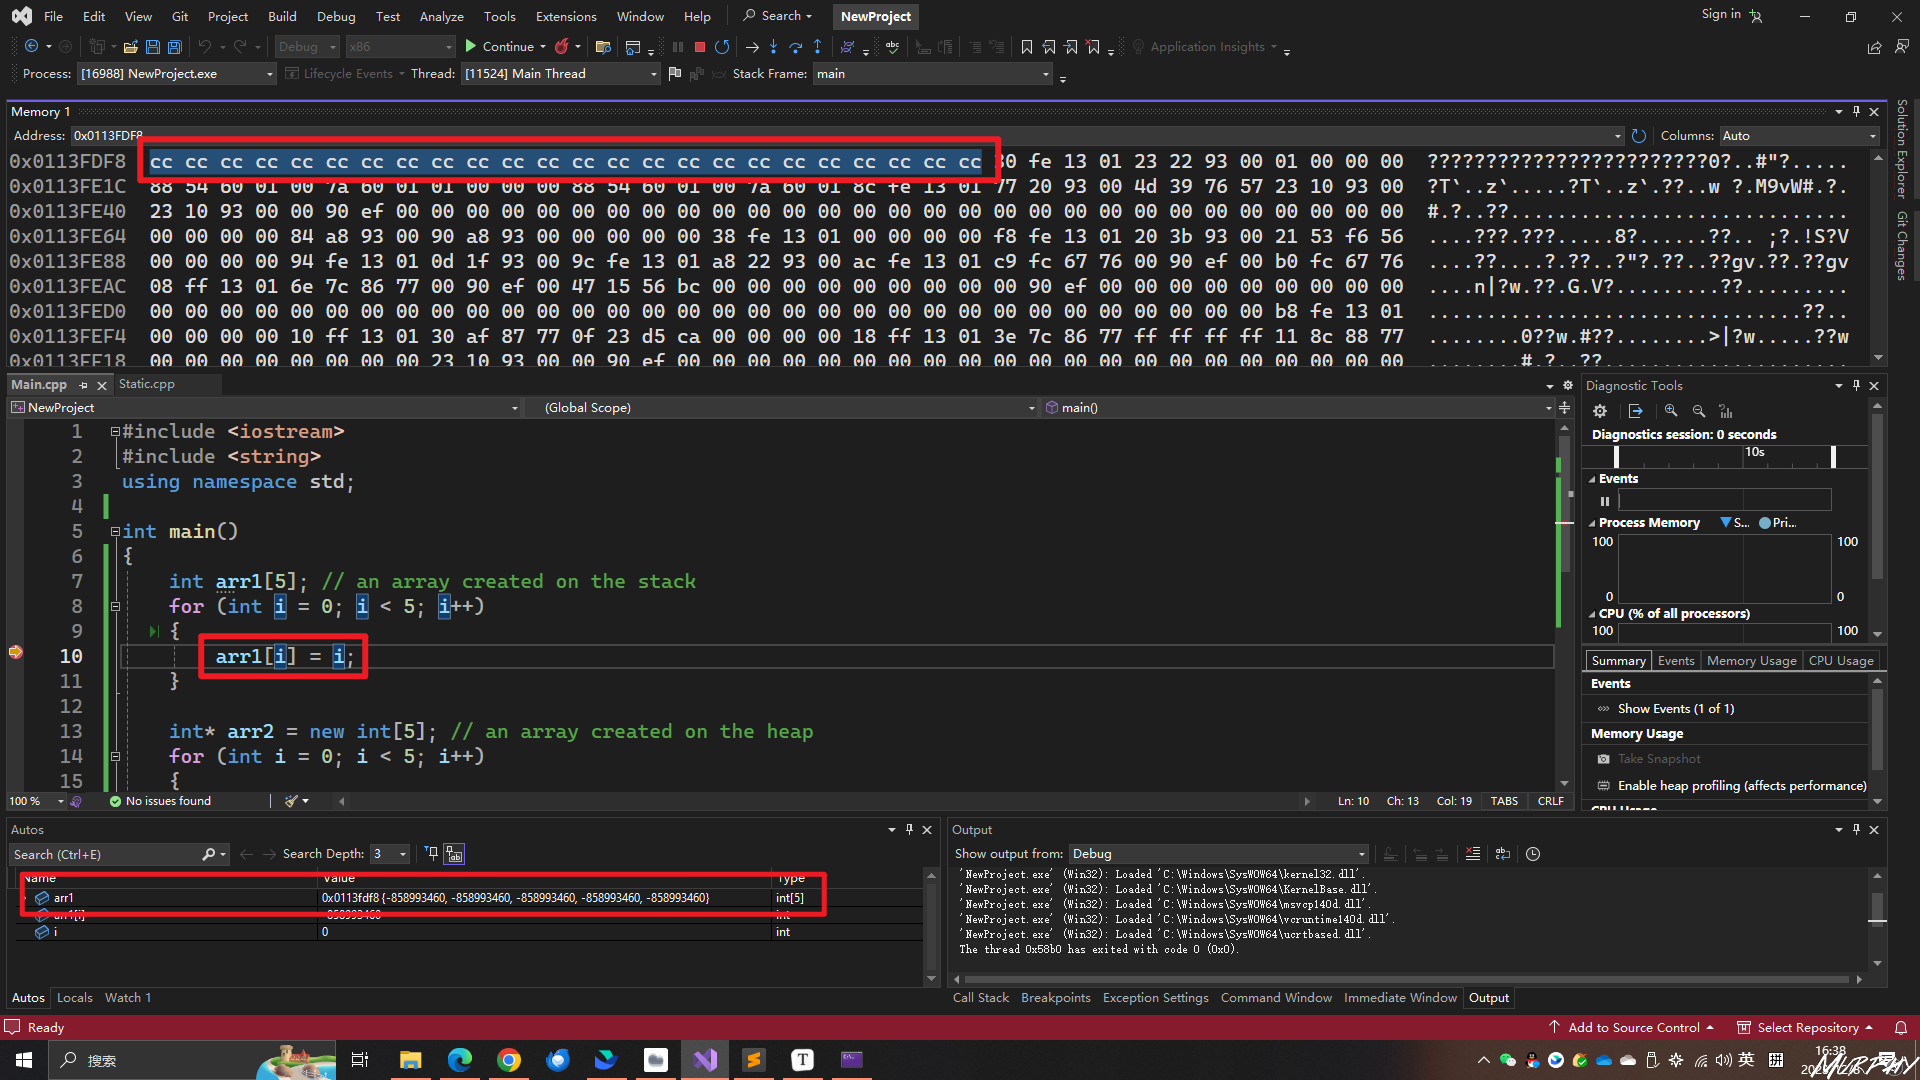
1 2 3 4 5 6 7 8 9 10 11 12 13 14 15 int arr1[5 ]; for (int i = 0 ; i < 5 ; i++)int * arr2 = new int [5 ]; for (int i = 0 ; i < 5 ; i++)delete [] arr2;
这里发现了一个新且有趣的知识点!在stack上定义的变量,自动初始化为“cccc”,而在heap上定义的变量,是自动初始化为“cdcd”,不知道是为什么会这样??
C++11 standard array
size of array
在原生数组中,计算数组的大小使用sizeof()方法,但是这种方法也仅仅适用于定义在stack上的数组;对于定义在heap上的数组,使用sizeof()后,返回值是指针的大小,下面的例子中,返回值是4,即整型类型的指针的大小。
1 2 3 4 5 6 7 8 9 10 11 12 13 14 15 16 17 18 19 20 21 22 class Entity public :int array1[5 ];int * array2 = new int [5 ];Entity ()int count = sizeof (array1) / sizeof (int ); "count of array1 is " << count << endl;sizeof (array2) / sizeof (int ); "count of array2 is " << count << endl;for (int i = 0 ; i < count; i++)
需要注意的是,当定义一个stack上的数组的时候,数组的大小必须是在编译时就需要注意的常量!
1 2 3 4 5 6 7 8 9 10 11 12 13 14 15 int array1Size = 5 ;int array1[array1Size];const int array1Size = 5 ;int array1[array1Size];static const int array1Size = 5 ;int array1[array1Size];
std::array
1 2 3 4 5 6 7 8 9 10 11 12 13 14 15 #include <iostream> #include <array> using namespace std;int main () int , 5> array1;for (int i = 0 ; i < array1. size (); i++)get ();
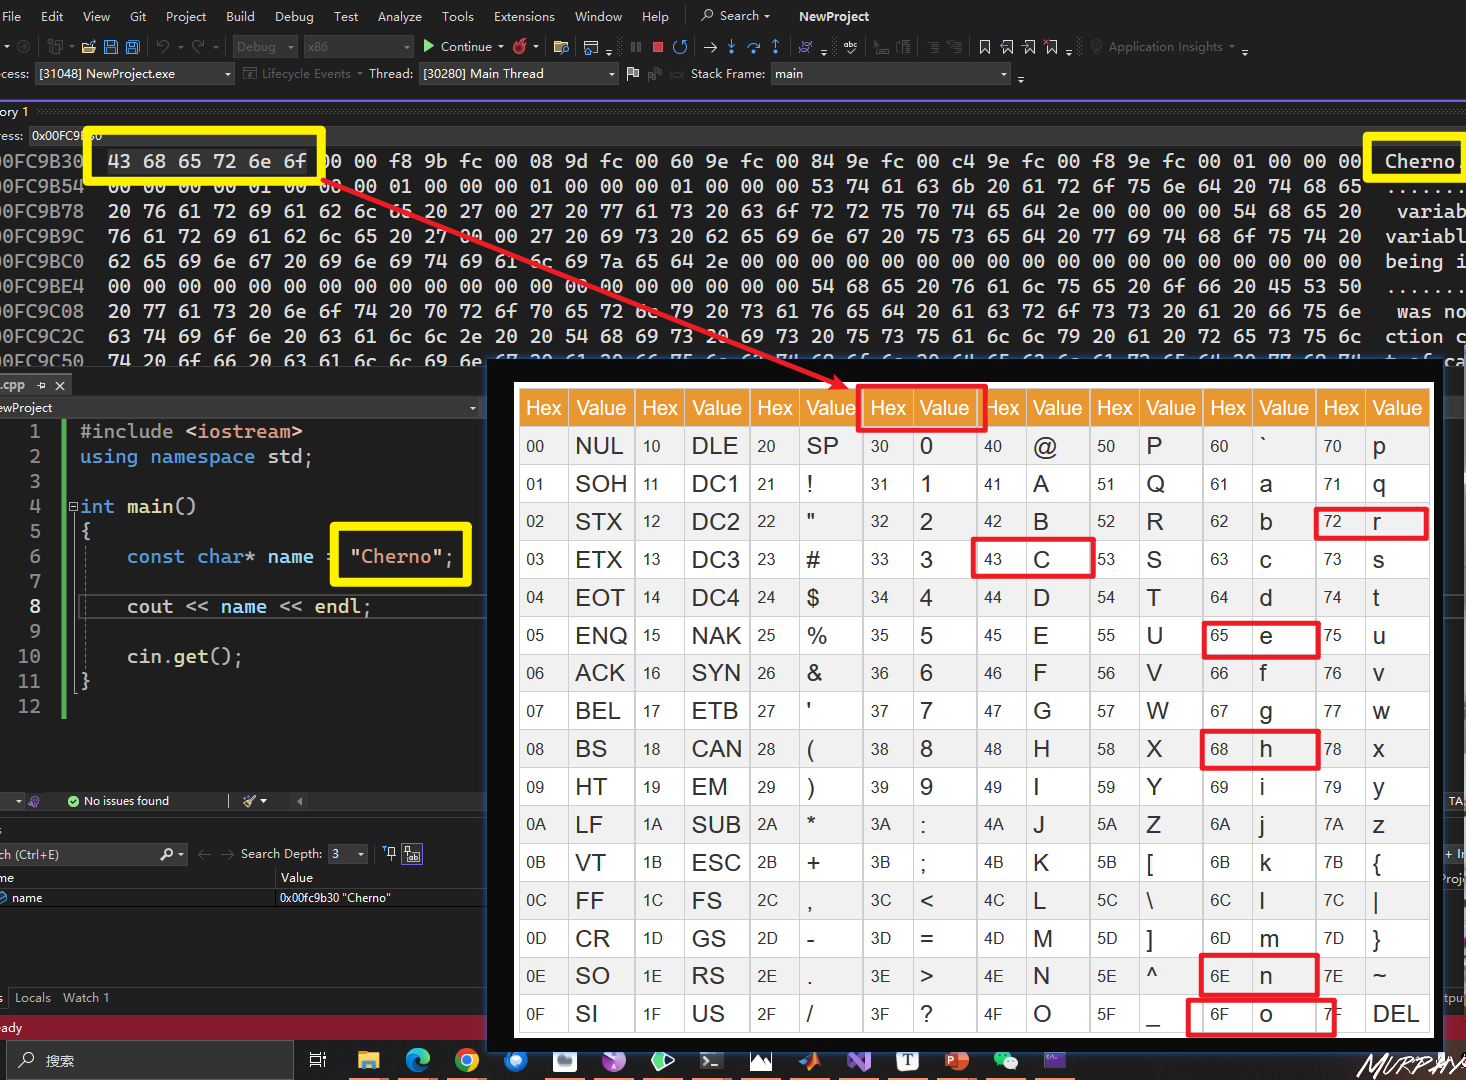
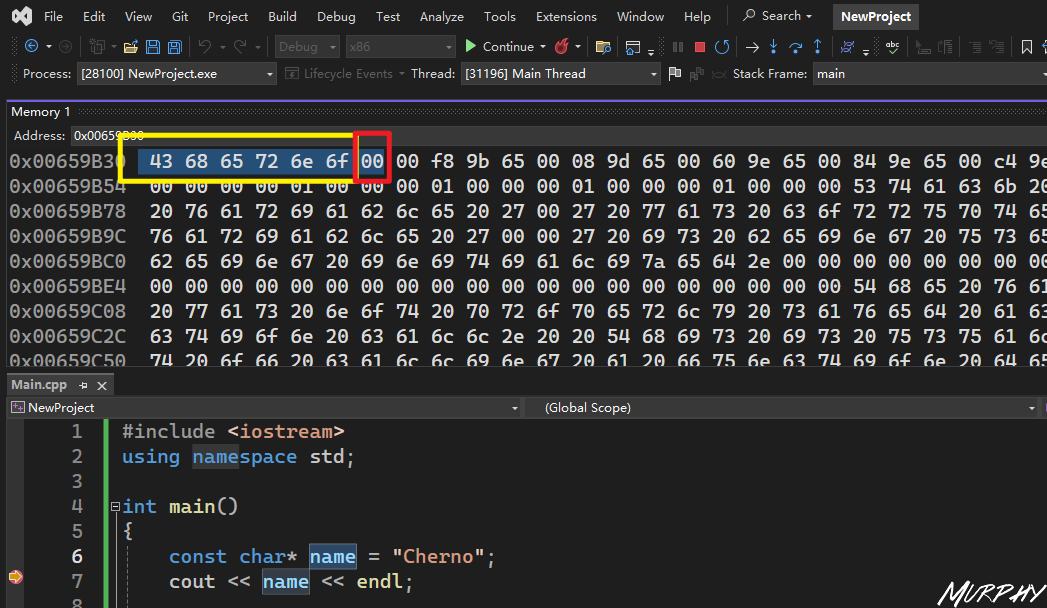
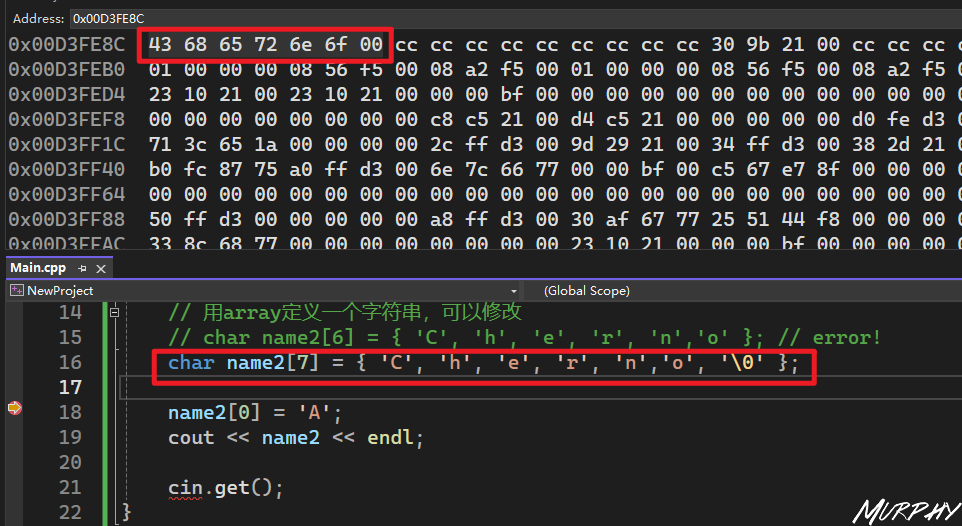
32. How Strings Work in C++ String, Pointer, Array, Memory address String is a group of characters
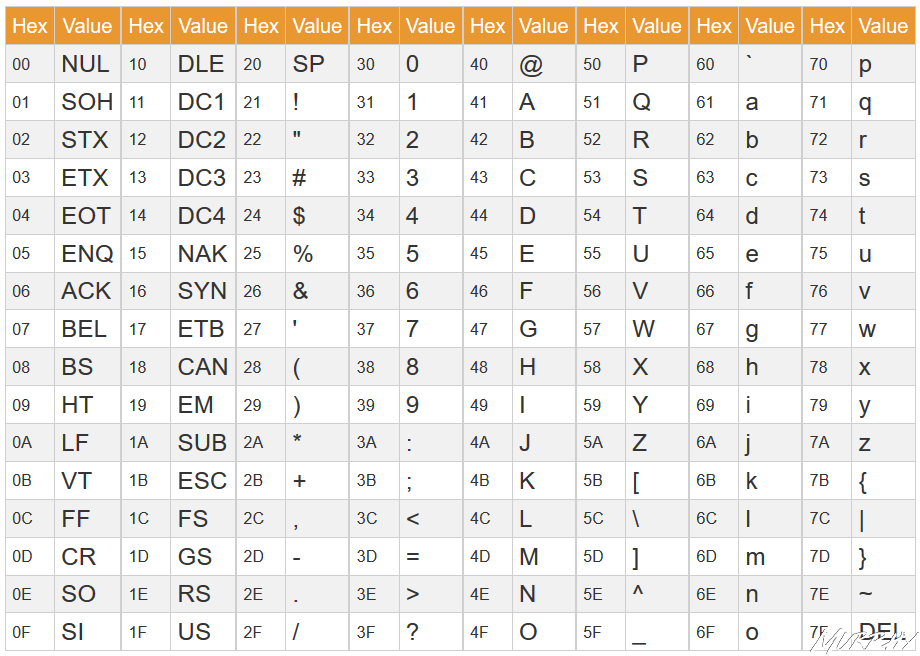
字符串结束的标志”\0“,在内存中存储的就是0。
const char* name = "Cherno";
这声明了一个指向常量字符的指针。这意味着指针name指向的字符串内容是不可修改的。你可以通过name指针读取字符串,但是尝试通过name指针修改字符串的内容将导致编译错误。
1 2 3 4 5 const char * name = "Cherno" ;char firstChar = name[0 ];
char* name = "Cherno";
这声明了一个指向字符的指针,但没有使用const。这意味着指针name指向的字符串内容是可修改的。然而,这在 C++ 中是不安全的,因为字符串常量(像 “Cherno”)通常存储在只读的内存区域,尝试修改它们可能导致未定义的行为。
1 2 3 char * name = "Cherno" ;
总的来说,如果你知道字符串不会被修改,最好使用第一个声明,即带有const的版本,以提高代码的安全性。如果你确实需要修改字符串,最好将字符串复制到一个可修改的内存区域,例如使用char[]数组:
char name[] = "Cherno";
1 2 char name[] = "Cherno" ; 0 ] = 'X' ;
1 2 3 4 5 6 7 8 9 10 11 12 13 14 15 16 17 18 19 20 21 #include <iostream> int main () const char * name = "Cherno" ;char name2[7 ] = { 'C' , 'h' , 'e' , 'r' , 'n' ,'o' , '\0' }; 0 ] = 'A' ;get ();
Standard string (std::string)
字符串定义与字符串函数。使用string定义的字符串变量其本质还是const char* name.
1 2 3 4 5 std::string name = "Cherno" ;size () << std::endl; find ("no" ) << std::endl;
字符串拼接
1 2 3 4 5 6 7 8 9 10 "Cherno1" ;" hello" ;string ("Cherno2" ) + " hello" ;
字符串作为函数参数传递
1 2 3 4 5 6 7 8 9 10 11 12 13 14 15 16 17 #include <iostream> #include <string> void PrintString (std::string onename) " hello" ;int main () "Cherno" ;PrintString (name); get ();
std::string onename是对std::string name = "Cherno"的复制,在PrintString函数中对onename做出的修改,实际上并不会影响原来name的值。
1 2 3 4 5 6 7 8 9 10 11 12 13 14 15 16 17 #include <iostream> #include <string> void PrintString (std::string& onename) " hello" ;int main () "Cherno" ;PrintString (name); get ();
1 2 3 4 5 6 7 8 9 10 11 12 13 14 15 16 17 #include <iostream> #include <string> void PrintString (const std::string& onename) int main () "Cherno" ;PrintString (name); get ();
33. String Literals in C++ 1. 字符串字面量
生成自ChatGPT
字符串字面量(String literals)是在源代码中直接表示字符串值的一种方式。在C++中,字符串字面量通常是由双引号括起来的字符序列。
例如:
1 const char * str = "Hello, World!" ;
上述代码中,"Hello, World!" 就是一个字符串字面量。这个字符串字面量的类型是一个 const char 数组(C++中字符串字面量的类型是一个字符数组),并且它以 null 字符 '\0' 结尾。
字符串字面量可以用于初始化字符数组、字符串指针、以及各种支持字符串操作的标准库类(比如 std::string)。
在C++中,有一些特殊的字符串字面量前缀,用于指定不同的字符集和字符宽度,如前面提到的:
L 前缀表示宽字符(wchar_t)。u 前缀表示UTF-16字符串(char16_t)。U 前缀表示UTF-32字符串(char32_t)。
示例:
1 2 3 const wchar_t * wideStr = L"Wide String" ;const char16_t * utf16Str = u"UTF-16 String" ;const char32_t * utf32Str = U"UTF-32 String" ;
字符串字面量是C++中处理字符串的基本元素之一,而且它们的使用非常普遍。在实际编程中,字符串字面量经常用于初始化字符串,作为函数参数传递,或者用于各种字符串操作。
2. 字符串长度与数组大小
There is a question! 字符串有6个字符,为什么定义中的长度是7呢?
因为要考虑到‘null termination character ’也要占用一个字符长度。
3. const char* name
Cherno在视频中提到了,这两行代码能不能编译取决于所使用的编译器。Cherno用的是VS2017可以编译,但在VS2019不能编译,VS2022中也不能编译,要求必须有const关键字。
4. diffierent ‘char’ 1 2 3 4 5 6 7 const char * name = "Cherno" ;const wchar_t * name2 = L"Cherno" ; const char16_t * name3 = u"Cherno" ; const char32_t * name4 = U"Cherno" ;
解释来自ChatGPT
这是 C++ 中用于定义字符串的一些不同方式,涉及到字符集和字符宽度:
**const char\* name = "Cherno";**(UTF-8)
这是一个普通的 C 字符串(null-terminated string),使用 const char* 类型的指针来指向以 null 结尾的字符序列。这是常见的字符串表示方式,其中字符的宽度是 1 字节。
const wchar_t\* name2 = L"Cherno";
这是使用宽字符集的字符串,L 前缀表示宽字符(wide character)。wchar_t 类型的指针指向以 null 结尾的宽字符序列。宽字符通常是 2 字节,用于支持更广泛的字符集,特别是国际化和多语言环境。
**const char16_t\* name3 = u"Cherno";**(UTF-16)
这是使用 UTF-16 编码的 Unicode 字符串,u 前缀表示 UTF-16 字符。char16_t 类型的指针指向以 null 结尾的 UTF-16 字符序列。每个字符通常占据 2 字节。
**const char32_t\* name4 = U"Cherno";**(UTF-32)
这是使用 UTF-32 编码的 Unicode 字符串,U 前缀表示 UTF-32 字符。char32_t 类型的指针指向以 null 结尾的 UTF-32 字符序列。每个字符通常占据 4 字节。
这些不同的字符串表示方式主要用于处理不同的字符集和字符宽度需求。在选择使用哪种类型的字符串时,需要考虑你的应用程序的特定要求,特别是对字符集的支持和国际化的需求。 C++11 引入了这些新的字符串类型和前缀,以更好地支持 Unicode 字符和不同的字符宽度。
虽然我们一直说 wchar 每个字符都是 2 字节,但实际上是由编译器决定的。(Windows:2 bytes,Linux:4 bytes)。 如果你希望它一直是 2 bytes,你可以用char16_t
5. 在字符串上附加一些东西
string_literals
in C++ 17
R method
1 2 3 4 5 6 7 8 9 10 11 12 13 14 15 16 17 18 19 20 21 22 23 24 25 26 27 28 29 30 31 32 #include <iostream> #include <string> #include <stdlib.h> int main () string ("Line1\n" ) + "Line2\n" + "Line3\n" ;using namespace std::string_literals;"Line1\n" s + "Line2\n" + "Line3\n" ;const char * name3 = R"(Line1 Line2 Line3)" ;const char * name4 = "Line1\n" "Line2\n" "Line3\n" ;get ();
6. the memory of the string literals and how it works 字符串字面量总是存储在只读内存(read-only memory)中
34. CONST in C++⭐
我比较喜欢把const叫做一个”fake keyword”,因为它实际上在生成代码的时候并没有做什么。 它有点像类和结构体的可见性,是一种针对开发人员写代码的强制规则,为了让代码保持整洁的机制。
基本上 const 就是你做出承诺,某些东西是不变的,是不会改动的。但是它只是个承诺,而且你可以绕过或不遵守这个承诺,就像在现实生活中一样。
1 const int MAX_NUMBER = 100 ;
1. const 与 pointer 当使用const处理指针的时候,可以是指针本身,也可以是指针指向的内容,取决于const放在声明处的某处,const是在“星号”的左边还是在“星号”的右边。
const类型限定符(type qualifier)是C++语言设计的一大亮点。我们围绕着这个语言特性使用“const正确性” (const correctness)的实践来防止const对象遭到改变。
1 2 3 4 const int MAX_NUM = 100 ;int * a = new int ;2 ;
问题在于,a 是一个指向动态分配内存的指针,而 &MAX_NUM 是一个指向常量的指针。你不能将一个指向常量的指针赋值给一个非常量指针,因为这违反了 const-correctness 规则。
1 2 3 4 5 6 7 8 9 10 11 12 13 14 #include <iostream> #include <string> int main () const int MAX_NUM = 100 ;int * a = new int ;2 ;int *)&MAX_NUM;get ();
1 2 3 4 5 6 7 8 9 10 11 12 13 14 #include <iostream> #include <string> int main () const int MAX_NUM = 100 ;const int * a = new int ; 2 ; int *)&MAX_NUM;get ();
1 2 3 4 5 6 7 8 9 10 11 12 13 #include <iostream> #include <string> int main () const int MAX_NUM = 100 ;int * const a = new int ;2 ; int *)&MAX_NUM; get ();
1 2 3 4 5 6 7 8 9 10 11 12 13 14 15 16 #include <iostream> #include <string> int main () const int MAX_NUM = 100 ;const int * const a = new int ;2 ; int *)&MAX_NUM; get ();
2. 类与方法中使用const 1 2 3 4 5 6 7 8 9 10 11 12 13 14 15 class Entity private :int m_X, m_Y;public :int GetX () const {return m_X;void SetX (int x) {
1 2 3 4 5 6 7 8 9 10 class Entity private :int * m_X, m_Y;public :const int * const GetX () const {return m_X;
ChatGPT
这段代码定义了一个名为 Entity 的类,其中包含了一个私有的指针成员 m_X 和一个私有的整数成员 m_Y。以下是对这段代码的详细解释:
1 2 3 4 5 6 7 8 9 10 cppCopy codeclass Entityprivate :int * m_X, m_Y;public :const int * const GetX () const {return m_X;
私有成员变量:
int* m_X: 是一个指向整数的指针。这是一个指针,可以指向一个整数值。但请注意,只有指针本身是私有的,而不是指针指向的内容。int m_Y: 是一个整数。这个成员变量是一个普通的整数。
公有成员函数 GetX:
const int*: 表示返回的指针指向的内容是常量,即不能通过这个指针修改对象的值 。
const int* const: 表示返回的指针本身也是常量,即不能通过这个指针修改指针的值 ,即不能使它指向其他内存地址。
const 关键字在函数的末尾表示这是一个常量成员函数,即在函数内不能修改对象的成员变量 。
GetX 函数的作用:
GetX 函数返回一个指向整数的常量指针,指向对象内部的 m_X 成员。
由于返回的指针是常量指针,外部代码不能通过这个指针修改 m_X 指向的内容。
同时,由于返回的指针本身也是常量指针,外部代码不能通过这个指针修改它指向的内存地址,即不能改变 m_X 的指向。
这种设计可以提供一定程度的数据封装和安全性,限制了外部对 m_X 的直接修改。
需要注意一个很有趣的地方!
1 2 3 4 - int* m_X, m_ Y; - 这样写的代表着m_X是int型指针变量,而m_ Y仍然是int型变量- int* m_X, *m_ Y - 而这样写才能使得两个变量都是int型指针变量
35. The Mutable Keyword in C++ mutable means something can be changed.
1. mutable and const 1 2 3 4 5 6 7 8 9 10 11 12 13 14 15 16 17 18 19 20 21 22 #include <iostream> #include <string> class Entity private :mutable int m_DebugCount = 0 ;public :const std::string& GetName () const {return m_Name;int main () const Entity e;GetName ();get ();
2. mutable and lambda 1 2 3 4 5 6 7 8 int x = 8 ;auto f = [=]() mutable f ();
36. Member Initializer Lists in C++ (Constructor Initializer List)⭐
成员初始化列表,在构造函数中初始化类成员(变量)的一种方式
1. 构造函数->初始化成员(变量) 1 2 3 4 5 6 7 8 9 10 11 12 13 14 15 16 17 18 19 20 21 22 23 24 25 26 27 28 29 30 31 32 #include <iostream> #include <string> class Entity private :public :Entity ()"Unknow" ;Entity (const std::string& name)const std::string& GetName () const {return m_Name;int main () const Entity e0;0. GetName () << std::endl;const Entity e1 ("Cherno" ) 1. GetName () << std::endl;get ();
2. 成员初始化列表
确保成员初始化列表时,要与成员变量声明时的的顺序一致 !!
为什么需要成员初始化列表?
因为构造函数的功能往往不仅仅是初始化成员变量,为了使得构造函数看起来简洁易读一些,我们可以把杂乱的初始化成员变量的这一部分以成员初始化列表的形式单独写做一行,这样就简化了构造函数。-> 1. 简化构造函数
简化构造函数
1 2 3 4 5 6 7 8 9 10 11 12 13 14 15 16 17 18 19 20 21 22 23 24 25 26 27 28 29 30 31 32 33 34 35 36 37 38 39 40 #include <iostream> #include <string> class Entity private :int m_Score;public :Entity ()m_Name ("Unknown" ), m_Score (0 )Entity (const std::string& name, const int score)m_Name (name), m_Score (score)const std::string& GetName () const {return m_Name;const int & GetScore () const {return m_Score;int main () const Entity e0;0. GetName () << ", " << e0. GetScore () << std::endl;const Entity e1 ("Cherno" , 10 ) 1. GetName () << ", " << e1. GetScore () << std::endl;get ();
避免构造两次
1 2 3 4 5 6 7 8 9 10 11 12 13 14 15 16 17 18 19 20 21 22 23 24 25 26 27 28 29 30 31 32 33 34 35 36 37 38 39 40 41 42 #include <iostream> #include <string> class Example public :Example ()"Created Example!" << std::endl;Example (int x)"Created Example with " << x << "!" << std::endl;class Entity private :public :Entity ()string ("Unknown" );Example (100 );int main () const Entity e0;get ();
1 2 3 4 5 6 7 8 9 10 11 12 13 14 15 16 17 18 19 20 21 22 23 24 25 26 27 28 29 30 31 32 33 34 35 36 37 #include <iostream> #include <string> class Example public :Example ()"Created Example!" << std::endl;Example (int x)"Created Example with " << x << "!" << std::endl;class Entity private :public :Entity ()m_Name ("Unkonwn" ), m_Example (Example (100 )) int main () const Entity e0;get ();
37. Ternary Operator in C++(Conditional Assignment)
Ternary Operator: 三元运算符-> 问号和冒号(本质上就是if语句的语法糖)
1 2 3 4 5 6 7 8 9 10 11 12 13 14 15 16 17 18 19 20 21 22 23 #include <iostream> #include <string> static int s_Level = 1 ;static int s_Speed = 2 ;int main () if (s_Level > 5 )10 ;else 5 ;5 ? 10 : 5 ;10 ? "Master" : "Beginner" ;5 ? s_Level > 10 ? 15 : 10 : 5 ;get ();
38. How to create/instantiate object C++⭐
C++创建对象
实例化定义的类
1. 在栈上创建对象(stack)
几乎所有时候。如果你可以这样创建对象的话,那就这么来创建,这是基本规则。 因为在 C++中这是初始化对象最快的方式和最受管控的方式。
1 2 3 4 5 6 7 8 9 10 11 12 13 14 15 16 17 18 19 20 21 22 23 24 25 #include <iostream> #include <string> class Entity private :public :Entity () : m_Name ("Unkown" ) {}Entity (const std::string name) : m_Name (name) {}const std::string& GetName () const return m_Name; }int main () GetName () << std::endl;Entity entity1 ("Cherno" ) ;1. GetName () << std::endl;get ();
定义在函数内的对象在函数结束之后,所占用的内存便会被释放
1 2 3 4 5 6 7 8 9 10 11 12 13 14 15 16 17 18 19 20 21 22 23 24 25 26 27 28 29 #include <iostream> #include <string> class Entity private :public :Entity () : m_Name ("Unkown" ) {}Entity (const std::string name) : m_Name (name) {}const std::string& GetName () const return m_Name; }void Function () Entity entity ("Cherno" ) ;int a = 10 ;int main () Function ();get ();
2.
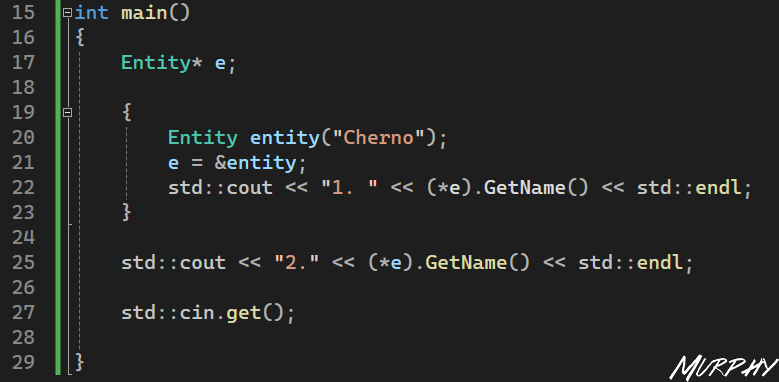
1 2 3 4 5 console输入的内容如下:
叫做Cherno的entity实例的生命周期仅在大括号之内,跳出大括号后,这个叫 Cherno 的 entity 对象已经不存在了,它已经不存在栈结构里了,所以就没有输出了。
另一个我们不想在栈上分配的原因可能是:如果这个 entity 太大了,同时我们可能有很多的 entity,我们就可能没有足够的空间来进行分配,因为栈通常都很小,一般是一两兆,这取决于你的平台和编译器。 因此你可能不得不在heap 上进行分配。
突然想到的一个内容,和本节内容相关
1 2 3 4 5 6 7 8 9 10 11 12 13 14 15 16 17 18 19 int main () Entity entity ("Cherno" ) ;GetName () << std::endl;GetName () << std::endl;GetName () << std::endl;get ();
std::cout << entity.GetName() << std::endl;
直接通过对象 entity 调用 GetName 函数,输出实体的名称。
这种方式是直接访问对象的成员函数,因为 entity 是 Entity 类的一个实例。
std::cout << e->GetName() << std::endl;
通过指针 e 调用 GetName 函数,输出实体的名称。
这种方式使用了指针,e 是一个指向 Entity 对象的指针,通过箭头运算符 -> 访问对象的成员函数。
std::cout << (\*e).GetName() << std::endl;
同样是通过指针 e 调用 GetName 函数,输出实体的名称。
这种方式使用了解引用操作符 *,先解引用指针,然后再访问对象的成员函数。
在这个特定的示例中,这三种方式都会输出相同的结果,即实体的名称。选择使用哪种方式通常取决于代码的上下文和个人偏好。在一般情况下,直接通过对象调用成员函数是最直观和常见的方式。使用指针或引用通常用于处理动态分配的对象或在函数参数中传递对象,但需要小心确保指针有效且指向有效的对象。
2. 在堆上分配(heap) 1 2 3 4 5 6 7 8 9 10 11 12 13 14 15 16 17 18 19 20 21 22 23 24 25 26 27 28 29 30 31 32 33 34 35 #include <iostream> #include <string> class Entity private :public :Entity () : m_Name ("Unkown" ) {}Entity (const std::string name) : m_Name (name) {}const std::string& GetName () const return m_Name; }int main () new Entity ("Cherno" );"1. " << entity->GetName () << std::endl;"2. " << e->GetName () << std::endl;get ();delete e;
Attention: 在使用了new关键字之后,不用的内存要注意使用delete关键字释放掉,防止内存泄漏。
3. 总结 两种创建对象的方法如何选择?
如果要创建的对象很大-> heap
显式地控制对象的生存期 -> heap
其他 -> stack
39. The New keyword in C++
关于连续内存的问题,计算机并不是搜索出来的这个4 bytes的连续内存,而是存在一种叫做空闲列表(free list)的东西,它会维护那些有空闲字节的地址。
new的作用就是要找到一个足够大的内存块,以满足我们的需求。
Entity* e = new Entity(); 在这里它不仅分配了空间,还调用了构造函数。通常,调用new 关键字会调用底层的C函数malloc ,它是用来分配内存的。 malloc()的实际作用是,传入一个size,也就是我们需要多少个字节,然后返回一个void指针
new本身实际上是一个operator(操作符),操作符意味着可以操作符重载 用完new之后记得使用delete
C++中的new和delete对应到C中就是malloc和free
1 2 3 4 5 6 7 8 int * a = new int ;delete a;int * b = new int [50 ];delete [] b;new Entity ();delete e;
placement new
int* b = new int[50];
Entity* e = new(b) Entity();
1 2 3 4 5 6 7 8 9 10 11 12 13 14 15 16 17 18 19 20 21 22 23 24 25 26 27 28 29 30 31 32 33 34 35 36 37 38 39 40 41 42 43 44 45 46 47 40. Implicit Conversion and the Explicit keyword in C++implicit :隐式的implicit *(隐式)的意思是不会明确地告诉你它要做什么,它有点像在某种情况下自动的工作。实际上 C++允许编译器对代码进行一次隐式的转换。1. Implicit Conversioninclude <iostream>include <string>class Entityprivate :int m_Age;public :name )name ), m_Age(-1 ) {}int age)"Uknown" ), m_Age(age) {}int main()"Cherno" );22 );"Cherno" );22 );"Cherno" ); // 隐式类型转换22 ; // 隐式类型转换
2. explicit keyword
如果把explicit关键字放在构造函数之前,这就意味着不能使用隐式构造
1 2 3 4 5 6 7 8 9 10 11 12 13 14 15 16 17 18 19 20 21 22 23 24 25 26 27 28 #include <iostream> #include <string> class Entity private :int m_Age;public :Entity (const std::string& name)m_Name (name), m_Age (-1 ) {}explicit Entity (int age) : m_Name("Uknown" ), m_Age(age) { }int main () Entity a ("Cherno" ) ;Entity b (22 ) ;Entity ("Cherno" );Entity (22 );string ("Cherno" );22 ;get ();
41. Operators and Operator overloading in C++⭐ 1. 运算符 1 2 3 4 5 operator:
2. 运算符重载 + and -
overload 重载这个术语本质就是给运算符重载赋予新的含义,或者添加参数,或者创建 允许在程序中国定义或更改运算符的行为。
不过说到底,运算符就是function ,就是函数。 与其写出函数名add,你只用写一个+这样的运算符就行,在很多情况下这真的有助于让你的代码更干净整洁,可读性更好。
运算符重载的使用应该非常少,而且只是在完全有意义的情况下使用。
没有运算符重载的时候写的程序如下:
1 2 3 4 5 6 7 8 9 10 11 12 13 14 15 16 17 18 19 20 21 22 23 24 25 26 27 28 29 30 #include <iostream> #include <string> struct Vector2 float x, y;Vector2 (float x, float y)x (x), y (y) {}Vector2 Add (const Vector2& other) const {return Vector2 (x + other.x, y + other.y);Vector2 Multiply (const Vector2& other) const {return Vector2 (x * other.x, y * other.y);int main () Vector2 position (4.0f , 4.0f ) ;Vector2 Speed (0.5f , 1.5f ) ;Vector2 Powerup (1.1f , 1.1f ) ;Add (Speed.Multiply (Powerup));get ();
有运算符重载的时候代码如下:
1 2 3 4 5 6 7 8 9 10 11 12 13 14 15 16 17 18 19 20 21 22 23 24 25 26 27 28 29 30 31 32 33 34 35 36 37 38 39 40 41 42 #include <iostream> #include <string> struct Vector2 float x, y;Vector2 (float x, float y)x (x), y (y) {}Vector2 Add (const Vector2& other) const {return Vector2 (x + other.x, y + other.y);operator +(const Vector2& other) const return Add (other);Vector2 Multiply (const Vector2& other) const {return Vector2 (x * other.x, y * other.y);operator *(const Vector2& other) const return Multiply (other);int main () Vector2 position (4.0f , 4.0f ) ;Vector2 Speed (0.5f , 1.5f ) ;Vector2 Powerup (1.1f , 1.1f ) ;Add (Speed.Multiply (Powerup));get ();
3. 运算符重载 << 1 2 3 4 5 6 7 8 9 10 11 12 13 14 15 16 17 18 19 20 21 22 23 24 25 26 27 28 29 30 31 32 33 34 35 36 37 38 39 40 41 42 43 44 45 46 47 48 49 50 #include <iostream> #include <string> struct Vector2 float x, y;Vector2 (float x, float y)x (x), y (y) {}Vector2 Add (const Vector2& other) const {return Vector2 (x + other.x, y + other.y);operator +(const Vector2& other) const return Add (other);Vector2 Multiply (const Vector2& other) const {return Vector2 (x * other.x, y * other.y);operator *(const Vector2& other) const return Multiply (other);operator <<(std::ostream& stream, const Vector2& other)", " << other.y;return stream;int main () Vector2 position (4.0f , 4.0f ) ;Vector2 Speed (0.5f , 1.5f ) ;Vector2 Powerup (1.1f , 1.1f ) ;Add (Speed.Multiply (Powerup));get ();
4. 运算符重载 == and != 1 2 3 4 5 6 7 8 9 10 11 12 13 14 15 16 17 18 19 20 21 22 23 24 25 26 27 28 29 30 31 32 33 34 35 36 37 38 39 40 41 42 43 44 45 46 47 48 49 50 51 52 53 54 55 56 57 58 59 60 61 62 63 64 65 66 67 68 69 70 71 #include <iostream> #include <string> struct Vector2 float x, y;Vector2 (float x, float y)x (x), y (y) {}Vector2 Add (const Vector2& other) const {return Vector2 (x + other.x, y + other.y);operator +(const Vector2& other) const return Add (other);Vector2 Multiply (const Vector2& other) const {return Vector2 (x * other.x, y * other.y);operator *(const Vector2& other) const return Multiply (other);bool operator ==(const Vector2& other) const return x == other.x && y == other.y;bool operator !=(const Vector2& other) const return !(*this == other); operator <<(std::ostream& stream, const Vector2& other)", " << other.y;return stream;int main () Vector2 position (4.0f , 4.0f ) ;Vector2 Speed (0.5f , 1.5f ) ;Vector2 Powerup (1.1f , 1.1f ) ;Add (Speed.Multiply (Powerup));if (result1 == result2)"equality" << std::endl;if (result1 != result2)"not equality" << std::endl;get ();
42. The “this” keyword in C++ ⭐ C++中有这样一个关键字this ,通过它可以访问成员函数。 this是一个指向当前对象实例的指针,该method (方法)属于这个对象实例。
1 2 3 4 5 6 7 8 9 10 11 12 13 14 15 16 17 18 19 20 21 22 23 24 25 26 27 28 29 30 31 32 33 34 35 36 #include <iostream> class Entity ;void PrintEntity (Entity* e) class Entity public :int x, y;Entity (int x, int y)this ->x = x;this ->y = y;PrintEntity (this );int GetX () const {const Entity* e = this ;return this ->x;void PrintEntity (Entity* e) int main () get ();
43. Obeject lifetime in C++ (Stack/Scope lifetimes)⭐
scope: 作用域
1. 基于stack和基于heap的变量在对象生存期上的区别
基于stack的变量在一出作用域,该变量所占用的内存空间便被释放了;
基于heap的变量只要不手动释放内存空间,则该内存空间便不会被释放,知道程序的结束。
1 2 3 4 5 6 7 8 9 10 11 12 13 14 15 16 17 18 19 20 21 22 23 24 25 26 27 28 29 30 31 #include <iostream> #include <string> class Entity public :Entity ()"Created Entity!" << std::endl;Entity ()"Destoryed Entity!" << std::endl;int main () get ();
1 2 3 4 5 6 7 8 9 10 11 12 13 14 15 16 17 18 19 20 21 22 23 24 25 26 27 28 29 30 #include <iostream> #include <string> class Entity public :Entity ()"Created Entity!" << std::endl;Entity ()"Destoryed Entity!" << std::endl;int main () new Entity (); get ();
举个例子
1 2 3 4 5 6 7 8 9 10 11 12 13 14 15 #include <iostream> int * CreatedArray () int array[50 ];return array; int main () int * a = CreatedArray ();get ();
改正方法
1 2 3 4 5 6 7 8 9 10 11 12 13 14 15 #include <iostream> int * CreatedArray () int * array = new int [50 ]; return array; int main () int * a = CreatedArray ();get ();
2. scope pointer 1 2 3 4 5 6 7 8 9 10 11 12 13 14 15 16 17 18 19 20 21 22 23 24 25 26 27 28 29 30 31 32 33 34 35 36 37 38 39 40 41 42 43 44 45 46 47 48 #include <iostream> #include <string> class Entity public :Entity ()"Created Entity!" << std::endl;Entity ()"Destoryed Entity!" << std::endl;class ScopePtr private :public :ScopePtr (Entity* ptr)m_Ptr (ptr) {}ScopePtr ()delete m_Ptr;int main () new Entity ();get ();
44. SMART POINTERS in C++ (std::unique_ptr, std::shared_ptr, std::weak_ptr)
smart pointers使得new-delete的过程自动化
1. unique_ptr—scope pointer 1 2 3 4 5 6 7 8 9 10 11 12 13 14 15 16 17 18 19 20 21 22 23 24 25 26 27 28 29 30 31 32 33 34 35 36 37 38 39 40 41 42 43 44 45 46 47 #include <iostream> #include <string> #include <memory> class Entity public :Entity ()"Created Entity!" << std::endl;Entity ()"Destoryed Entity!" << std::endl;void Print () {"Hello world!" << std::endl;int main () make_unique <Entity>();Print ();get ();
一个更好 的做法是:
1 std::unique_ptr<Entity> entity = std::make_unique <Entity>();
这对于unique_ptr来说很重要,主要原因是出于exception safety (异常安全),如果构造函数碰巧抛出异常,它会稍微安全一些。你不会最终得到一个没有引用的dangling pointer (悬空指针)而造成过内泄漏。
前面提到了unique_ptr不能被复制。如果你去看它的定义,你会发现它的拷贝构造函数和拷贝构造操作符实际上被删除了,这就是为什么你运行如下代码时会编译错误。
2. shared_ptr
shared_ptr使用的是reference counting (引用计数).
举个例子,我刚创建了一个共享指针,又创建了另一个共享指针来复制它,此时我的引用计数是 2。第一个指针失效时,我的引用计数器减少 1,然后最后一个失效时,我的引用计数回到 0,就真的“dead”了,因此内存被释放。
1 2 3 4 5 6 7 8 9 10 11 12 13 14 15 16 17 18 19 20 21 22 23 24 25 26 27 28 29 30 31 32 33 34 35 36 #include <iostream> #include <string> #include <memory> class Entity public :Entity ()"Created Entity!" << std::endl;Entity ()"Destoryed Entity!" << std::endl;void Print () {"Hello world!" << std::endl;int main () make_shared <Entity>();get ();
有了共享指针,你当然可以进行复制。 下图代码中有两个作用域,可以看到里面这个作用域死亡时,这个 sharedEntity 失效了,然而并没有对 Entity 析构并删除,因为 e0 仍然是有效的,并且持有对该 Entity 的引用。再按一下 F10,当所有引用都没了,当所有追踪shared_ptr的栈分配对象都死亡后,底层的 Entity 才会从内存中释放并删除。
3. weak_ptr
1 2 3 4 5 6 7 8 9 10 11 12 13 14 15 16 17 18 19 20 21 22 23 24 25 26 27 28 29 30 31 32 33 34 35 #include <iostream> #include <string> #include <memory> class Entity public :Entity ()"Created Entity!" << std::endl;Entity ()"Destoryed Entity!" << std::endl;void Print () {"Hello world!" << std::endl;int main () make_shared <Entity>();get ();
4. smart pointer and new-delete 这就是很有用的智能指针,但它们绝对没有完全取代new和delete关键字。只是当你要声明一个堆分配的对象而且不希望由自己来清理,这时候你就应该使用智能指针,尽量使用unique_ptr,因为它有较低的开销。但如果你需要在对象之间共享,不能使用unique_ptr的时候,就用shared_ptr
45. Copying and Copy constructors in C++ copy means: copy data and copy memory.
创建一个String类
1 2 3 4 5 6 7 8 9 10 11 12 13 14 15 16 17 18 19 20 21 22 23 24 25 26 27 28 29 30 31 32 33 34 35 36 37 38 39 40 41 42 43 44 45 46 47 #include <iostream> #include <string> class String private :char * m_Buffer; unsigned int m_Size; public :String (const char * string)strlen (string); new char [m_Size + 1 ]; memcpy (m_Buffer, string, m_Size + 1 ); String ()delete [] m_Buffer;friend std::ostream& operator <<(std::ostream& stream, const String& string);operator <<(std::ostream& stream, const String& string)return stream;int main () "Cherno" ;get ();
1. shallow copy 1 2 3 4 5 6 7 8 9 10 11 12 13 14 15 16 17 18 19 20 21 22 23 24 25 26 27 28 29 30 31 32 33 34 35 36 37 38 39 40 #include <iostream> #include <string> class String private :char * m_Buffer;unsigned int m_Size;public :String (const char * string)strlen (string);new char [m_Size + 1 ];memcpy (m_Buffer, string, m_Size + 1 );String ()delete [] m_Buffer;friend std::ostream& operator <<(std::ostream& stream, const String& string);operator <<(std::ostream& stream, const String& string)return stream;int main () "Cherno" ;get ();
现在问题来了,内存中有两个 String,因为它们直接进行了复制,这种复制被称为shallow copy (浅拷贝)。它所做的是复制这个 char,内存中的两个 String 对象有相同的 char 的值,换句话说就是有相同的内存地址。这个 m_Buffer 的内存地址,对于这两个 String 对象来说是相同的,所以程序会崩溃的原因是当我们到达作用域的尽头时,这两个 String 都被销毁了,析构函数会被调用,然后执行delete[] m_Buffer两次,程序试图两次释放同一个内存块。这就是为什么程序会崩溃——因为内存已经释放了,不再是我们的了,我们无法再次释放它。
2. deep copy — copy constructor 1 2 3 4 5 6 7 8 9 10 11 12 13 14 15 16 17 18 19 20 21 22 23 24 25 26 27 28 29 30 31 32 33 34 35 36 37 38 39 40 41 42 43 44 45 46 47 48 49 50 51 52 53 54 55 56 57 58 59 60 #include <iostream> #include <string> class String private :char * m_Buffer;unsigned int m_Size;public :String (const char * string)strlen (string);new char [m_Size + 1 ];memcpy (m_Buffer, string, m_Size + 1 );String ()delete [] m_Buffer;String (const String& other) m_Size (other.m_Size)"Copied String!" << std::endl;new char [m_Size + 1 ];memcpy (m_Buffer, other.m_Buffer, m_Size + 1 );char & operator [](unsigned int index)return m_Buffer[index];friend std::ostream& operator <<(std::ostream& stream, const String& string);operator <<(std::ostream& stream, const String& string)return stream;void PrintString (const String& string) int main () "Cherno" ;2 ] = 'a' ;PrintString (string);PrintString (second);get ();
46. The Arrow Operator in C++ 1. pointer, reference, arrow 1 2 3 4 5 6 7 8 9 10 11 12 13 14 15 16 17 18 19 20 21 22 23 24 25 26 #include <iostream> #include <string> class Entity public :void Print () const "Hello!" << std::endl; }int main () Print ();Print (); Print ();Print ();get ();
2. overloading 箭头作为一种运算符,C++可以重载
1 2 3 4 5 6 7 8 9 10 11 12 13 14 15 16 17 18 19 20 21 22 23 24 25 26 27 28 29 30 31 32 33 34 35 36 37 38 39 40 41 42 43 #include <iostream> #include <string> class Entity public :void Print () const "Hello!" << std::endl; }class ScopedPtr private :public :ScopedPtr (Entity* entity)m_Obj (entity)ScopedPtr ()delete m_Obj;operator ->()return m_Obj;const Entity* operator ->() const return m_Obj;int main () new Entity ();Print ();get ();
3. offset 1 2 3 4 5 6 7 8 9 10 11 12 13 14 15 16 17 18 19 20 21 22 23 24 25 26 27 #include <iostream> #include <string> struct Vector3 float x, y, z;int main () int offsetx = (int )&((Vector3*)nullptr )->x;int offsety = (int )&((Vector3*)nullptr )->y;int offsetz = (int )&((Vector3*)nullptr )->z;get ();
47. Dynamic Arrays in C++
所以C++提供给我们一个叫做Vector的类,这个Vector在std namespace (std命名空间中)。
为什么叫Vector?可以在链接 中了解到背后的故事: 它被称为向量是因为标准模板库的设计者 Alex Stepanov 在寻找一个名称以区分它与内置数组时采用了这个名字。他现在承认这是一个错误,因为数学已经使用术语 “向量” 来表示一组固定长度的数字序列。而 C++11 则进一步加重了这个错误,引入了一个名为 ‘array’ 的类,它的行为类似于数学上的向量。 Alex 给我们的教训是:在给事物命名时要非常小心谨慎。
所以它其实不应该被叫做Vector (向量),而是应该被称为类似ArrayList 动态数组 。它有点像一个集合,一个不强制其实际元素具有唯一性的集合。 换句话说,它基本上就是一个array (数组),不过与C++普通数组类型(原始数组或标准数组类[31 Arrays in C++](https://nagi.fun/Cherno-CPP-Notes/1-50/31 Arrays in C%2B%2B/))不同的是,它可以调整数组大小 ,这意味着当你创建这个vector的时候,这个动态数组的时候,它并没有固定大小 。你可以给它一个固定大小,如果你想用一个特定的大小初始化它。但一般情况下我们不给它设置一个size。 你只需要创建这个Vector然后把元素放进去,每次你往里面放一个元素,数组大小会增长。
原理:当你超过分配的内存大小时,它会在内存中创建一个比第一个大的新数组,把所有东西都复制到这里,然后删除旧的那个,这样你就拥有了更多存储空间的新数组。 (所以可以猜测Alex当时是觉得动态数组可以像向量一样无限延长……)
[47 C++的动态数组(std::vector) - cherno-cpp-notes (nagi.fun)](https://nagi.fun/Cherno-CPP-Notes/1-50/47 Dynamic Arrays in C%2B%2B (std - -vector)/)
1 2 3 4 5 6 7 8 9 10 11 12 13 14 15 16 17 18 19 20 21 22 23 24 25 26 27 28 29 30 31 32 33 34 35 36 37 38 39 40 41 42 43 44 #include <iostream> #include <string> #include <vector> struct Vertex float x, y, z;operator <<(std::ostream& stream, const Vertex& vertex)", " << vertex.y << ", " << vertex.z;return stream;int main () push_back ({ 1 , 2 , 3 });push_back ({ 4 , 5 , 6 });"first" << std::endl;for (int i = 0 ; i < vertices.size (); i++)"second" << std::endl;for (Vertex& v: vertices) "third" << std::endl;erase (vertices.begin () + 1 );for (Vertex& v : vertices)"forth" << std::endl;clear ();get ();
48. Optimizing the usage of std::vector in C++
std::vector class基本上是这样工作的: 你创建一个 vector,然后你开始push_back元素,也就是向数组中添加元素。如果 vector 的容量不够大,不能容纳你想要的新元素。vector 需要分配新的内存,至少足够容纳这些想要加入的新元素和当前已有的内容,从内存中的旧位置复制到内存中的新位置,然后删除旧位置的内存。 所以当我们尝试push_back一个元素的时候,如果容量用完,它就会调整大小,重新进行分配——这就是将代码拖慢的原因之一。事实上,我们需要不断地重新分配,which is a 缓慢的操作,我们需要重新分配当我们要复制所有的现有元素的时候,这是我们要避免的。 事实上,这就是我们现在对于复制的优化策略:我们如何避免复制对象,如果我们处理的是 vector,特别是基于 vector 的对象(我们没有存储 vector 指针,我们存储的是 vector 对象) 。
1 2 3 4 5 6 7 8 9 10 11 12 13 14 15 16 17 18 19 20 21 22 23 24 25 26 27 28 29 30 31 32 33 34 35 36 37 #include <iostream> #include <string> #include <vector> struct Vertex float x, y, z;Vertex (float x, float y, float z)x (x), y (y), z (z) {}Vertex (const Vertex& vertex)x (vertex.x), y (vertex.y), z (vertex.z)"Copied!" << std::endl;int main () push_back (Vertex (1 , 2 , 3 ));push_back (Vertex (4 , 5 , 6 ));push_back (Vertex (7 , 8 , 9 ));get ();
如果我们了解自己的“环境”,就是如果我们知道本身计划要放进 3 个 vertex 对象,为什么不让 vector 一开始就留下足够 3 个元素的内存,这样就不用调整两次大小了。 -> vertices.reserve(3);这就是第二种优化策略。
我们所做的就是将 vertex 从 main 函数复制到 vector 类中,如果我们可以再适当的位置构造那个 vertex,在 vector 实际分配的内存中,这就是优化策略一号。在这种情况下,不是传递我们已经构建的 vertex 对象,而是只是传递了构造函数的参数列表,它告诉我们的 vector:在我们是的 vector 内存中,使用以下参数来构造一个 vertex 对象。
1 2 3 4 5 6 7 8 9 10 11 12 13 14 15 16 17 18 19 20 21 22 23 24 25 26 27 28 29 30 31 32 #include <iostream> #include <string> #include <vector> struct Vertex float x, y, z;Vertex (float x, float y, float z)x (x), y (y), z (z) {}Vertex (const Vertex& vertex)x (vertex.x), y (vertex.y), z (vertex.z)"Copied!" << std::endl;int main () reserve (3 );emplace_back (1 , 2 , 3 );emplace_back (4 , 5 , 6 );emplace_back (7 , 8 , 9 );get ();
49. Using Libraries in C++(Static Linking) An OpenGL library | GLFW
[49 C++中使用库(静态链接) - cherno-cpp-notes (nagi.fun)](https://nagi.fun/Cherno-CPP-Notes/1-50/49 Using Libraries in C%2B%2B (Static Linking)/)
静态链接与动态链接
静态链接
静态链接意味着这个库会被放到你的可执行文件中 (它在你的 exe 文件内部,或者其它操作系统下的可执行文件内)。
动态链接
动态链接库是在运行时被链接的额,所以你仍有一些链接,你可以选择在程序运行时装载动态链接库,有一个叫loadLibrary 的函数,你可以在 WindowsAPI 中使用它作为例子。它会载入你的动态库,可以从中拉出函数然后开始调用。你也可以在应用程序启动时加载你的 dll 文件,这就是你的Dynamic Link Library (动态链接库)。
所以主要的区别就是:库文件是否被编译到 exe 文件中,或链接到 exe 文件中,还是一个在运行时单独的文件,你需要把它放在你的 exe 文件旁边或某个地方,然后你的 exe 文件可以加载它。因为这种依赖性,你需要把 exe 文件和 dll 文件弄在一起。 所以通常喜欢用静态的。静态链接在技术上更快,因为编译器或链接器实际上可以执行链接时优化之类的。静态链接在技术上可以产生更快的应用程序,因为有几种优化方法可以应用,因为我们知道在链接时要链接的函数。而对于动态库,我们不知道会发生什么而必须保持它的完整,当动态链接库被运行时的程序装载时,程序的部分将被补充完整。
所以通常情况下,静态链接是更好的选择 。
静态链接实例 在Visual Studio中,需要对Solution Property进行修改。参考:[49 C++中使用库(静态链接) - cherno-cpp-notes (nagi.fun)](https://nagi.fun/Cherno-CPP-Notes/1-50/49 Using Libraries in C%2B%2B (Static Linking)/)
50. Using Dynamic Libraries in C++ 动态链接发生在runtime (运行时),而静态链接是在编译时发生的。 当你编译一个静态库的时候,将其链接到可执行文件,也就是应用程序,或者链接到一个动态库。就像你取出了那个静态库的内容,然后你把那些内容放入到其它的二进制数据中,实际在你的动态库中或者在你的可执行文件中。
有很多地方可以优化,因为编译器和链接器现在完全知道静态链接时实际进入应用程序的代码(静态链接允许更多的优化发生)。 而动态链接发生在运行时,所以只有你真正启动你的可执行文件时,你的动态链接库才会被加在,所以它实际上不是可执行文件的一部分(运行时将一个额外的文件加载到内存中)。
现在可执行文件在实际运行前就需要具备某些库、某些动态库、某些外部文件,这就是为什么你在Windows上启动一个应用程序时,可能看到一个错误消息弹出:需要dll、没有找到dll……. 这是动态链接的一种形式,可执行文件知道动态链接库的存在,把动态库作为一项需要,虽然动态库仍然是一个单独的文件,一个单独的模块,并在运行时加载。你也可以完全动态地加载动态库,这样可执行文件就与动态库完全没有任何关系了,但是在你的可执行文件中,你可以查找并在运行时加载某些动态库,然后获得某些函数指针或者动态库里你想要的东西,然后使用那个动态库。
对于动态库,请记住两个版本。 第一个是“静态的”动态库的版本,我的应用程序现场需要这个动态链接库,我已经知道里面有什么函数,我可以用什么。 第二个版本是我想任意加载这个动态库,我甚至不需要知道里面有什么,但我想取出一些东西或者做很多事。 这两种动态库都有很好的用途,先专注看第一种:我知道我的应用程序需要这个库,但我要动态地链接它。
如果你要对比静态和动态链接的话,对于函数之类的声明,动态链接时实际有些不同。但GLFW像大多数库一样,同时支持静态和动态链接,使用相同的头文件。
见上节课,.dll和dll.lib同时编译是非常重要的,因为如果你尝试使用不同的静态库,在运行时链接到dll,你可能会得到不匹配的函数和错误类型的内存地址,函数指针不会正常工作。
51. Making and Working with Libraries in C++(Multiple Projects in Visual Studio) [51 C++中创建与使用库 - cherno-cpp-notes (nagi.fun)](https://nagi.fun/Cherno-CPP-Notes/51-100/51 Making and Working with Libraries in C%2B%2B (Multiple Projects in VS)/)
52. How to Deal with Multiple Return Values in C++ [52 C++中如何处理多返回值 - cherno-cpp-notes (nagi.fun)](https://nagi.fun/Cherno-CPP-Notes/51-100/52 How to Deal with Multiple Return Values in C%2B%2B/)
1. 指针和引用 1 2 3 4 5 6 7 8 9 10 11 12 13 14 15 16 17 18 19 20 #include <iostream> #include <string> void returnWithReference (std::string& str, int & num) "Hello" ;42 ;int main () int num;returnWithReference (str, num);", " << num << std::endl;return 0 ;
2. array和vector
Array和vector的区别:array会在栈上创建,而vector会把它的底层存储在堆上,所以从技术上讲返回std::array会更快。
注意:多返回值需要是同类型
1 2 3 4 5 6 7 8 9 10 11 12 13 14 15 16 17 18 19 20 21 22 23 24 25 26 27 28 29 30 31 32 33 34 35 #include <iostream> #include <string> #include <array> #include <vector> std::array<int , 2> returnWithArray () int , 2> result;0 ] = 42 ;1 ] = 56 ;return result;std::vector<int > returnWithVector () int > result;push_back (42 );push_back (56 );return result;int main () int , 2> arrResult = returnWithArray ();0 ] << ", " << arrResult[1 ] << std::endl;int > vecResult = returnWithVector ();0 ] << ", " << vecResult[1 ] << std::endl;return 0 ;
3. tuple和pair
tuple基本上是一个类,它可以包含x个变量,但不关心类型,
1 2 3 4 5 6 7 8 9 10 11 12 13 14 15 16 17 18 19 20 21 22 23 24 #include <iostream> #include <string> #include <tuple> std::tuple<std::string, int > returnWithTuple () return std::make_tuple ("Hello" , 42 );std::pair<std::string, int > returnWithPair () return std::make_pair ("Hello" , 42 );int main () int > tupleResult = returnWithTuple ();get <0 >(tupleResult) << ", " << std::get <1 >(tupleResult) << std::endl;int > pairResult = returnWithPair ();", " << pairResult.second << std::endl;return 0 ;
4. Struct⭐ (Cherno推荐使用的方法) 1 2 3 4 5 6 7 8 9 10 11 12 13 14 15 16 17 18 19 20 21 22 23 24 25 #include <iostream> #include <string> struct Result int num;Result returnWithStruct () "Hello" ;42 ;return result;int main () returnWithStruct ();", " << structResult.num << std::endl;return 0 ;
53. Templates in C++ 1. 函数重载 1 2 3 4 5 6 7 8 9 10 11 12 13 14 15 16 17 18 19 20 21 22 23 24 25 26 #include <iostream> #include <string> void Print (int value) void Print (std::string value) void Print (float value) int main () Print (5 );Print ("Hello" );Print (5.5f );get ();
2. 模板 1 2 3 4 5 6 7 8 9 10 11 12 13 14 15 16 17 #include <iostream> #include <string> template <typename T>void Print (T value) int main () Print (5 );Print ("Hello" );Print (5.5f );get ();
模板只有在它被调用时才会创建,否则它根本就不存在。你甚至在里面有语法错误,只要不调用都不会影响编译。(视频中的VS2017是这样的,但目前VS2022中的错误就算不调用也会影响编译。)
3. 用在类上的模板 1 2 3 4 5 6 7 8 9 10 11 12 13 14 15 16 17 18 19 20 #include <iostream> #include <string> template <typename T, int N>class Array private :public :int GetSize () const return N; }int main () int , 5 > array1;1. GetSize () << std::endl;get ();
4. 哪里用模板?哪里不用 本部分完全是主观的,仅供参考。 很多游戏工作室或软件公司实际上禁止使用模板 ,但模板非常有用,比如在日志系统或者其它的使用场景下,你想记录每一种可能的类型,难道你真的要为每个函数都进行重载吗?你可以用模板自动完成,也就是你可以让编译器基于一些规则为你写代码。 这是说,你可以深入使用模板来做一些很好的事,但如果你的模板变得非常复杂,你开始让它为你生成一个完整的元语言就有点过头了。因为这里有一个平衡点,当模板变得越来越复杂时,没人能搞懂它是做什么的了,你得花大量时间弄清楚哪些代码已经被编译了以及你的模板到底发生了什么而不能工作。这种情况说明你做的过头了。
Cherno 的观点是:手动做一些事,自己写代码实际上会让你和你的团队受益更多,而不是试图创建庞大的模板魔法般地为你做所有事。所以模板不应该被完全禁止,但也不应该滥用。比如游戏引擎的日志系统 和材质系统 肯定会用到模板,当你有一个可以包含各种不同类型的统一缓冲区时,模板在一定程序上是非常有用的。
54. Stack vs Heap Memory in C++ 1. 什么是栈和堆? 应用程序启动后,操作系统要做的就是将整个程序加载到内存,并分配一大堆物理 RAM(随机存取存储器:Random Access Memory )以便我们的实际应用程序可以运行。 栈和堆是 RAM 中实际存在的两个区域: 栈stack 通常是一个预定义大小的内存区域,通常约为 2 兆字节(2MB)左右; 堆heap 也是一个预定义了默认值的区域,但是它可以增长,并随着应用程序的进行而改变。 重要的是要知道这两个内存区域的实际物理位置都是在 RAM 中,很多人倾向于认为栈存储在 CPU 缓存中或类似的位置,它确实因为我们不停访问而在缓存中活跃,但不是所有的栈内存都会存储在这里,这并不是它的工作方式。只要记住这两个内存区域的实际位置都在我们的内存中,这就是为什么内存中有两个不同区域的原因。
2. 栈与堆的内存分配 我们的程序中,内存是用来存储运行程序所需的数据的,不管是从局部变量还是从文件中读取的东西。而栈和堆就是我们可以存储数据的地方。 它们的工作原理非常不同,但本质上做的事情是一样的:我们可以要求 C++从栈或者堆中给我们一些内存,顺利的话它会给我们一个要求大小的内存块。而不同之处在于,它会如何分配内存 。
1 2 3 4 5 6 7 8 9 10 11 12 13 14 15 16 17 18 19 20 21 22 23 24 25 26 27 28 29 30 31 32 33 34 35 36 #include <iostream> #include <string> struct Vector3 float x, y, z;Vector3 ()x (10.0f ), y (11.0f ), z (12.0f ) {}int main () int value = 5 ;int array[5 ];for (int i = 0 ; i < 5 ; i++)int * hvalue = new int ;5 ;int * harray = new int [5 ];for (int i = 0 ; i < 5 ; i++)new Vector3 ();delete hvalue;delete [] harray;delete hvector;get ();
栈分配 因为 debug 模式下在变量周围添加了safety guards ,以确保我们不会溢出所有变量,在错误的内存中访问它们等问题。所以在内存中这些变量的存储位置都很接近 ,因为实际发生的是:当我们在栈中分配变量时,栈顶部的指针就移动这个变量大小的字节。分配一个 4 个字节的整数,栈顶指针就移动 4 个字节。内存实际上是像栈一样相互叠加存储的,现在在大多数栈的实现中,栈是倒着来的。 这就是为什么你看图中会发现:第一个 int value 存储在更高的内存地址,后续的 array 和 vector 在旁边存储在较低的内存地址,因为它是反向生长的。
栈的做法就是把东西叠在一起,这就是为什么stack allocation (栈分配)非常快,它就像一条 CPU 指令,我们所做的就是移动栈指针,然后返回栈指针的地址。我如果要分配一个整数,我要反向移动栈指针 4 个字节,然后返回那个内存地址,因为这是 4 个字节块的开始。
栈中分配内存时,一旦这个作用域结束,你在栈中分配的所有内存都会被弹出,内存被释放。
堆分配 堆分配的内存不会紧挨着,在堆中分配new后要调用delete关键字来释放内存,用[智能指针](https://nagi.fun/Cherno-CPP-Notes/51-100/54 Stack vs Heap Memory in C%2B%2B/44 SMART POINTERS in C++.md)的make也一样会帮你调用关键字,所以我们需要手动去释放内存。
3. new关键字实际上做了什么? new关键字实际上调用了一个叫做malloc的函数(memory allocate)的缩写,这样做通常会调用底层操作系统或平台的特定函数,这将在堆上为你分配内存。当你启动应用时,你会被分配到一定数量的物理 RAM,而你的程序会维护一个叫free list (空闲列表)的东西,它的作用是跟踪哪些内存块是空闲的并储存它们的位置。当你使用malloc请求堆内存时,它可以浏览空闲列表,找到一块符合大小要求的内存块,然后返回你一个它的指针,并记录分配的大小和它现在是否被分配的情况(这样你就不能使用这块内存了)。
这里想说的重点是,在堆上分配内存是一大坨事情,而在栈上分配内存就像一条 CPU 指令。这两种主要内存的区别就是分配方式的区别,可以从汇编指令中看到,声明变量时栈分配的指令就一两行,而堆分配就是一大段指令了,之后还要调用delete,这又是大段指令。
所以事实上,如果可能的话你应该尽量在栈上分配内存 。在堆上分配的唯一原因是如果你不能在栈上分配,比如你需要让它的声明周期比你在处理的作用域更长,或者你特别需要更多的数据,比如我想加载一个 50MB 的纹理材质,这就不适合在栈上分配,因此你不得不在堆上分配。
性能的不同是因为分配方式,所以理论上如果你在运行你的程序前在堆上预先分配一个内存块,然后从这个预先分配的内存块中进行堆分配,那栈、堆分配就基本一样了,你唯一可能要处理的就是cpu cache miss 的问题(缓存不命中),但 miss 的数量可能不够造成麻烦。所以当你调用new时,你需要检查 free list,请求内存再记录所有内容,这就是堆相比于栈慢的地方,而实际的访问(CPU、缓存)通常可以忽略不计
55. Macros in C++
带有#的为preprocessor statement ,即预处理指令。 该类指令发生在真正的编译之前,当编译器收到一个源文件时,做的第一件事情就是预处理所有预处理指令。
预处理阶段基本上是一个文本编辑阶段,在这个阶段我们可以控制给编译器什么代码,这就是macro (宏)的用武之地了。 我们能做的就是写一些宏,它将代码中的文本替换为其它东西,这基本就像遍历我们的代码然后执行查找和替换。 (所以模板会比宏评估得更晚一些)
你使用宏的方式取决于你的个人爱好,如果你用了很多宏,代码可能会比较难理解。不要用太多的 C++特性,尤其是当我们进入更高级的特性时,你不需要向所有人炫耀你知道所有的 C++特性,用更多的特性也不是写好代码的方式。
1 2 3 4 5 6 7 8 #include <iostream> #define WAIT std::cin.get() int main ()
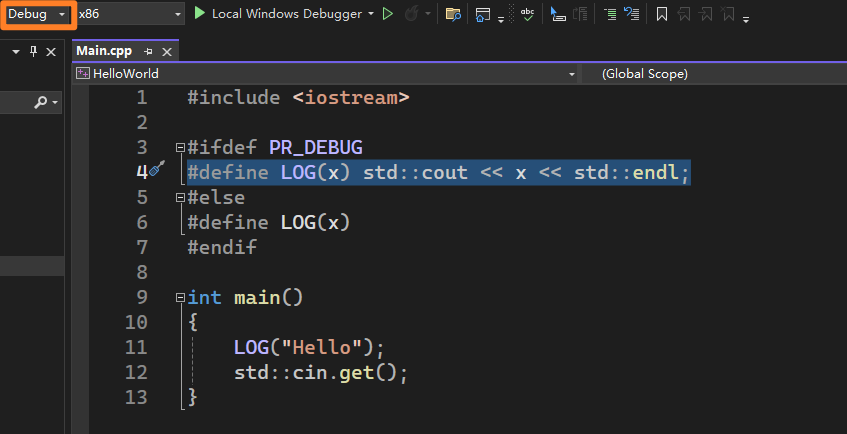
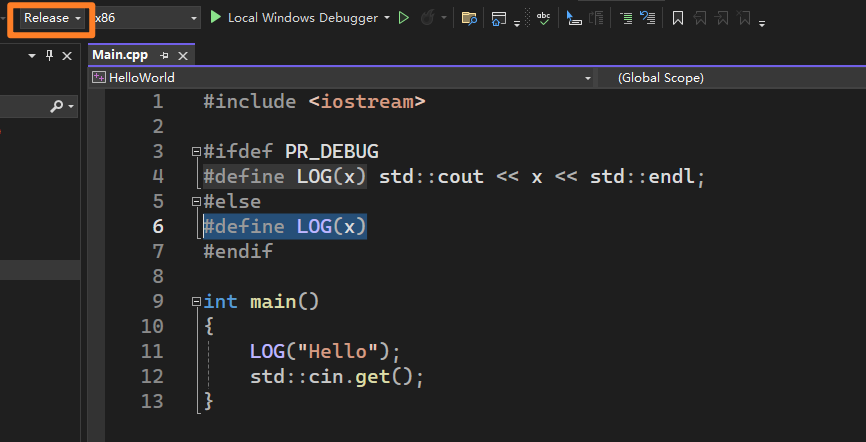
1 2 3 4 5 6 7 8 9 #include <iostream> #define LOG(x) std::cout << x << std::endl int main () LOG ("Hello" );get ();
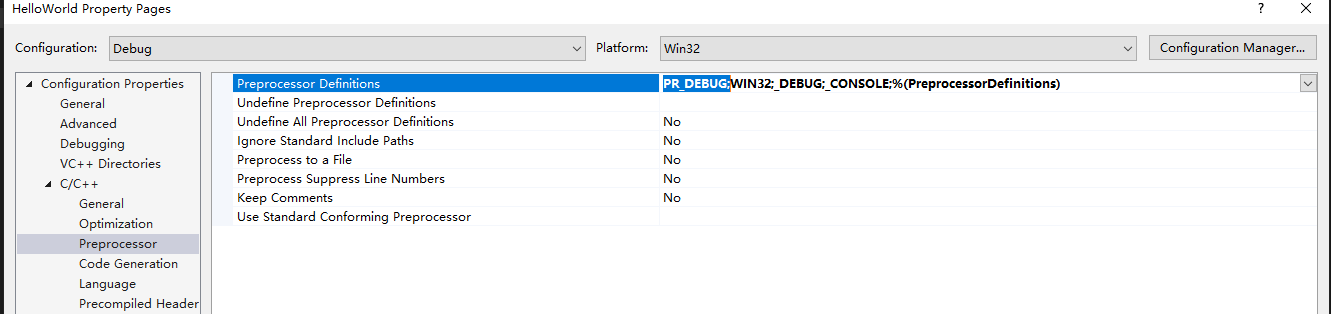
1. 使用宏区分Debug和Release
2. 多行宏定义 1 2 3 4 5 6 7 8 9 #include <iostream> #define MAIN int mian()\ {\ std::cout << "hello" << std::endl;\ std::cin.get();\ }
56. The AUTO keyword in C++ 有一种方法可以让 C++自动推导出数据的类型,不管是在创建、初始化变量数据时,还是在将一个变量对另一个变量进行赋值时。
1 2 3 4 5 6 7 8 9 10 11 12 int a = 5 ;auto b = a;"Cherno" ;auto name2 = name1;std::string GetName () return "Cherno" ;auto name = GetName ();
这样如果api 发生改变时,比如 GetName 的返回类型改为了char*,客户端不需要任何改动。但是坏处是我也不知道 api 已经改变了,它可能会破坏依赖于特定类型的代码。
什么时候适合用 auto?
1 2 3 4 5 6 7 8 9 10 11 12 13 14 15 16 17 18 19 #include <iostream> #include <string> #include <vector> int main () push_back ("Apple" );push_back ("Orange" );for (auto it = strings.begin (); it != strings.end (); it++) get ();
1 2 3 4 5 6 7 8 9 10 11 12 13 14 15 16 17 18 19 20 21 22 23 24 25 26 27 28 29 30 31 32 33 34 #include <iostream> #include <string> #include <vector> #include <unordered_map> class Device {};class DeviceManager private :public :const std::unordered_map<std::string, std::vector<Device*>>& GetDevice () const return m_Devices;int main () using DeviceMap = std::unordered_map<std::string, std::vector<Device*>>;typedef std::unordered_map<std::string, std::vector<Device*>> DeviceMap;const DeviceMap& devices = dm.GetDevice ();const auto & devices = dm.GetDevice ();get ();
57. Static Array in C++(std::array) 1. 静态数组 1 2 3 4 5 6 7 8 9 10 11 12 13 14 15 16 17 18 19 20 21 22 23 24 25 26 #include <iostream> #include <array> template <int T>void PrintArray (std::array<int , T>& array) for (int i = 0 ; i < T; i++)int main () int , 5> data;for (std::array<int , data.size ()>::iterator it = data.begin (); it != data.end (); it++)0 ;PrintArray (data);get ();
2. 静态数组和普通数组异同 std::array和普通数组在内存上形式是一样的,都在栈上分配,不像std::vector类是在堆上分配的。
但是std::array有边界检查(仅在 Debug 模式下),在最优化的情况下和普通数组性能是一样的。
std::array实际上不存储自己的 size,size 是你给它的一个模板参数,这意味着调用 size function 直接返回 5 而不是返回一个存储在内存中的 size 变量
可以看到边界检查是在一个宏中的,这意味着只有在那个调试级别才会发生,如果等级为 0 则返回跟 C 语言数组工作方式一样的。
你应该开始选择使用std::array而不是 C 语言风格数组,因为它增加了一层调试(在你期望对代码保护时),而且也没有性能成本,还可以让你记录数组的大小。
58. Function Pointers in C++ 把函数传给变量;将函数作为参数传递给其他函数
1 2 3 4 5 6 7 8 9 10 11 12 13 14 15 16 #include <iostream> void HelloWorld () "Hello world" << std::endl;int main () auto fun1 = HelloWorld;fun1 ();void (*fun2)() = HelloWorld;fun2 ();get ();
1 2 3 4 5 6 7 8 9 10 11 12 13 14 15 16 17 18 19 20 #include <iostream> #include <vector> void PrintValue (int value) "Value: " << value << std::endl;void ForEach (const std::vector<int >& values, void (*func)(int )) for (int value : values)func (value);int main () int > values = { 1 , 5 , 4 , 2 ,3 };ForEach (values, PrintValue); get ();
1 2 3 4 5 6 7 8 9 10 11 12 13 14 15 #include <iostream> #include <vector> void ForEach (const std::vector<int >& values, void (*func)(int )) for (int value : values)func (value);int main () int > values = { 1 , 5 , 4 , 2 ,3 };ForEach (values, [](int value) {std::cout << "Value: " << value << std::endl; }); get ();
这里的[]叫做capture method (捕获方式),也就是如何传入传出参数,后面会介绍更多。
59. lambda in C++ lambda 本质上是我们定义一种叫做匿名函数的方式,用这种方法不需要实际创建一个函数,就像是一个快速的一次性函数,我们更想将它视作一个变量而不是像一个正式的函数那样,在我们编译的代码中作为一个符号存在。
只要你有一个函数指针 ,你都可以在C++中使用lambda,这就是它的工作原理,所以lambda是我们不需要通过函数定义就可以定义一个函数的方法。 lambda的用法是,在我们会设置函数指针指向函数的任何地方,我们都可以将它设置为lambda。
lambda是一个指定一个函数未来想要运行的代码的很好的方法。
1. capture 如果我们想把外部变量放到lambda函数内部的指令中呢? 和我们创建自己的函数其实一样,都是有两个方法:值传递和引用传递 ,这也就是捕获这一块的东西,[]就是我们打算如何传递变量。([=],传递所有变量,通过值传递;[&]传递所有变量,通过引用传递) 还可以只传入单独的变量,[a]通过值传递传入a,[&a]通过引用传递。
1 2 3 4 5 6 7 8 9 10 11 12 13 14 15 16 17 18 19 20 21 22 23 24 25 #include <iostream> #include <vector> #include <functional> #include <algorithm> void ForEach (std::vector<int >& values, const std::function<void (int )>& func) for (int value : values)func (value);int main () int > values = { 1 ,7 ,3 ,5 ,4 };auto it = std::find_if (values.begin (), values.end (), [](int value) {return value > 2 ; });int a = 5 ;auto lambda = [=](int value) {std::cout << "Value: " << value << std::endl; };ForEach (values, lambda);get ();
60. Why I don’t use “using namespace std” 1. 什么是 using namespace? 就像上文中的代码用了很多标准库的内容,如果在代码前面加上
就可以直接写 vector,find_if 了,看上去代码更干净一点。 还可以把它限制在作用域中,比如写到 main 函数的第一行,这样 main 函数中调用标准库就不用写”std::“了。
所以using namespace可以非常有用,如果你在处理很长的命名空间,或是你有自己的命名空间,自己的项目文件中的符号都在这个命名空间中,你可以使用这个。
但是我个人 不喜欢using namespace std
2. 为什么不喜欢 第一眼看上去代码是干净了,但是如果看原始代码,可以发现你很容易就能指出代码中使用的是 C++标准模板库(带有 std 前缀的)。如果用了using namespace std,就相对而言有点难分辨了。如果你也用标准库喜欢用的snake case (蛇形命名法,如 find_if),就很难区分到底是不是 std 中的。
1 2 3 4 5 6 7 8 9 10 11 12 13 14 15 16 17 18 19 20 21 22 23 24 25 26 27 28 29 30 31 32 #include <iostream> #include <string> namespace apple {void print (const std::string& text) {namespace orange {void print (const char * text) {reverse (temp.begin (), temp.end ());using namespace apple;using namespace orange;int main () print ("Hello" );get ();
这并不是 orange 在 apple 后导致的,而是因为其它原因。“Hello”其实是一个 const char[]数组,而不是一个 string,如果只有 apple 命名空间,会在 apple::print()中做一个[隐式转换](https://nagi.fun/Cherno-CPP-Notes/51-100/60 Why I don’t using namespace std/40 Implicit Conversion and the Explicit Keyword in C++.md#^cde452),将 const char 数组转换为 string 对象。但是引入 orange 命名空间后,orange::print()匹配度更高,因为它的参数本来就是一个 const char*,不需要隐式转换。
如果我们不用using namespace,而是简单地引入另一个库apple::print()就不会有这样的运行时错误。
另一个要百分百避免的就是在头文件中使用 using namespace ,永远不要这样做,把这些命名空间用在了你原本没有打算用的地方,谁知道它会 include 什么呢?任何大型项目中追踪起来都是很困难的,所以绝对不要在头文件中使用 using namespace!
61. Namespaces in C++ [61 C++的名称空间 - cherno-cpp-notes (nagi.fun)](https://nagi.fun/Cherno-CPP-Notes/51-100/61 Namespaces in C%2B%2B/)
62. Threads in C++ 本节课讲的是threads (线程),也就是讲我们如何进行parallelization (并行化)。现在大多数计算机或处理器等设备都有不止一个逻辑处理线程,当我们进入更复杂的项目时,将某些工作移动到两个不同的执行线程会对我们非常有益。不仅仅是为了提高性能,也是我们还能用它做些什么事。
1 2 3 4 5 6 7 8 9 10 11 12 13 14 15 16 17 18 19 20 21 22 23 24 25 26 27 28 29 30 31 32 #include <iostream> #include <string> #include <thread> static bool s_Finished = false ;void DoWork () using namespace std::literals::chrono_literals;"Started thread id = " << std::this_thread::get_id () << std::endl;while (!s_Finished)"Working...\n" ;sleep_for (1 s);int main () std::thread worker (DoWork) ;get ();true ;join ();"Finished." << std::endl;"Started thread id = " << std::this_thread::get_id () << std::endl;get ();
这就是一个简单的 C++多线程例子。代码的主要工作流程如下:
全局的s_Finish标记声明为static,以限制其在当前源文件中的作用范围。
DoWork函数是一个线程例程。它进入一个无限循环,每秒打印一次”Working…”,直到s_Finish标志被设置为true。在main函数中,创建了一个名为worker的新线程。DoWork函数被作为参数传递给线程的构造函数,表示应在新创建的线程中运行此函数。
std::cin.get();语句是一个阻塞调用,它等待用户按回车键。一旦按下回车键,s_Finish标志被设置为true,这导致DoWork函数跳出其循环并返回。
worker.join();语句用于等待线程完成其执行,然后程序才能继续。确保线程在主线程(在这种情况下,是程序)结束之前完成执行是至关重要的。如果程序在worker线程仍在运行时结束,那么它将被突然终止,这可能导致各种问题,如资源未被正确释放。
线程很重要,它们对于加速程序非常有用,主要目的是优化,还可以做例如上面例子中这些事情。
63. Timing in C++ 我们如何计算完成某个操作或者执行某个代码所需要的时间呢?
计时对很多事情都很有用,不论你是希望某些事情在特定时间发生,还是只是评估性能或做基准测试,看你的代码运行得有多快,你需要知道应用程序实际运行的时间。
有几种方法可以实现这一点,C++11 之后我们有了“chrono”,它是 C++库的一部分,不需要去使用操作系统库。但在有 chrono 之前,如果你想要高分辨率的时间,你想要一个非常精确的计时器,那你就需要用到操作系统库了。例如在 Windows 中有一个叫做“QueryPerformanceCounter”的东西,我们仍然可以使用那些东西。事实上如果你想要更多地控制即使,控制 CPU 的计时能力,那么你可能会使用平台特定的库。不过本节只会看一看和平台无关的 C++标准库方法(chrono 库的一部分),它可以计算出执行代码时,代码之间经过了多长时间。
1. 计时1s 1 2 3 4 5 6 7 8 9 10 11 12 13 14 15 16 17 #include <iostream> #include <chrono> #include <thread> int main () using namespace std::literals::chrono_literals;auto start = std::chrono::high_resolution_clock::now ();sleep_for (1 s);auto end = std::chrono::high_resolution_clock::now ();float > duration = end - start;count () << "s " << std::endl;get ();
chrono 库非常好,可以高精度计时,几乎适用于所有平台,所以非常建议使用这个方法来满足你所有的计时需求,除非你在做一些特定的底层的事情。
2. 计算时间 1 2 3 4 5 6 7 8 9 10 11 12 13 14 15 16 17 18 19 20 21 22 23 24 25 26 27 28 29 30 31 32 33 34 35 36 37 38 39 40 #include <iostream> #include <chrono> #include <thread> struct Timer float > duration;Timer ()now ();Timer ()now ();float ms = duration.count () * 1000.0f ;"Timer took " << ms << "ms" << std::endl;void Function () for (int i = 0 ; i < 100 ; i++)"Hello\n" ; int main () Function ();get ();
64. Multidimensional Arrays in C++(2D arrays) 从二维数组开始作为一个例子,实际上它只是数组的数组 (三维数组就是数组的数组的数组…..),就是数组的集合。 我们考虑处理数组的一种策略就是使用指针 ,我们有一个指针,指向数组在内存中的开头位置。可以想象一下有一个指针的数组,最终你会得到一个内存块,里面包含的是连续的指针,每个指针都指向内存中的某个数组,所以得到的是指向数组的指针的集合,也就是数组的数组。
1 2 3 4 5 6 7 8 9 10 11 12 13 14 15 16 17 18 19 20 21 22 23 24 25 26 27 28 29 30 31 32 33 #include <iostream> int main () int * array = new int [50 ];delete [] array;int ** a2d = new int * [50 ];for (int i = 0 ; i < 50 ; i++)new int [10 ];for (int i = 0 ; i < 50 ; i++)delete [] a2d[i];delete [] a2d;int *** a3d = new int ** [50 ];for (int i = 0 ; i < 50 ; i++)new int * [10 ];for (int j = 0 ; j < 10 ; j++)new int [3 ];get ();
这里只是分配了一个可以存储200字节指针的内存块,并没有初始化。 然后我们可以遍历并设置每个指针指向一个数组,这样就能得到一个包含50个数组的内存位置的数组
65. Sorting in C++ 1 2 3 4 5 6 7 8 9 10 11 12 13 14 15 16 17 18 19 20 21 22 23 24 25 26 27 28 29 30 31 32 33 34 35 36 37 38 39 40 #include <iostream> #include <vector> #include <algorithm> #include <functional> int main () int > values = { 3 ,5 ,1 ,4 ,2 };"first" << std::endl;sort (values.begin (), values.end ());for (int value : values)"second" << std::endl;sort (values.begin (), values.end (), std::greater <int >());for (int value : values)"third" << std::endl;sort (values.begin (), values.end (), [](int a, int b)return a > b;for (int value : values)"forth" << std::endl;sort (values.begin (), values.end (), [](int a, int b)if (a == 1 ) { return false ; }if (b == 1 ) { return false ; }return a < b;for (int value : values)get ();
66. Type Punning in C++ Type punning (类型双关)只是一个花哨的术语,用来在 C++中绕过类型系统 。C++是强类型语言 ,也就是说它有一个类型系统,不像 JavaScript 那样创建变量不需要声明变量类型,但 C++中你创建变量时必须声明整数、双精度数、结构体等等类型。然而这种类型系统并不像 Java 中那么“强制”,C++中虽然类型是由编译器强制执行的,但你可以直接访问内存,所以可以很容易地绕过类型系统 ,你是否要这么做取决于你的实际需求。在某些情况下,你绝对不应该规避类型系统,因为类型系统存在是有原因的,除非你有充分的理由,否则你不会想过多地使用它。
1 2 3 4 5 6 7 8 9 10 #include <iostream> int main () int a = 50 ; double value = a; get ();
1 2 3 4 5 6 7 8 9 10 #include <iostream> int main () int a = 50 ; double value = (double )a; get ();
1 2 3 4 5 6 7 8 9 10 #include <iostream> int main () int a = 50 ; double value = *(double *)&a; get ();
1 2 3 4 5 6 7 8 9 10 11 12 13 14 15 16 17 18 19 #include <iostream> struct Entity int x, y;int main () 5 ,8 };int * position = (int *)&e;0 ] << ", " << position[1 ] << std::endl; int y = *(int *)((char *)&e + 4 );get ();
67. Unions in C++ Union (联合体)有点像 class 类型或者 struct 类型,只不过它一次只能占用一个成员的内存。 通常如果我们有一个结构体,我们在里面声明 4 个浮点数,就可以有 4x4 个字节在这个结构体中,总共是 16 个字节。 但一个联合体只能有一个成员,所以如果我要声明 4 个浮点数,比如 abcd,联合体的大小仍然是 4 个字节,当我尝试去处理它们,比如将 a 设为 5,它们的内存是一样的,d 的值也会是 5,这就是联合体的工作方式。
你可以像使用结构体或类一样使用它们,也可以给它添加静态函数或者普通函数、方法等。然而你不能使用虚方法,还有一些其它限制,但通常人们用联合体来做的事,是和[类型双关](https://nagi.fun/Cherno-CPP-Notes/51-100/66 Type Punning in C%2B%2B/)紧密相关的。当你想给同一个变量取两个不同的名字时,它真的很好用。
通常union是匿名使用的,但匿名 union 不能含有成员函数。
1 2 3 4 5 6 7 8 9 10 11 12 13 14 15 16 17 18 19 20 #include <iostream> int main () struct Union union float a;int b;2.0f ;", " << u.b << std::endl; get ();
1 2 3 4 5 6 7 8 9 10 11 12 13 14 15 16 17 18 19 20 21 22 23 24 25 26 27 28 29 30 31 32 33 34 35 36 37 38 39 40 41 42 43 44 45 46 47 48 49 #include <iostream> struct Vector2 float x, y;struct Vector4 union struct float x, y, z, w;struct void PrintVector2 (const Vector2& vector) ", " << vector.y << std::endl;int main () 1.0f ,2.0f ,3.0f ,4.0f };PrintVector2 (vector.a);PrintVector2 (vector.b);"====================" << std::endl;500.0f ;PrintVector2 (vector.a);PrintVector2 (vector.b);get ();
68. Virtual Destructors in C++ 虚析构函数可以想象为虚函数和析构函数的组合。
虚析构函数对于处理多态非常重要 ,换句话说,如果我有一系列的子类和所有的继承:有一个类 A,然后一个类 B 派生于 A,你想把类 B 引用为类 A,但它实际上是类 B,然后你决定删除 A 或者它以某种方式删除了,然后你还是希望运行 B 的析构函数,而不是运行 A 的析构函数,这就是所谓的虚析构函数以及它的作用。
1 2 3 4 5 6 7 8 9 10 11 12 13 14 15 16 17 18 19 20 21 22 23 24 25 26 27 28 29 30 31 32 33 34 35 36 37 38 39 40 41 42 43 44 45 46 47 #include <iostream> class Base public :Base () { std::cout << "Base Constructor\n" ; }Base () { std::cout << "Base Destructor\n" ; }class Derived :public Basepublic :Derived () { std::cout << "Derived Constructor\n" ; }Derived () { std::cout << "Derived Destructor\n" ; }int main () "-----First:Base" << std::endl;new Base ();delete base;"-----Second:Derived Inherited from Base" << std::endl;new Derived ();delete derived;"-----Third:Polymorphic" << std::endl;new Derived ();delete poly;get ();
在第三种情况下,Derived只调用了构造函数,没有调用析构函数,这是有可能会造成内存泄露了!!
这里只有基类的析构函数被调用了,而派生类的析构函数没有被调用。 这点很重要,因为这会造成内存泄漏。 delete poly 时,它不知道这个调用的析构函数可能有另一个析构函数,因为它(~Base)没有被标记为虚函数。
1 2 3 4 5 6 7 8 9 10 11 12 13 14 15 16 17 18 19 20 21 22 23 24 25 26 27 28 29 30 31 32 33 34 35 36 37 38 39 40 41 42 43 44 45 46 47 48 49 50 #include <iostream> class Base public :Base () { std::cout << "Base Constructor\n" ; }virtual ~Base () { std::cout << "Base Destructor\n" ; } class Derived :public Baseprivate :int * m_Array;public :Derived () { m_Array = new int [5 ]; std::cout << "Derived Constructor\n" ; } Derived () { delete [] m_Array; std::cout << "Derived Destructor\n" ; }int main () "-----First:Base" << std::endl;new Base ();delete base;"-----Second:Derived Inherited from Base" << std::endl;new Derived ();delete derived;"-----Third:Polymorphic" << std::endl;new Derived ();delete poly;get ();
标记为virtual ,意味着 C++知道在层次结构下可能有某种重写的方法,这个方法就可以被覆写。 而virtual destructor (虚析构函数)的意思不是覆写析构函数,而是加上一个 析构函数。换句话说如果我把积累的析构函数改为虚函数,它实际会先调用派生类析构函数,然后在层次结构中向上,调用基类析构函数。
69. Casting in C++ 1. 什么是 casting 这里的casting (转换)是指类型转换,或者说是必须在 C++可用类型系统中进行的类型转换。
C++是一门强类型语言,意味着存在一个类型系统,而且类型是强制的。(见[66 课:类型双关](https://nagi.fun/Cherno-CPP-Notes/51-100/66 Type Punning in C%2B%2B/#^4d9dfe)) 如果我把某物设为 int,那就不能突然把它当做 double 或者 float,反过来也一样。我必须坚持原有的类型,除非有一个简单的隐式转换 ([见 40 课:隐式和显式](https://nagi.fun/Cherno-CPP-Notes/51-100/69 Casting in C%2B%2B/40 Implicit Conversion and the Explicit Keyword in C++.md#^cde452)),这意味着 C++知道如何在这两种类型之间转换,并且没有数据损失,这就是隐式转换;或者是有一个显示转换 ([见 66 课:类型双关](https://nagi.fun/Cherno-CPP-Notes/51-100/66 Type Punning in C%2B%2B/#^f3904d)),告诉 C++你需要把这个类型转换成目标类型,本章将正是介绍强制转换 的含义,并了解如何使用它。
2. casting C 风格 1 2 3 4 5 6 7 8 9 10 11 12 13 14 15 16 17 18 19 20 21 22 23 24 25 26 #include <iostream> int main () int a1 = 5 ;double b1 = a1;", " << b1 << std::endl;double a2 = 5.3 ;int b2 = a2;", " << b2 << std::endl;double a3 = 5.3 ;int b3 = (int )a3;", " << b3 << std::endl;get ();
C++ 风格 C++风格的转换有多种,一个是static_cast,还有reinterpret_cast、dynamic_cast、const_cast,共这四种主要的 cast。它们并不能做任何 C 风格类型转换做不到的事情,这并不是添加新功能,只是添加了一些syntax sugar
dynamic_cast,它会实际执行一个检查,如果转换不成功返回 NULL,所以这做了额外的事情,会降低运行速度。但在大多数情况下,C++风格类型转换并不做额外的事情,它们只是一些代码中的英文单词。
static_cast,意思是静态类型转换,在静态类型转换的情况下,还会做一些其它的编译时检查,检查这种转换是否可能。
reinterpret_cast也是一样,就像是把我们说过的类型双关 用英语表达出来一样,意思就是我要把这段内存重新解释成其它东西.
const_cast,移除或者添加变量的 const 限定。
所以为什么要搞这么多 CAST ?因为除了可能收到上面说的那些编译时的检查外,还可以方便我们从代码库中搜索它们。如果我想看到我的类型转换都在哪儿,也许我有性能问题而不想用dynamic_cast,我可以直接搜索这个词,如果用的是 C 语言风格的 cast,就很难去搜索它,所以它对程序员的阅读和编写代码都有帮助。 而且它也能帮助我们减少在尝试强制转换时,可能意外犯下的错误,比如类型不兼容。
70. Conditional and Action Breakpoints in C++ [70 条件与操作断点 - cherno-cpp-notes (nagi.fun)](https://nagi.fun/Cherno-CPP-Notes/51-100/70 Conditional and Action Breakpoints in C%2B%2B/)
本讲内容是一个简单的 VS 开发和调试的技巧,不过不仅仅是断点,而是关于条件与操作应用在断点上。
1. 条件断点 Condition 通过条件或条件断点,我们可以告诉调试器想在这里放置一个断点,但我希望断点在特定条件下触发,比如内存中的某些东西满足了条件就触发这个断点。
2. 操作断点 Action 操作断点是允许我们采取某种动作,一般是在碰到断点时打印一些东西到控制台。
这里有两种类型的操作断点:
一是让你在打印你想要的东西时继续执行,比如你想记录鼠标位置,每次鼠标移动,移动事件(打印鼠标位置)就会发生,可以让那个断点打印一些东西到控制台但保持程序运行;
二是打印一些东西,但仍然中断程序,暂停程序的执行,这样我们就可以检查内存中的其它东西。
71. Safety in modern C++ and how to teach it 本节将讨论C++中“安全”意味着什么。
安全编程,就是在编程中,我们希望降低崩溃、内存泄漏、非法访问等问题。 随着C++11的到来,Cherno想说的是应该转向智能指针这样的概念,而不是原始指针。这主要是因为存在内存泄漏以及不知道实际分配或者释放了哪些内存的问题。本节也重点围绕指针和内存,而不是异常或者是其它与安全编程有关的比如错误检查之类的东西。
当我们开始倾向于[智能指针](https://nagi.fun/Cherno-CPP-Notes/51-100/71 Safety in modern C%2B%2B and how to teach it/44 SMART POINTERS in C++.md)之类的东西时,这一切都可以归结为我想要分配堆内存 ,智能指针和自动内存管理系统的存在使程序员的生活更容易,且更有力,这意味着你不再需要处理某些事情,就算忘记处理了它也会自动为你处理。
分配内存这件事很简单,你想在堆上分配一块内存,如果你分配成功会得到一个指向那块内存开始部分的有效的指针,它将一直存在,直到你明确地删除它,这就是整个基本概念了。
那问题就来自几方面了:
如果我***忘记释放***我的内存会发生什么问题,可能是无害的甚至注意不到,也有内存耗尽灾难性地导致程序崩溃。而“细心一点、做一个好程序员”显然不是一个真正的解决方案,你还是需要考虑更复杂的结构来删除由你自己明确分配的内存。
还有ownership (所有权问题),即谁会拥有分配的内存呢?如果我有一个原始指针,指向那块内存,我把它从一个函数传递给另一个函数,从一个类传递给另一个类,谁会负责管理和清理这些内存 就是***所有权问题***。你不确定A、B这两个管理那个原始指针的函数哪个最后结束,但是要保证两个函数都能访问那个指针,除非你指明这两个函数运行完后再执行一个清理步骤,但这显然会极大复杂化整个程序,也是我们绝对想避免的。我想要重新分配数据,但我不想要显式地建立一些东西,比如管理所有权或者转义所有权,which会使事情变得非常复杂,你将不得不手动跟踪它。这是另一种所有权问题。
这两大问题就是我们需要自动删除内存的原因,当我们讨论C++的安全问题时,特别是智能指针时,我们只需要自动化一行简单的代码就搞定了内存删除与释放问题,所以你百分之百不应该拒绝使用智能指针,自己构建、修改智能指针也是正常的。
当然如果只是做一个一百来行的小型sandbox应用,可能用原始指针可读性更好,因为你不关心是否释放了内存,也不关心所有权,你只用写一个*就能让代码会更干净。
Cherno认为大家应该停止关于“Smart or Raw”的争论,在一个真正的框架环境、真正的应用中,生产代码应该使用智能指针,不这么做是非常愚蠢的举动,大部分典型的问题都可以通过这样解决(可能线程方面有点问题,因为shared_ptr不是线程安全的,使用智能指针还有很多其它约束,所以智能指针不是通用的内存解决方案)。更严肃的代码中完全应该使用智能指针,只是初学C++是需要了解原始指针和内存是如何工作的,因为[智能指针只是原始指针上的包装](https://nagi.fun/Cherno-CPP-Notes/51-100/71 Safety in modern C%2B%2B and how to teach it/44 SMART POINTERS in C++.md#^a6997e),它们围绕原始指针做了额外的辅助代码,以便自动化所有事情,但本质上只是删除和释放了内存。你必须得知道这一切是如何工作的,这也是为什么Cherno有几课是讲编译器和链接是如何工作的([06 How the C++ Compiler Works](https://nagi.fun/Cherno-CPP-Notes/51-100/71 Safety in modern C%2B%2B and how to teach it/06 How the C++ Compiler Works.md)、[07 How the C++ Linker Works](https://nagi.fun/Cherno-CPP-Notes/51-100/71 Safety in modern C%2B%2B and how to teach it/07 How the C++ Linker Works.md))
1. 什么是预编译头文件 预编译的头文件实际上是让你抓取一堆头文件,并将它们转换成编译器可以使用的格式,而不必一遍又一遍地读取这些头文件。 举个例子,每次在 C++文件中#include <vector>的时候,它需要读取整个 Vector 头文件并编译它,而且 Vector 还包含一堆其它的包含文件,这些文件也一样需要读取,预处理器必须把这些复制到这个 Vector 文件,这就有 10w+行代码了,它们需要被解析并以某种形式标记并编译,在你想要编译 main 文件之前,因为你的 main 文件包含 Vector 文件的话,Vector 必须复制并粘贴到 main 文件中,然后所有代码每次都需要被解析和编译。重点是每次你对 C++文件进行修改,哪怕只是加了个空格,整个文件都要重新编译,所以 Vector 文件必须被复制并粘贴到你的 C++文件中,从头开始重新解析并编译。不仅如此,你的项目中有多个文件它们又都包含了 Vector,你不得不持续一遍遍地解析同样的代码,这需要大量时间。
所以你可以用一个叫做预编译头文件 的东西来代替,它的作用是接受一堆你告诉它要接收的头文件(基本上是一堆代码)它只编译一次,以二进制格式存储,这对编译器来说比单纯的文本处理要快得多。这样就不需要解析整个 Vector 文件,每次它只需要看预编译的头文件,which 此时已经是非常快速且容易使用的、对编译器来说很容易使用的二进制格式。这意味着它会大幅加快编译时间,特别是你的项目越来越大,你会有越来越多的 C++文件。越来越多的头文件,诸如此类,你可以在预编译头文件中添加更多内容,你也有更多使用了共同头文件的源文件需要编译,它会指数级地加速,好的多得多。
所以如果你关心编译时间,你一定要使用预编译头文件。
不过,还有些你不应该用预编译头文件做的事: 到目前为止提到的预编译头文件,其本质还是头文件,which 包含了一堆其它头文件。因此你可能会想把项目中所有的东西都放在预编译头文件中,如果这样做的话是不是构建速度飞快。
是这样,但是如果你把东西放到预编译头文件中,而这些东西会发生变化,在实际的项目中我们在处理项目所以它很有可能会变化,显然必须重新构建预编译的头文件,而这要花费时间,这也可能会导致编译速度变慢。所以不要把会频繁更改的文件放入预编译头文件中。
尽管预编译头文件很有用,而且把你自己的项目文件当进去也没问题,比如把一个不会需要修改的 Log.h 文件放进去就很好,因为这个文件很常用,也方便使用,你不需要再手动地将 Log 包含到项目中的每个 C++文件中。但只要这个 Log 会修改,就不适合放入预编译头文件中,否则每次都要重新编译。
预编译头文件真正有用的是外部依赖,本质上它主要用于不是你写的那些代码,比如 STL、Windows api 等,如果你要#include <windows.h>,which is a 巨大的的头文件,包含了非常多的其它头文件,你不回去修改 windows.h 或者 STL,所以它没有理由不被你放在预编译头文件中,因为它们的代码可能比你的实际项目代码多很多倍,每个 C++文件每次都要编译它们可想是一件多么恐怖的事情,你可能永远也不会去修改它们。因此直接把它们放入到预编译头文件中就不用管了。
2. 依赖关系 PCH(就是预编译头文件)实际上做的事是把所有东西都塞进来,它可能会隐藏现在实际正在使用的东西,会影响可读性。比如只有个别文件需要使用一个窗口库 GLFW,那就没必要把所有的依赖项都放在 PCH 中,如果你只看一个单独的 cpp 文件你并不知道它需要什么依赖,再把它导入其它文件时就不好理解它依赖的东西了。但如果你通过实际的include包含它们就很清晰了,可以看到每个文件需要什么文件。但是如果你只包含 PCH,然后 PCH 中放很多包含文件,就会比较麻烦了。
所以不要把所有依赖都放在 PCH 中 ,因为包含实际的依赖会更容易阅读。应该放进 PCH 的东西是像 STL 这样的,因为 string、vectors、std::cout 是许多地方都要用到的,你不希望每次都编译它们,而 GLFW 可能就只需要编译一次。
73. Dynamic Casting in C++ dynamic_cast是专门用于沿继承层次结构 进行的强制类型转换,比如我的一个游戏里有一个实体类,它派生出了玩家类和敌人类,如果我想将玩家转换为实体是很简单的,因为玩家本身就是实体对象,可以隐式转换。但如果我想将一个实体类型转换为玩家,编译器会相信我们,如果它并不是一个玩家的话我们就相当于在尝试玩家独有的数据,程序可能会崩溃。因为这个原因,dynamic_cast常被用来做验证,如果我们尝试使用它将一个敌人转化为玩家,这个转化会失败,dynamic_cast会返回一个 NULL 指针,也就是 0。
1 2 3 4 5 6 7 8 9 10 11 12 13 14 15 16 17 18 19 20 21 22 23 24 25 26 27 28 29 30 31 32 33 34 35 36 37 38 39 40 41 42 43 44 45 46 #include <iostream> #include <memory> #include <chrono> class Timer private :public :Timer ()now ();Timer ()Stop ();void Stop () {auto EndTimepoint = std::chrono::high_resolution_clock::now ();auto start = std::chrono::time_point_cast <std::chrono::microseconds>(m_StartTimepoint).time_since_epoch ().count ();auto end = std::chrono::time_point_cast <std::chrono::microseconds>(EndTimepoint).time_since_epoch ().count ();auto duration = end - start;double ms = duration * 0.001 ;"us (" << ms << "ms)\n" ;int main () int value = 0 ;for (int i = 0 ; i < 1000000 ; i++)2 ;
智能指针的性能对比 1 2 3 4 5 6 7 8 9 10 11 12 13 14 15 16 17 18 19 20 21 22 23 24 25 26 27 28 29 30 31 32 33 34 35 36 37 38 39 40 41 42 43 44 45 46 47 48 49 50 51 52 53 54 55 56 57 58 59 60 61 62 63 64 65 66 67 68 #include <iostream> #include <memory> #include <chrono> #include <array> class Timer private :public :Timer ()now ();Timer ()Stop ();void Stop () {auto EndTimepoint = std::chrono::high_resolution_clock::now ();auto start = std::chrono::time_point_cast <std::chrono::microseconds>(m_StartTimepoint).time_since_epoch ().count ();auto end = std::chrono::time_point_cast <std::chrono::microseconds>(EndTimepoint).time_since_epoch ().count ();auto duration = end - start;double ms = duration * 0.001 ;"us (" << ms << "ms)\n" ;int main () struct Vector2 float x, y;"Make shared!" << std::endl;1000 > sharedPtrs;for (int i = 0 ; i < sharedPtrs.size (); i++)make_shared <Vector2>();"New shared!" << std::endl;1000 > sharedPtrs;for (int i = 0 ; i < sharedPtrs.size (); i++)shared_ptr <Vector2>(new Vector2 ());"Make unique!" << std::endl;1000 > sharedPtrs;for (int i = 0 ; i < sharedPtrs.size (); i++)make_unique <Vector2>();
切换到 Release 模式,可以发现make_shared明显比new快,所以一定要确保你所分析的代码,是在 Release 时真正有意义的,因为你不会在 Debug 时发布代码。
75. Structed bindings in C++(C++17)
Structured binding (结构化绑定)是一个新特性,让我们更好地处理多返回值(多返回值可参考[52 C++处理多返回值](https://nagi.fun/Cherno-CPP-Notes/51-100/52 How to Deal with Multiple Return Values in C%2B%2B/)),这是在 52 课方法基础上拓展的一种处理多返回值的新方法,特别是如何处理 tuple (元组)和 pairs (对组)以及返回诸如此类的东西。因为结构化绑定简化了我们的代码,让它比以前的做法更简洁。
没有结构化绑定这个新特性时,最好使用sturct来处理多返回值
1 2 3 4 5 6 7 8 9 10 11 12 13 14 15 16 17 18 19 20 21 22 23 24 25 26 27 28 29 30 31 32 33 #include <iostream>
需要确保项目属性设置为C++17才行,C++11和C++14不支持此属性,编译通过不了。
1 2 3 4 5 6 7 8 9 10 11 12 13 14 #include <iostream> #include <string> #include <tuple> std::tuple<std::string, int > CreatePerson () return { "Cherno" , 24 };int main () auto [name, age] = CreatePerson ();":" << age << std::endl;
76. How to deal with OPTIONAL Data in C++(C++17) 很多时候,我们有一个返回数据的函数,比方说我们正在读取一个文件,但是如果这个文件不能被读取会发生什么?它可能不存在,或者是数据不是我们期望的格式,我们仍然需要从函数中返回一些东西。在这个特定的情况下,可能只会返回一个空字符串,但这没有多大意义。意思是,如果读取文件是空的, 我们应该有办法看到数据是否存在。
这就是要用到std::optional的地方了,这是 C++17 标准的新东西。
1 2 3 4 5 6 7 8 9 10 11 12 13 14 15 16 17 18 19 20 21 22 23 24 #include <iostream> #include <fstream> std::string ReadFileAsString (const std::string& filepath, bool & outSuccess) std::ifstream stream (filepath) ;if (stream)close ();true ;return result;false ;return std::string ();int main () bool fileOpenedSuccessfully;ReadFileAsString ("data.txt" , fileOpenedSuccessfully);if (fileOpenedSuccessfully) {}
1 2 3 4 5 6 7 8 9 10 11 12 13 14 15 16 17 18 19 20 21 22 23 24 25 26 27 28 29 30 31 #include <iostream> #include <fstream> #include <optional> ReadFileAsString (const std::string& filepath)std::ifstream stream (filepath) ;if (stream)close ();return result;return {};int main () ReadFileAsString ("data.txt" ); if (data)"file read successfully\n" ;else "file could not read\n" ;get ();
77. Multiple TYPES of Data in a SINGLE VARIABLE in C++ 1 2 3 4 5 6 7 8 9 10 11 12 #include <iostream> #include <variant> int main () int > data;"Cherno" ;get <std::string>(data) << std::endl;2 ;get <int >(data) << std::endl;get ();
这个和std::optional很像,它的作用是让我们不用担心处理的确切数据类型, 只有一个变量放在那儿,我们之后再去考虑它的具体类型。它允许你列出所有可能的类型,然后你可以决定它将是什么,如果你想的话可以把它重新赋值给任意类型,这也是你创建可能有多个类型的变量的一种方式。
78. How to store ANY data in C++(C++17) [78 如何存储任意类型的数据 - cherno-cpp-notes (nagi.fun)](https://nagi.fun/Cherno-CPP-Notes/51-100/78 How to store ANY data in C%2B%2B/)
79. How to make C++ run FASTER (with std::async) 通过多线程来提高性能!
附:编程习惯 A. m_ C++中m_的含义是什么? |21xrx.com
在C++中,m_是一种命名约定,通常被用于表示一个类的成员变量。m_的含义是”member variable”或者”成员变量”,是为了区分成员变量和其他类型的变量而引入的。
使用m_的好处是可以方便地区分成员变量和其他变量,使代码变得更加可读和易于理解。此外,m_还可以避免与全局变量、局部变量或其他变量混淆,从而避免出现代码错误。
在使用m_时,需要注意以下几点:
\1. m_只是一种命名约定,不是C++的关键字或保留字,因此在使用时不要将其与其他变量名混淆。
\2. 使用m_时应该遵循统一的规范,例如将所有成员变量都以m_为前缀命名。
\3. 在构造函数和析构函数中,应该将所有成员变量的初始值或释放操作放在一起,以方便管理。
\4. 注意,在使用m_时应该尽可能使用访问器(getter和setter)而不是直接访问成员变量,这样可以使代码更加可维护和易于修改。
总的来说,m_是一种很好的命名约定,可以使代码更加清晰和易于理解。在编写C++代码时,使用m_能够提高代码的可读性和可维护性,值得开发者们好好利用。
B. 命名规则 1. 驼峰 原始:user login count
驼峰:userLoginCount
2. 帕斯卡 原始:user login count
帕斯卡:UserLoginCount
3. 蛇形 原始:user login count
蛇形:user_login_count
4. 匈牙利 int g_i32tempuratureValue:全局 32位有符号整型变量
float l_f32tempuratureValue:局部 32位有符号整型变量
unsigned char s_u8tempuratureValue:静态 无符号字符型变量
参考:内容目录 — Google 开源项目风格指南 (zh-google-styleguide.readthedocs.io)
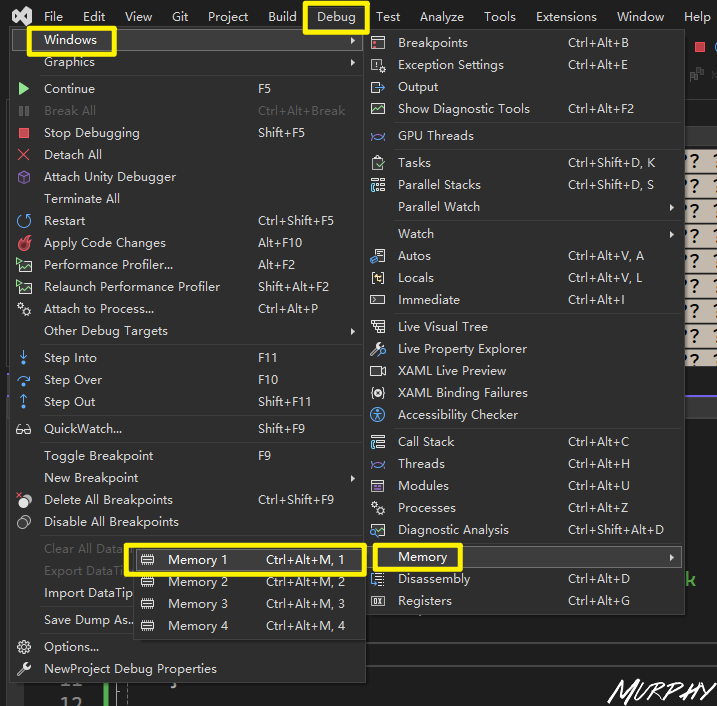
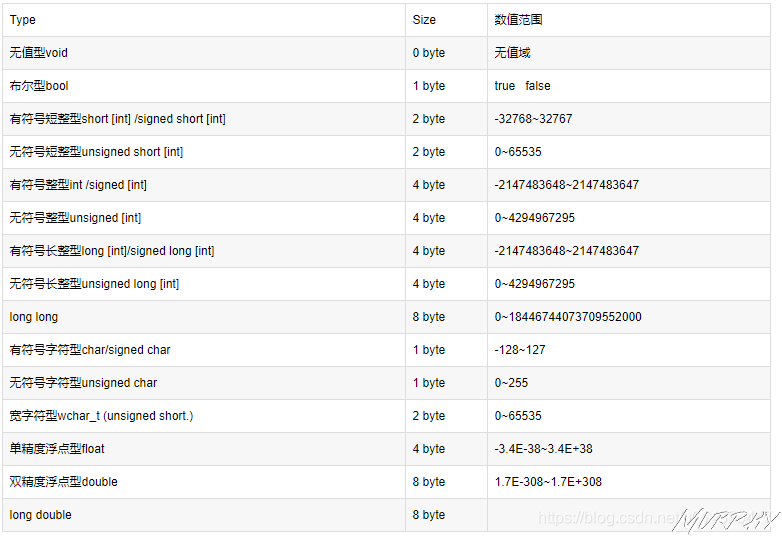
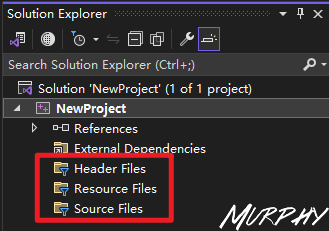
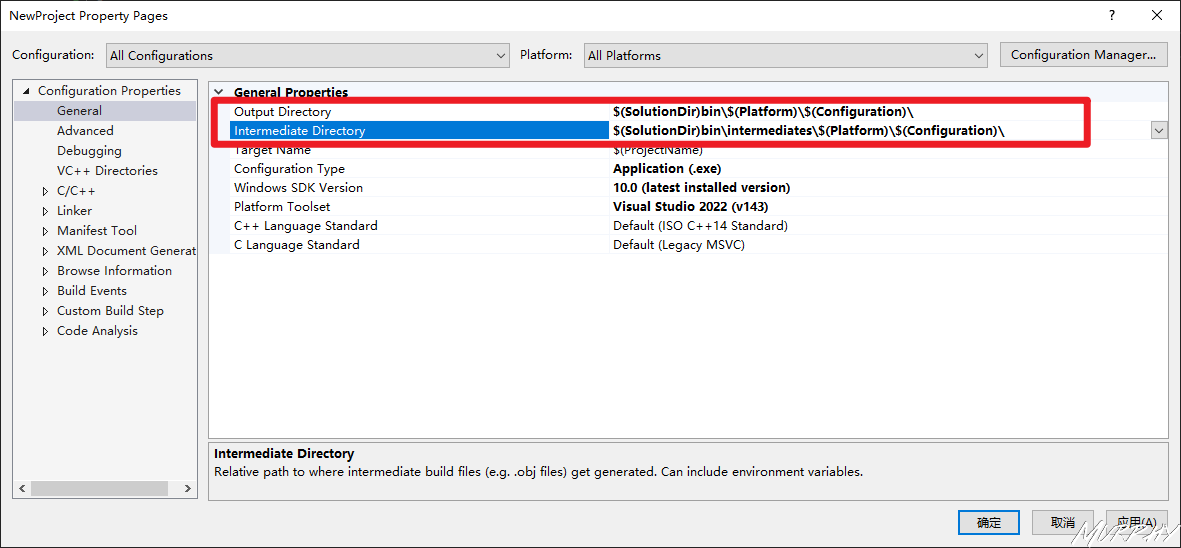
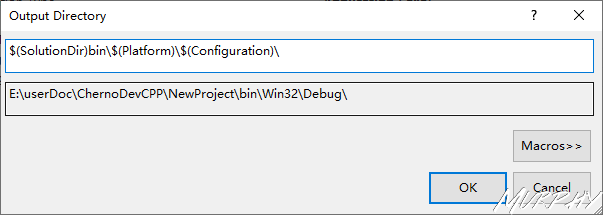
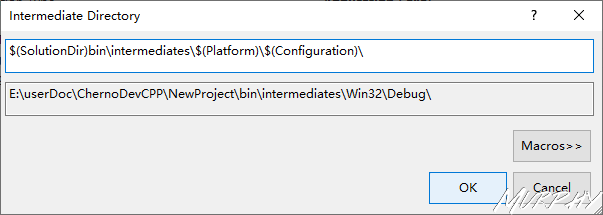
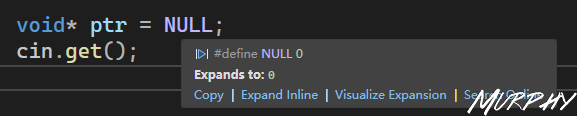
![new char[8]?](https://murhyimgur.oss-cn-beijing.aliyuncs.com/img/image-20231118113422225.png)